Image Map

Wednesday, July 31, 2013

No Sew Window Valance

My sister Candace came to visit one weekend and she is a definite decorator at heart. She has such an amazing eye of how to make something out of nothing. She is very much like our mother. I have 2 older sisters. My oldest sister Candace got the decorating eye, my next sister Brittney got the organizing to a "T" gene, and I'm the artsy one. We all inherited MANY things from our mother those are just a few.

 Anyway, as my sister was visiting she noticed I didn't have a curtain over my "awkward" corner windows. I said I didn't know how because the windows are so close I couldn't get a rod to fit. So I left it as is. Well that just wouldn't do for my sister Candace. So she said she remembered something she made with my mom in one of her girl's room's in her previous home. They took cloth napkins and hung them with thumb tacks. I said, no way! That's fun but how could we do that? We started searching my house for something to make a Valance. We found these red cloth napkins she gave me a few months back at a dry cleaners sale for .10 each! We ironed then down and tacked them up! Talk about a big difference! 


Ordinary Square Cloth Napkins


Fold and Measure how long you want each section. We measured out the window molding and figured out how many napkins we needed at 12 inches each.


Iron the napkin down WELL for solid creases


Safety Pin the corners together in the middle


Don't push the pin all the way through, so it doesn't show when you line them all up


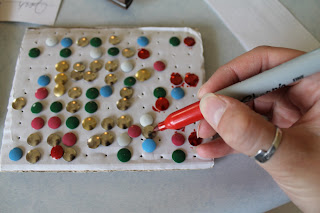
I colored my thumb tacks red with a sharpie


Take a small nail and gently tap it through the cloth napkin and the wood. Don't go in too far or the tack won't hold.


Remove the nail...


And tap the tack in place


Repeat until finished! 


Linking up here


Tuesday, July 30, 2013

Skinny Mini Cheesecakes

I recently went to a party with a dessert buffet. We were all asked to bring a dessert, and this was mine! All I heard were good reviews. I was excited with all of the positive comments because this was SO simple to put together! I especially loved making a dessert that I didn't have to bake. I hate heating my house with the oven in the summer, so this was PERFECT! Look how easy this is!


Blend 1 1/2 c. Vanilla Waffers into a fine powder and scoop into 12 muffin paper liners


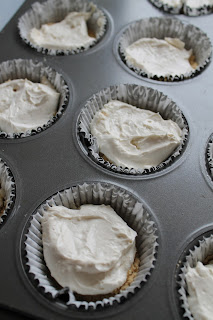
With a hand blender whip 8 oz. of low fat cream cheese, 3 T Brown Sugar and 1/4 c. Milk until smooth.
Scoop by dollops on top of the vanilla waffer powder


.

Lightly drizzle "Smuckers Boysenberry Syrup" over the cream cheese.


Finish the mini cheesecakes with a berry of your choice. I loved the tangy-ness of the raspberry.


Cover and chill in the refrigerator over night. 


Linking up here

Monday, July 29, 2013

Grilled Biscuit Scone Sandwich

This is our last Grilled Biscuit of our 7 different grilled biscuits. I tried the lemon pepper one and it was YUCKY! SO DON'T MAKE THAT ONE! You live and you learn right? But I have to tell you, this might be my new way to eat a Peanut Butter and Honey sandwich! The grilled refrigerator biscuit was so crisp, just like a scone! Then the warm peanut butter just melted in my mouth! DELICIOUS! Super simple and this could be awesome for school sack lunches. Let me know if it works out for you as well as it did for me!


Take your can of refrigerator biscuits, rolling pin and george foreman grill.


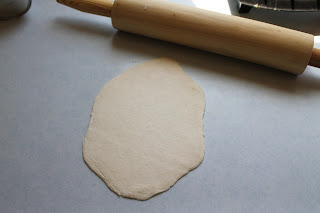
Roll out the biscuit,


and GRILL!


To make this Scone Sandwich you don't need any seasonings on the biscuit before you grill. Slather the grilled biscuit with peanut butter and drizzle with honey. Cut and eat! DELISH!


Linking up here


Saturday, July 27, 2013

Homemade Cesar Salad Dressing

This Ceasar Salad Dressing was just lovely. I loved making something that I don't have to buy now! I made this salad and took all the pictures without the grilled croutons! Ha ha, they were sitting right on the pan! My back was turned and completely forgot. When I was done, I sprinkled the croutons over top and ate it all up. I didn't think twice that I didn't take pictures with it! AHH! So I do apologize for lack of grilled croutons in the picture. But believe me, they were delicious!


Homemade Ceasar Salad Dressing

1/2 c. Mayonnaise
1/2-1 T. Lemon Juice
1/2 tsp. Worcestershire Sauce
1 Garlic Clove (minced)
1/4 c. Parmesan Cheese
3-4 T. Milk
1 T. Plain Greek Yogurt
1/4 tsp. Salt
Dash of pepper

Mix all ingredients in a blender or food processor until smooth. Add milk to desired consistency.

Take your Grilled Basil and Parmesan Grilled Biscuit and brush with a small amount of olive oil and lemon juice. Cut into small squares for your croutons. Place on a cookie sheet and broil in the oven for 5-10 min. until desired crispness. Take out and garnish on your bed of romaine. DELISH!


Linking up here


Friday, July 26, 2013

Roasted BLT Salad

I personally was SO excited to try this. I found this recipe I had kept but never made. Well here was my chance to use up some cherry tomatoes and my new grilled refrigerator biscuit. I used the garlic & parsley grilled bread as my croutons for the salad. Talk about DELISH! This was an AMAZING SALAD! Good on the wallet, good for you, and tasted scrumptious! The 3 best things I love about any dish! Take a look!


Roasted BLT Salad:

3-4 Slices of Bacon - cooked and patted to remove excess grease. Cut in pieces
1/2 c. Cherry Tomatoes
Olive Oil
1 head of Romaine Lettuce cut into 4 wedges
Dash of salt & Pepper

Preheat Oven to 375-400. Take a cookie sheet and line with parchment paper. (or lightly greased) Place tomatoes on with 1 tsp. olive oil. Coat the tomatoes in the olive oil and bake uncovered for 10 min. When tomatoes are done transfer to a bowl. 
Next cut your "flat bread" into squares and place on the cookie sheet with the lettuce wedges. Drizzle the romaine lettuce with 1-2 tsp. olive oil. Place back in the oven for about 5 min. Until the lettuce edges start turning brown.
On your serving tray place your Roasted Lettuce wedges, Cut Bacon, Roasted Tomatoes & Grilled Croutons.Toss together and dash with Salt and Pepper.

*All of the flavors together with that small amount of salt and pepper were FABULOUS!Don't be surprised if this is your new favorite salad!


Linking up here


Thursday, July 25, 2013

Sugar Crusted Grilled Biscuit

This sugar crusted grilled refrigerator biscuit was SOOO good with this raspberry jam. My sweet cousins made it for us! Talk about divine! I want a raspberry bush BAD so I can make raspberry jam for people! This simple sugar crusted refrigerator biscuit "flat bread" was awesome! We also tried it with honey, but we liked the jam better. It was just like a crispy sugar roll with jam. YUM!


Roll out your refrigerator biscuit with a dash or 2 of sugar


Grill the Sugar Crusted Biscuit on the George Foreman, cut up and EAT!


Linking up here


Wednesday, July 24, 2013

Grilled Taco Flat bread

This is Grilled Taco Flat Bread. I rolled out my biscuit dough and dashed it with a little cumin, chili powder & salt. I put on some taco seasoned shredded chicken I previously made for my Guacamole Chicken Tacos. I put on lettuce, cheese, sour cream and salsa. YUMMMY!


Grab your biscuit dough, dash some Chili Powder, Cumin and Salt.
Roll it out with a rolling pin and place on Grill.


Let cook until golden brown


Finished product


Add your favorite taco toppings, cut and share (or don't).
DELICIOUS!


Linking up here


Tuesday, July 23, 2013

Grilled Biscuit "French Toast Sticks"

These were so simple and easy to make! I can't wait to make them when company comes. My little girl and I pounded these down FAST (Dad and little brother were sleeping)! They were pretty much the best french toast sticks I have EVER had! Crisp and delicious. This was the grilled "flat bread" with cinnamon & sugar. Talk about DELICIOUS!


Roll out the refrigerator biscuit, sprinkle with cinnamon & sugar.


Grill on your George Foreman


And PRESTO!


Cut into strips, dash with some powdered sugar and serve with syrup.
DELISH!


Linking up here


Monday, July 22, 2013

7 different Grilled Refrigerator Biscuits

This was a total weird idea that became genius! ha ha! I had these refrigerator biscuits that I had planned to use in a different way, but the idea fell through. So what was I to do with this roll of biscuits that I have NEVER used before?! Well I am a CHOPPED fanatic. It's a show on the food network, if you haven't seen it, it is addicting! My niece Carly and I, that's our thing. Anyway, the past few episodes I've watched they made these flat breads with the already prepared pizza dough in the refrigerator for their appetizer round. So I thought to myself why couldn't I make a flat bread out of refrigerator biscuits? So I did! The crispiness of the "crust/bread" was FANTASTIC! So this whole week I will show you the 7 different ways I used these "flavor added" grilled refrigerator biscuits!

 "Stay tuned all week to see what I've come up with!"


Flavors of this week's featured flat breads:
Plain
Parmesan & Basil
Chili Powder & Cumin
Lemon Pepper
Garlic Powder & Parsley
Cinnamon & Sugar
Sugar


Things you need:
1 rolling pin
1 can refrigerator biscuits
1 "George Foreman" Grill
(added spices)


Roll out the biscuit dough...


And grill until golden brown!


Don't forget to come back to see the results!


Linking up here


Friday, July 19, 2013

Guacamole Chicken Tacos

I was looking for a new take on chicken tacos. I guess this isn't very new to the world but it was new to us and me cooking it. I've never made quacamole let alone make it to put in a taco, so needless to say I was very eager to see how it would turn out. And it was WONDERFUL! One of the best chicken tacos I've had in a long time! I made this meal in under 30 min. How nice is that for all of us out there who are busy with life?! VERY NICE! This is definitely going on our "regular dinner" menu.


Guacamole Chicken Tacos

2-3 boneless skinless chicken breasts
1 tsp. Olive Oil
1/2 T. Taco Seasoning
1/4 tsp. salt

Guacamole:
1 garlic clove - sliced 
1 tomatillo
1 avacado - scooped out of it's shell and seed discarded
3 Heaping T. sour cream
1/4 tsp. salt

Cut your chicken breasts in half to speed up cooking. Place cut chicken in a pot with enough water to cover. Cook on Medium High for 15 min or until easily "shreddable." 

While the chicken is boiling make the guacamole. Add all ingredients in a food processor or blender. Mix until desired consistency. 

 When chicken is done, remove from the water and shred on a cutting board. Place shredded chicken in a skillet and add olive oil, taco seasoning and salt. ( If chicken is dry, add 1/4 c. chicken stock you just made) Cook on medium high for about 2-3 min.

Place chicken on a Healthy Homemade Tortilla and garnish with the guacamole "sauce." Add salsa, tomatoes, sour cream or cheese. Whatever your heart desires! Delish!


Linking up here


Thursday, July 18, 2013

Very Berry Oatmeal Shake

I am so tired of  "healthy" shakes being yucky. I was determined to make a shake that was healthy AND delicious. So, I am pleased to inform you ladies and gentlemen, I HAVE DONE IT! This Very Berry Oatmeal Shake was my lunch the other day and I was full until dinner! Add a scoop of protein powder and I'm sure if would stay with you much longer. Make it your own by changing it up and adding some of your favorites. Check it out.


In a blender place:

1 Peeled Banana
1 c. Milk (Almond or Soy milk can be used)
1/4 - 1/2 c. Oats - (depends on how thick you want it)
1 c. Frozen Berries (I used Strawberries and Blueberries)
1/2 Green Apple - cored

Blend until smooth. 

* To make it even sweeter use a ripe banana
* To make it more Velvety and have an Ice Cream texture, freeze your banana


Linking up here
Tuesday, July 16, 2013

Raspberry & Cream Pancakes

If you can believe it, this actually tasted better than it looks. I am not the biggest pancake fan, I love crunchy more than smooth when it comes to breakfast. But, oh my heavens, I am very pleased to tell you this was the GREATEST PANCAKE BREAKFAST I HAVE EVER HAD! My little girl and I split this and boy were we in heaven. I was mean and wouldn't let her eat my portion even when she wanted more. I was taking that DOWN, and no one could stop me! 
These were simple, creamy and perfect. Perfect to wow family and friends or for Christmas, Mother's Day or Father's Day in the future... hint hint.


Make your favorite pancakes- I've been on a "bisquick kick" lately, but I tweaked it a little.

2 c. Bisquick
2 tsp. Baking Powder
3 tsp. Applesauce
1 1/2 tsp. Vanilla
2 1/2 T. Sugar
1 c. Milk
2 eggs

Mix all together and pour out circles on a warm greased skillet. Cook until bubbles form and flip. Cook on the other side until golden brown.

Layers:
Pancake
Land O Lakes Whipped Light Cream - ( I just discovered this tastes better than cool whip.)
Cut up raspberries (maybe 1-2  raspberries per cream and pancake layer)
Pancake
Cream
Raspberries
etc...

Add a dollop of Whipped Cream, drizzle with Smuckers Boysenberry syrup (that's our favorite) and more raspberries.
Talk about PERFECTION! Eat fast, the cream starts to melt and your sturdy stack will soon be the leaning tower of Pisa!


Linking up here

Monday, July 15, 2013

$3 End Table Makeover

This $3 End Table Makeover was worth every penny. My VERY kind Sister and Brother In-law gave these to my husband and I when they remodeled their optometry office. We were newly weds and needed furniture. This has been our living room end table, our bedroom end table, and now my daughters end table. I was tired of the "waiting room" look and wanted to give it a face lift. Talk about a big difference! This helps bring all of the colors of her room together. Just some spray paint, scrapbook paper and mod podge made a simple and darling upgrade.


Supplies:
2 cans white spray paint ( I purchased the $1 cans of white paint from Walmart)
Matte finish Mod Podge
Scrapbook paper to make a collage


I sprayed about 3 coats of paint to cover the blonde wood. While drying I took the glass from the top and grabbed my books of scrapbook paper. I started cutting and making a collage of layered paper. Once happy with the collage and colors I took a cell phone picture. I laid the phone down where I could see the picture well. I painted the glass with the mod podge and layered down the paper according to my picture. When finished I painted another layer of mod podge to seal it. I placed the glass back in the end table frame and put it in it's rightful place in my daughter's bedroom! EASY PEASY!


Linking up here

Friday, July 12, 2013

Red Lobster Cheddar Bay Biscuits - (Copy Cat)

About 5 years ago my oldest niece Morgan made some biscuits when I was visiting. First of all I was shocked she was cooking biscuits, then I was even MORE shocked when I saw what kind they were! She made Red Lobsters Cheddar Bay Biscuits! Now these were not your normal attempt at making something from a restaurant, and coming up close. These literally could have been taken right from the basket! I called her yesterday and begged her for the recipe. She was a doll and let me share her secret with you! You will be praising her for life! Plus, it always helps when they're only 6 ingredients.


Red Lobster Cheddar Bay Biscuits - (Copy Cat

2 c. Bisquick
2/3 c. Milk
1/2 c. Shredded Cheddar Cheese

Mix together and drop by spoon fulls onto a greased cookie sheet. Bake at 425 for 6-10 min. depending on how large you made the biscuits, or until golden brown underneath.

Stir together:
2 T. Butter - melted
1/8 tsp. Garlic Powder
1/4 tsp. Parsley Flakes

Brush over warm biscuits.


Linking up here


Thursday, July 11, 2013

Crock Pot Greek Chicken Pita Pockets

I can definitely say that I was very excited for a late lunch on Sunday. These Greek Chicken Pita Pockets hit the spot! Light and delicious! I loved I could make the chicken in the crock pot early and it was done in the afternoon. As you know, the crock pot is one of my most favorite appliances in my house. This is a simple and flavorful dish.


Crock Pot Greek Chicken

2-4 Boneless Skinless Chicken Breasts
1 1/2 c. Water
1 1/2 tsp. Chicken Bouillon Granules 
1 can Chic Peas - drained
1 tsp. Cumin
1/4 tsp. Celery Salt
1/4 tsp. Chili Powder
1 1/4 Parsley flakes
2-3 T. Lemon Juice

Place chicken in a greased crock pot. In a bowl combine remaining ingredients and pour over chicken. Cook on High for 4 hours or Low for 6. Shred chicken in juices. Remove chicken from the crock pot with a slotted spoon and add:

1/3 c. Plain Greek Yogurt
1/4 c. Sour Cream
Salt and Pepper to taste

Mix well and scoop into your pita pockets, or flat bread. Serve with cherry tomatoes and spring salad. Garnish with a pinch of parsley flakes.

* You can use Pita Bread shells or I made my Healthy Homemade Tortillas- just thicker

Linking up here

Wednesday, July 10, 2013

2 Piece Basketball Hoop

I made a way to use 2 of your ordinary household items into a Basketball Hoop! 1. A wreath hanger. 2. A laundry basket. The best thing I love about this is I don't have a huge basketball hoop in my living room or outside that never gets played with. If the kids want to play basketball, they can whip this out in no time! I am sure once they are older they will think otherwise, but in the meantime, mommy is likin' this! My second favorite thing is we can play it outside, or inside. For those people living in apartments or those with no backyard, this is a perfect alternative. Hang it on your door!
 Hope you will love this as much as I am! 


Place 1 wreath hanger over a fence or door. Place a laundry basket onto the hanger. Grab some balls and start shooting! 


Linking up here

Tuesday, July 9, 2013

White Pesto & Broccoli Fettuccine

I was so excited to try my hand at making a pesto sauce from scratch. So many pesto sauces I have had from a jar or in a packet were never very flavorful to me. I wanted to attempt a more flavorful pesto sauce. It came out white, not green like you normally see. But man was it DELICIOUS! Add any vegetable you want to it, spinach, broccoli, etc. This white pesto sauce makes any noodle dish fantastic! 


White Pesto Sauce:
1 c. Milk
1/4 c. Parmesan Cheese
1/2 tsp. Salt
1/4 -1/2 tsp. Garlic Powder (which ever your heart desires)
1 tsp. Parsley
1/2 tsp. Basil
1 tsp. Corn Starch

Place all ingredients into a small sauce pan EXCEPT the corn starch. When all has simmered for about 5-10 min, constantly stirring, add in the cornstarch to "thicken." If not thick enough for your liking, add more corn starch.
(This recipe is easily doubled for larger groups)

Steam some broccoli or spinach. 
I steam my veggies in a pyrex glass bowl with a lid, with about 3-4 T. of water in the bottom. Cook for 2-3 min and stir. Cook again for another 2-3 min. Repeat until desired texture.

In a separate pot, boil your fettuccine noodles with some salt for about 10-12 min. then drain.

Grab a bowl or plate and place your noodles, broccoli and white pesto sauce on top. DELICIOUS!

*This is GREAT with chicken!


Linking up here

Monday, July 8, 2013

Freezer Paper Stencil Necklace

This freezer paper stencil necklace turns this t-shirt dress into something special! It's adds fun character to any shirt. This would be darling on a onesie too! Just 7 simple steps to a successful Freezer Paper Stencil Necklace. Just look and see how easy it is!


1. Supplies: T-Shirt or Onesie, Freezer Paper, Single Hole Punch, Pencil, Fabric Paint and Paint brush, and Iron.
2. Place a piece of freezer paper SHINY SIDE DOWN, and "measure" where you want your necklace to be, trace it lightly with a pencil.
3. Cut around the traced design and start punching. 
(When cutting around the design, the rounder edges stick better when ironed)
4. The finished punched necklace stencil.
5. Iron the freezer paper SHINY SIDE DOWN onto the T-Shirt or Onesie. Be sure to iron it down WELL. (DO NOT pull up the stencil, once it is ironed, it can't "stick" again, you would have to start ALL over! So place it correctly the first time.)
6. Place foil inside the shirt to keep from bleeding to the other side. Start to paint the stencil, EVENLY. If you paint in un-even layers it will stay that way. Let dry, and paint another coat. 
(I always do at least 2 coats of fabric paint)
7. When dry, peel off the freezer paper. Make a small bow with ribbon to match the fabric paint, and hand sew in place. 

Check out these other projects I've done with Freezer Paper Stencils

Check out some other fun Freezer Paper Stenciling I've done:


Linking up here