Image Map

Saturday, March 30, 2013

Pecan Crusted French Toast

When my in-laws came for the weekend, I of course wanted to impress them. I've had this recipe for a while but was to lazy to try it on just us. So, when they came it was the perfect time to try it and they would rant and rave about it. Doesn't everyone love praise?! I had my Bread Machine Honey Wheat Bread made the day before so I could use the "good stuff" on the French Toast. Everything tastes better with homemade bread. I woke up early to get it all ready. I put it all together and VICTORY! My father in-law said when we were done eating, "I've never been much of a french toast fan, but this is the best french toast I've ever had." SCORE! The soft crunch of the pecans will send you to the ROOF! This is INCREDIBLE! Try it you will just die and go to heaven!


Pecan Crusted French Toast

3 eggs
1/4 c. Milk
1 1/2 c. Copped Pecans
1 tsp. Cinnamon
8 Slices whole wheat bread (Bread Machine Honey Wheat Bread)

Preheat oven to 200 and line a baking sheet with parchment paper
Grab 2 shallow bowls, in one shallow bowl  place your eggs and milk and whisk until combined. In the other shallow bowl place the chopped pecans and the cinnamon, stir until pecans are coated with the cinnamon. Cut your bread into the shape desired (squares, triangles etc). Grab your pan or griddle and turn the heat to medium/medium high. Lightly grease your pan.  Dip one slice of bread, into the egg and milk mixture then into the pecans. Make sure both sides are coated, then lay on your hot pan. Repeat with the rest of the bread. Flip your french toast with a spatula to cook the other side. When your french toast is done cooking, remove from the pan and place in the oven on the parchment paper lined baking sheet to keep warm. When all of your french toast is done cooking you will be able to take the whole pan out of the oven and sit down and eat all together! GENIUS! Serve with your favorite syrup. DELISH!

*Keeping the french toast in the oven didn't dry it out. It was just as wonderful as it could be!

I was featured at The Patriotic Pam! Check it out!
I was featured on High Heels and Grills #23! Thanks guys!
I was featured at Cheerios and Latte's #58! Thanks so much!

Linking up here

Friday, March 29, 2013

Pastel Paper Garland

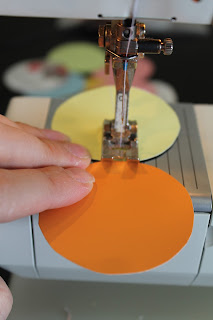
This pastel paper garland took me 20 min. to make and it adds the perfect amount of color to feel like Easter and Spring. I grabbed all my "paint colors" I wanted from a store and cut them into circles then sewed them together. My daughter LOVES it! I did it during naps of course and when she woke up she had a colorful surprise! Fast, simple and darling. What more could you ask for? 


Cut out all your circles from the paint swatches. When you begin to sew, first pull a good amount of thread out to have something to hang from. Start to sew all of your cirlcles together. Try to make them as even as possible, you can have gaps between the circles or have them touch. It's up to you! Have fun! 


Linking up here


Wednesday, March 27, 2013

T-Shirt to Bolero

It all started when I made a bolero a year or so ago for my little girl for her Christmas dress. Someone gave us this not very cute pink and black velvet dress that I knew I would never let her wear. Little children's boleros can be expensive especially if they're only going to wear it 1-2 times. So, I looked at this dress and cut the top velvet half off, cut it down the middle in the front and made a bolero. It looked perfect with the dress I had purchased and it only took me 20 min to make. This is how it all came to be. From t-shirt to bolero/jacket.


(Isn't my model darling?)


This is a T-Shirt I got on the $2-3 rack at Wal-Mart. She has worn it one time and it shrunk up and became a belly shirt, so what better to use it for than to turn it into a bolero?!

Take the shirt, lay it flat and cut to your desired length. Don't forget to leave a little extra fabric to sew up for your hem.


Next fold it in half, down the front of the shirt, one sleeve facing down, and one sleeve facing up. This is to make sure both front sides of the bolero match up perfectly.


 Start cutting your shirt straight down the crease to begin your "opening" to the bolero.


This is your option now, you can round your bolero sides or keep them square. I rounded my bolero to remove the printed designs. 


From the beginning cut you previously made on the crease, cut what will be both front sides of the bolero all together, to make both sides of the bolero even. Like shown above.


Unfold and and lay "normally" and it should look like this.


Next, simply sew the raw edge over and make an easy hem to keep from fraying. 


And there you have it! A simple, cute and FREE Bolero!


*If you want, you can add a button and ribbon or elastic to the top to secure the opening of the bolero. I did that on the black velvet bolero and it worked great.

Linking up here


3 Ingredient Peanut Butter Cookies (Gluten & Milk Free)

When we had our baby boy this last September a wonderful friend of ours kept giving us goodies. I didn't need cookies after I just had a baby, I wanted to get back to my body fast. So hence cookies were the last thing I wanted to eat. But with these, I ate almost the WHOLE BAG! They were the softest Peanut Butter cookies I had ever had! They were soft and moist and SCRUMPTIOUS! I always grew up with my moms Peanut Butter Cookies, they are fabulous for 10 min out of the oven, then they get hard as rocks and you can't microwave them or anything. So when we were given these cookies I HAD to have the recipe. I was floored when she asked, "Did you really like them?" I said, "YESSSSSS! PLEASE can I have the recipe?" She said, "well its just 3 things." 3 things? I thought, how can a cookie this good just be 3 ingredients? She gave me the recipe and I was ecstatic. When I saw there wasn't any gluten or milk in them I knew I could make them for my Young Women at church! I have 2 girls who have gluten allergy and 3 girls with a milk allergy. So this is now my go to cookie for Young Women events. 
These are FABULOUS people I am telling you. They will change your life forever! 


3 Ingredient Peanut Butter Cookies:

1 c. Peanut Butter (if worried about gluten allergies - be sure to check on what kind of peanut butter you use. We just use regular.)
1 c. Sugar
1 egg

Pre-heat your oven to 350. 

Mix all ingredients together in a bowl. Grease your cookie sheet and place cookie dough balls onto it. With a dinner fork press the cookie dough balls down and make a cross hatched design. Place in your oven and cook for 8 min. or until they start to crack on top. Leave on your cookie sheet for a couple min. then move to cooling racks. Serve with milk. DELISH!


Linking up here

Tuesday, March 26, 2013

Swirly Bedroom Border

When my sister's family moved into a house who's entire upstairs was painted a sort of mint/ inside of an avocado green. It was EVERYWHERE! The family room, kitchen, ceiling of the bedrooms and bathrooms, it was EVERYWHERE! We painted almost every room, but we kept one half bath and their youngest daughters's room green. The green went with a couple bedspreads they already had. But they wanted their room to be more fun. She showed my mom and I a scrapbook paper with a swirly base. She said she wanted a border to look similar to the scrapbook design. My mom and I love to paint so we were up to the task. However the whole family was going on a week long vacation and I was home visiting family. So we were going to do this as a surprise for when they got home, it would be a "different" room. My mom and I worked for about 4-5 days, in the morning. It was in the middle of summer and the girls's room was ALWAYS in the sun so it BAKED us! I sketched the swirls with a pencil and my mom was behind me with pink and orange paint. When I was done sketching one wall I would help paint that, then start sketching another. It was AWESOME! Talk about team work. When they came home from their trip the girls were funny and pretended to faint. They loved their "new room". This fun swirly border was the perfect solution to fix up a different green room to make it match their personalities. 
Check it out! Maybe you and a few friends or family could do the same to a
 bedroom, play room or bathroom! 


Linking up here

I was featured at Sugar Bee Crafts for my Swirly Bedroom Border. Check it out!


Monday, March 25, 2013

Bread Machine Honey Wheat Bread

My dear mother always taught me that when you don't have enough time to make bread from scratch use your bread machine. And since my life is ALWAYS busy I use my bread machine often. I love the taste of homemade bread and use it for everything; sandwiches, french toast, snacks etc. This is my favorite recipe I have found. I know you will enjoy it too!


Bread Machine Honey Wheat Bread:

(Add in order into the machine)
2 c. Water
2 T. Powdered Milk
1 T. Butter
1 1/2 tsp. Salt
3 T. Honey
2 1/2 c. Wheat Flour
1 1/2 c. Bread Flour
1 1/2 tsp. bread machine Yeast

Put all ingredients in order into the bread machine and let it do its business! If you have a menu on your machine I always use the Sandwich option. 

*A little tip to help with the honey. My mother in-law taught me to spray a little cooking spray into your measuring spoon and it will slide right out! GENIUS! 


Linking up here


Sunday, March 24, 2013

Don't Ask for it to be Changed

I am teaching my Laurel's in Young Women's today and made this handout for them. I love the talk that I cover today by Elder Bednar called The Atonement and the Journey of Mortality. We have been covering the Atonement all this month. How fitting for Easter to be at the end of this month, the Young Women can more fully understand the Atonement of Jesus Christ. I truly believe that every time I am teaching, the lesson is really meant for me to apply in my own life. I am thankful for this opportunity to teach and learn myself more fully the Atonement in my life and in the lives of others.


Saturday, March 23, 2013

Appetizing Tortilla Roll-Ups

These tortilla roll-ups are the greatest appetizer to add to a party platter. They taste great, look great and are easy to make. I made these for a friends "baby gender reveal party" and they said they, "everyone loved them." These are great for parties, game day's, and can be made in advance. Try them! They're awesome!


Appetizing Tortilla Roll-Ups

1 8oz. Pkg Cream Cheese
1/3 c. Chunky Salsa
Thin Chicken Lunch Meat
Romaine Lettuce
Tooth Picks

In a bowl, beat the cream cheese and salsa until smooth. Spread the cream cheese and salsa mixture on to a tortilla. Place a piece of chicken meat on the cream cheese mixture, and then put a piece of romaine lettuce over the chicken. Have your tooth picks ready. Roll the whole tortilla up and stick tooth picks in the tortilla roll every 2-3 inches. (Depending on how big your want your roll- ups.) With a knife cut the roll in between the toothpicks. You may have to re-roll a few if the toothpick didn't hold it together. Plate them, share them, eat them! DELISH! 


Linking up here


Friday, March 22, 2013

Savory Orange Chicken

I made this up a few weeks ago and it has been a hit in our home ever since. I wanted Chinese food for dinner but didn't want to go out to eat. So what did I do? Made my own of course! I made the Healthy Pan Fried Rice and this delicious Orange Chicken. This is a good one, I'm telling ya!


Savory Orange Chicken

3-4 Boneless Skinless Chicken Breasts - Cubed
1 c. Russian Salad Dressing'
1 medium Orange Juiced - cutting the leftover "orange sections" that hold the juice
2 T. Dried Mined Onion
2 cubes Beef Bouillon

In a bowl combine the Russian Salad Dressing, Orange Juice and "chunks", Minced Onion and Beef Bouillon Cubes. Place the cubed chicken in a greased 8x8 pan. Pour the orange "sauce" over the chicken. Bake at 350 for 40-45 min. Until Chicken is done. DELISH!

*Serve over Brown rice or with Healthy Pan Fried Rice. 
*This is also scrumptious with Fresh Crumb Green Beans


Linking up Here
I was featured at Dessert Now, Dinner Later on Sweet and Savory Saturday's #6! (I guess 6 is my lucky number with link parties!)

Thursday, March 21, 2013

Wild Rice Chicken

Perfectly portioned Chicken and Wild Rice. I love to make this. My whole family loves it, and I love that I can stretch my Wild Rice mixes. We make this for company and have never had a negative reaction. This is super simple and delicious! You will want to make this a weekly meal.


Wild Rice Chicken

1 T. Olive Oil
2 Boxes Wild Rice- Rice a Roni
1/4 c. Jasmin Rice
3 1/4 c. Water

1 c. Chicken Broth
2-3 Boneless Skinless Chicken Breasts - Filleted 

In a large skillet heat the olive oil and place the wild rice and jasmin rice in the oil to heat for 1 min. Add the water and the seasoning packets from the Rice a Roni. Cover and cook on medium high for 8 min. 
In the meantime grease your 8x8 glass pan and your chicken broth. Fillet your chicken breasts and place in the greased 8x8 pan. When rice is done pour it over the chicken and pour your 1 c. chicken broth over the top. Place in the oven and bake at 350 for 40-50 min. Until Chicken is done and rice is all tender.

* You can put foil over top to keep the rice from getting crispy in the oven- or just stir all the rice when it is done- the top "crispy rice" gets moist very quickly.


Linking up here


Wednesday, March 20, 2013

"HOP Season" Picture

It's Hop Season! Easter is coming quickly. I have made another 12x12 scrapbook page to display for the season. I'm so proud. I wanted this to turn out just right and it did! That NEVER happens to me! This is so simple and it makes my living room feel more like the Easter Season. Dig out that scrap book paper and go to town! This would also make a DARLING card!


First start with a 12x12 light blue sheet
Then start cutting out your bunny. The 2 ears, a long oval with one end cut to make straight. The head, one long oval and a half circle together, and a half circle for the body. I drew the shapes on the back then cut them out when I was happy with the shape of my bunny.


Glue your bunny down and start cutting out your grass. The grass is very simple. Just make slight "hooks" with different pattered green paper. Anything goes with grass, there's no right or wrong way.


Next your tulips and bunny cheeks
2 circles for the bunny cheeks and the petals for the tulips
(As you can see on the main picture I have 2 "tulip buds" I wanted 2 more when I was done, so I just cut out one petal shape of the tulips.)


Glue down your bunny cheeks 
and your tulips- overlapping the petals.


Then draw your bunny face, I used a pen and drew the 2 half moon eyes and rounded a pink heart and glued it upside down for the nose. 
I don't have a picture of it, but I took a soft pattern of pink for the inside of the ears on my bunny. I used the piece of paper I cut out the ears from as a measure for the pink. 


Use a glue dot to secure the floppy bunny ear down and you are done!


Linking up here


Monday, March 18, 2013

Spaghetti and Meatballs

I have always loved spaghetti, its one of my easy 20 min meals. I wanted to try making it with meatballs instead of meatsauce. I used my Prize Winning Meatball recipe. The whole meal turned out WONDERFULLY! Simple, and homemade. DELISH!


Spaghetti & Meatballs

1 jar Favorite Spaghetti Sauce
1 can stewed tomatoes - Drained
Favorite pasta- Egg Noodles- Angel Hair- Spaghetti- Fettuccine etc.

Make the Prize Winning Meatballs according to the recipe and directions. When meatballs are simmering in the beef bouillon liquid, start cooking your pasta in a separate pan according to package directions. While your pasta and meatballs are cooking open your spaghetti sauce and your stewed tomato cans. Drain the stewed tomatoes and have it ready to pour with your spaghetti sauce. When meatballs are done drain the liquid from the large skillet. Pour in your spaghetti sauce and stewed tomatoes. Stir and let simmer together about 5-10 min. When noodles are done drain and gently rinse with hot water (to get all the starch off). Plate your noodles then pour some sauce and meatballs over top. DELISH!


Linking up here

Saturday, March 16, 2013

Sore Abs Over Here!

A few days ago I did a Bob Harper Yoga Ab Workout Video. I haven't worked my abs this hard in a LONG time! So hence when I was done, I felt GREAT. Then a few hours later I was SORE! I instantly put this on and RELIEF! Thank Heavens for Amish Origins! They cure my sore muscles. It's like Icy Hot but this is Hot Icy, and lasts A LOT longer! Their website is, www.amishorigins.com. They have a WHOLE bunch of products my family cannot live without! Try it! I am so glad we have it on hand!


Linking up here

I love Saturday Link Parties!

Check out these awesome blogs I link to on Saturdays!
           

      showandtellsaturday

Friday, March 15, 2013

Prize Winning Meatballs

So versatile, so meaty, so delicious! These meatballs are the best in the west. This is my Dad's recipe, and we have loved them for YEARS. I grew up having them with Fondue, Spaghetti, Oriental Sauce, and just plain. There is nothing like a good homemade meatball. DELISH.


Prize Winning Meatballs:

In a small shallow pan, saute:
1/4 c. chopped Onion
1/4 c. chopped Celery
2 tsp. Olive Oil

In a mixing bowl combine:
1 lb. raw Hamburger
1/2 tsp. ground sage
2 T. flour
1 egg
a few dashes of salt and pepper

In a bowl or in your liquid measuring cup measure 1 1/2 c. water and 3 cubes beef bouillon. and 1/4 c. milk.
Set aside

Combine the saute'd onion and celery to the hamburger mixture. Form the meat mixture into meatballs and place in a large greased skillet (with lid).


Brown the meatballs in the skillet , they don't have to be cooked all the way through. (yes not very pretty now, but just you wait)


When browned add your water/beef bouillon and milk mixture


Cover and cook on medium heat for 10-15 min. 


When cooked through, use a slotted spoon and remove from liquid. Serve with fondue, spaghetti, oriental sauce, or make them small for a great appetizer. DELISH!


Linking up here


Thursday, March 14, 2013

Fancy "Cheating" Cream Puffs

These fancy "cheating" cream puffs are DELISH! I always want to keep things simple every time I help with a party, but I just can't. SO what do I do? I bought some plain 'ole cream puffs from the store. And as usual they are fabulous by them selves, but I wanted to make them "fancier". I grabbed some ice cream caramel sauce and some chocolate syrup and drizzled it over the cream puffs! Now they look and taste even more delicious than ever. Easy and I kept it simple! I am so proud of myself!


Put the cream puffs on a cooling rack.
Underneath  the cooling rack and cream puffs place a cookie sheet lined with parchment paper


Grab your caramel sauce and chocolate sauce and act like Jackson Pollack and start drizzling! 


When done drizzling put them in the freezer. The caramel and chocolate will not set up, I put them in the freezer and they were still gooey even after 4 hours. You can put these on Popsicle sticks or serve in a bowl with toothpicks. 


Next time I am going to drizzle with chocolate! Can't wait!


Linking up here


Wednesday, March 13, 2013

Crock Pot Steak Stroganoff

This is one of my favorites for just us and for company. I got this recipe from my sister. Lots of my good recipes come from her. She's kind of amazing. My sister introduced us to having this stroganoff on baked potatoes about a year ago and I can't go back. DELISH! You can put it over baked potatoes, rice or noodles, all are fabulous. I love that I put the stroganoff in the crock in the morning and don't touch it until dinner time. This is so easy, and SOOO good. I recently had my in-laws over and they loved it! Score. This is a MUCH better alternative to hamburger and gravy. I can't even imagine going back. It almost sounds yucky compared to this. Just try it. You won't be disappointed.


Crock Pot Steak Stroganoff

1-2 lbs Stew meat or cubed steak
1 pkt Onion soup mix (or you can sub in 4 cubes beef bouillon and 2 T. dried minced onion)
1 can Cream of Mushroom Soup
1 can Cream of Celery Soup
1 "can" Water (use one of the empty "cream soup" cans to measure the water)

Place the meat in a greased crock pot and sprinkle the onion soup mix (or the bouillon and onion) over top. In a bowl mix together the soups and water. Pour over the meat and onion soup mix. Cook on Low for 8-10 hours or High for 4-6. DELISH!

*I wanted to make this one Sunday and didn't have mushroom soup or celery soup and I tried Cream of Chicken soup and it was JUST AS GOOD! Just the same creaminess, just not as salty. So don't be afraid to use Cream of Chicken if you ran out of the other 2.

*When done, it's amazing to put a dollop of sour cream on top. It cools it down and adds even more creaminess to the meal. I especially love the sour cream with the baked potatoes. 


Linking up here

Tuesday, March 12, 2013

Plaid Shirt Pocket Card

Doesn't it just make your day to get a cute card in the mail instead of junk? It sure makes MINE! On any occasion I LOVE LOVE LOVE to receive and send cards. I love this card. It was simple and it's super cute. Any Husband, Dad, Grandpa, Uncle, Nephew, Son, Cousin etc. would love this. I love to make these in bulk, so when I'm in the groove I can pop a whole bunch out at the same time. I have a stalk pile of my cards that I can send out at any time, it's wonderful. Look how cute this is! It can hold a gift card, or money in the pocket or just be cute and 3D with the pop out pocket. I know you have someone in mind. Crank one or 2 or 3 out today, and make someone's day tomorrow!


This can hold money or a gift card


I started with a blank white card. I found a plaid print of scrap book paper I liked and cut out the rectangle for the "shirt" portion, eye balled and cut the "obtuse triangle" collar (I haven't used the word obtuse triangle since 6th grade! ha ha) and the pocket.
I cut out a large pocket of white card stalk and made flaps to fold down. (I used a gift card as my guide on how wide to make the pocket) On the folded creases I glued the pocket down to the plaid "shirt". I then put the plaid scrapbook paper over the white card stalk pocket.
I also bordered the plaid "collar" in white card stalk to give it a pop. Without the borders they fade into the plaid print.
I made 3 buttons out of brown paper. Lastly I grabbed a thin brown sharpie and made my stitches along the pocket, the collar and the X's on the buttons. Simple and adorable. 

*Great for any Birthday or Father's day!


Linking up here

Monday, March 11, 2013

Healthy Blended Banana Ice Cream

I love to try new things and make them my own. This past week I've been seeing a lot of people including chefs, make ice cream from frozen bananas. Well it was my turn to try it. I grabbed a few bananas in the morning, peeled them, froze them and in the afternoon made myself a Blended Banana Shake! It was HEAVENLY! Look at that! Doesn't that make your mouth water?! This was definitely as sweet it did NOT feel guilty eating.


Blended Banana Ice Cream

1 Banana peeled and put in a ziploc bag, and frozen
1/8 c. Frozen Strawberries
1/8 c. Fresh Blue Berries
1/2 -3/4 c. Almond Milk (the Almond milk makes it sweeter, it is still good with normal milk)

Place everything in a blender. (I used my magic bullet) Blend until smooth, you can add more milk if you prefer it more runny. If you use both frozen strawberries and frozen blue berries it will take more milk. If using fresh it will take less milk. Place in a glass or bowl, grab a spoon and indulge in the sweetness of nature! DELISH!

*Don't let the Banana Ice Cream sit to long, it is all natural and it will start to turn brown. 
*This recipe makes a perfect 1 person serving. It's easily doubled and tripled to share!


Linking up here
I was featured at High Heels and Grills Link Party # 21

Sunday, March 10, 2013

Healthy Pan Fried Rice

I love Chinese fried rice. I'll say it again, I LOVE Chinese fried rice. And when it's easy to make, even better! I started making fried rice and Spanish rice when I was in college, I would play around with different ingredients and finally came up with what you see today. Easy, delicious and healthy! This goes beautifully with my Apricot Chicken, and (coming soon) Orange Chicken. 


Simple ingredients make a simple and delicious side.


Healthy Pan Fried Rice

2 c. Instant Brown Rice
2 c. Water
1 (heaping) T. Diced Carrots
1 (heaping) T. Fresh or Frozen Peas
1 T. Soy Sauce 
1-2 Eggs ((beaten) Your choice in eggs is how much scrambled egg you want in your rice, I don't like much, hence the 1 egg, but you can put as many eggs as you want) 
2 tsp. Olive Oil

In a skillet heat your olive oil. Pour in your instant brown rice, carrots and peas and saute for about 1-2 minutes. Carefully add the water and Soy Sauce, stand back, it boils FAST. Cover and cook on Medium/Low heat until all the water is absorbed. About 7-10 min. When water is absorbed return heat to medium/high and add your beaten egg(s), scramble your egg(s) by folding the rice and veggies over the egg. Stir and fold over, stir and fold over, continue until eggs are done. Add a few dashes of salt and serve! 

Salt and soy sauce to taste. We always keep salt and soy sauce on the table when eating Chinese because everyone likes theirs different, some super salty and some not so much. DELISH!


Linking up here