Image Map

Monday, November 6, 2017

Chocolate Chip Banana Bread Mini Loaves

Need a SCRUMPTIOUS neighbor, friend or family gift for the holidays? Why not a mini loaf of Chocolate Chip Banana Bread!? DELICIOUS and DARLING! Make 6 mini loaves in 1 batch. This is what our family is going to be giving this year, what about you?!


Chocolate Chip Banana Bread Mini Loaves:

3 c. Flour
2 c. Sugar
2 tsp. Baking Soda
1/2 tsp. Salt

4 eggs
1/2 c. Oil (I use Olive Oil)
4 Ripe Bananas

1 1/2 c. Chocolate Chips

-------------------------------------

In a large bowl combine Flour, Sugar, Baking Soda and Salt.

In another large bowl mix Eggs, Oil and Bananas with a hand blender or mixer.

Combine the Banana/Egg/Oil mixture in with the Flour/Sugar bowl. Mix until smooth.

Fold in the Chocolate Chips.

Spray 6 small loaf pans with cooking spray and divide batter into each loaf pan evenly. 

Bake at 350 for 35-40 minutes or until inserted toothpick comes out clean.


Wrap up with string and take to a friend or neighbor for the holidays!
DELISH!


Monday, October 30, 2017

Sausage Tortellini Soup

This soup was a HUGE hit at our house! Anything with cheese tortellini is a huge hit at our house. I've made this before but forgot to take a picture of it! So, here it is, a great, EASY recipe to make on cold days. This thick soup is hearty and delicious! 

Need more soup ideas? Click HERE!


Crock Pot Sausage Tortellini Soup

1 lb. ground sausage
1 small onion - diced
1 14 oz. can diced tomatoes (do not drain)
1 24 oz. can/jar traditional spaghetti sauce
4 c. water
2 tsp. Italian seasonings
----------------------------
1 pkg. Cheese tortellini - cooked according to pkg. directions

In a medium pan place onion and sausage. Cook until sausage is cooked through and onions are transparent. Drain any excess fat. 

Place sausage and onions into the crock pot.

Add spaghetti sauce, diced tomatoes, water and Italian seasonings. 

Cook on LOW for 3 hours.

Add cooked tortellini. Cover and cook for another 30 minutes. 

Salt and Pepper to taste.

Serve with fresh basil and mozzarella cheese on top! 


Friday, September 29, 2017

Cookie Cutter Pancakes

I am boasting BIG TIME, I totally "mom scored" on these bad boys! I had a stroke of brilliance two days ago and wanted to share it with YOU!!! I'm sure most of you have seen the cute idea of pushing a cookie cutter into your kids' school lunch sandwiches (if you haven't its DARLING), well this is along the same lines; only with PANCAKES!

My kids LOVE pancakes, but ever since my dad started adding food coloring to the batter on special occasions I just can't compete. They seriously won't touch mine because they're not colored! So, I decided to make good old buttermilk pancakes two days ago. I was DETERMINED to make my kids LOVE THEM OR ELSE!!!! So.... I started making the pancakes before the kids woke up, and while I was cooking them on the stove my mind started wandering of things I needed to get done.... 
"I still have to make the kids' lunches... hmmm.... what kind of sandwich will I make today?.....how about you surprise the kids today with a cookie cutter sandwich..... change it up a little you know...?"

I look down at the pancake and DING!!!! A HUGE light bulb went off!
"Let the kids play and cut out the pancakes with cookie cutters! They'll want to eat them more than "rainbow pancakes." Easy, no mess, PERFECTION!"

This was the BEST surprise breakfast EVER!
My June even said, "MOM! YOU'RE A GENIUS!" 
HA HA!!! MOM SCORE!!!

So have a FUN breakfast with your kids and use cookie cutters! They're only kids for a little while, enjoy every morning you get!


Tuesday, September 12, 2017

Cookies & Cream Cake Mix Cookies

I had a bunch of left over chocolate cookie crumbs after my attempt at my son's birthday cake. 

I put the extra chocolate crumbs in a zip bag and saved them for later. The day after the birthday party I remembered I volunteered to take a meal to a friend who just had knee surgery. I made them a meal and needed a dessert. I looked in my pantry for something quick. Everyone likes my cake mix cookies, but I only had a white cake mix in my cupboard. I ALWAYS have chocolate! Oh NO! What am I going to do with a white cake mix?! 

(Back track) Cookies and cream ice cream has been on my mind for the past few months. My husband and kids have always asked me what my favorite flavor of ice cream is, and I never could answer, I like so many! Well, I finally decided that my MOST favorite is cookies and cream! 
(I just wish there were more cookies in it! 
More cookies+less cream=perfect ice cream)

So, I saw the cookie crumbs and saw the white cake mix and a literal light bulb went off over my head. Our kitchen light sometimes flickers on and off. I took that as a good sign and went for it! 

These cookies were AWESOME! Keep this recipe in your back pocket for a quick delicious treat!


Cookies and Cream Cake Mix Cookies

1 White cake mix
2 Eggs
1/3 c. Oil
1/3 c. Chocolate Chips
1/2 c. Chocolate Cookie Crumbs (Oreo or Knock off Brand)

Mix all ingredients together. 
Scoop and roll batter into balls. 
Place them on a greased cookie sheet. 
Bake at 350 for 8 minutes.
Let cookies sit for 2-3 minutes before removing to a cooling rack.

Serve with cold milk! Yummm.....


http://cookandcraftmecrazy.blogspot.com/2013/01/cookies.html

Wednesday, September 6, 2017

Birthday Cake - NAILED IT!

I just have to share this. Not everything I make turns out as planned! This is REAL LIFE! I am not going to publish my only perfect recipes or crafts. I also want to share with you my funny mishaps and moments that definitely DID NOT work out! I've had my share of recipes that didn't turn out, but this one "takes the cake," pun TOTALLY intended.

This was my effort at my son's birthday cake yesterday. It brought some much needed comedy and relief to my day. I had found this cake idea in a magazine ages ago and kept it just in case my little boy would want a cake like this! It had the recipe and it seemed simple enough that I could give it a try. Well, my Connor LOVES Captain America, so much that this is his third super hero party. (The other 2 he didn't really care what the theme of his party was.) He also loves motorcycles so I printed and cut out this picture of Captain America riding a motorcycle and decided the perfect cake to put it on would be this 
"dirt mound cake."

I wish there was a hidden camera in my kitchen, because I would have made a million dollars on America's funniest home videos! I was laughing, squealing and ugly/funny crying for over an hour as the cake kept falling, crumbling, and moving as I frosted it. Tears of continuous laughter streaked my face as I tried to keep it somewhat upright. Frosting splattered my walls, cake crumbs were all over my floor, and frosting covered my hands as I attempted to adjust it to keep it from falling over. This cake was the funnest, most HILARIOUS cake I have ever attempted; too bad I was the only one to witness this shenanigan. I took lots of pictures so I could share my "NAILED IT" moment with you!

NOTE TO SELF: Just because it looks easy in a magazine or on Pinterest, doesn't mean it will always end up like the picture. Sometimes it does, and sometimes it doesn't.

Needless to say, Buddy the Cake Boss will NOT be begging for my assistance in his bakery. 

But Hey! I should get points for it looking realistic don't you think?!


Tuesday, August 22, 2017

Beach Ball "Getting to know you game"

We recently went to a swimming pool party for my niece, and took her this beach ball game! I bought a cheap beach ball and wrote questions all over it. You toss the ball and whoever catches it,
 has to answer the question that's under (or near) their right hand pointer finger.

 We played the question game, then after that we played beach volleyball! 
Hey! Two games in one, win-win! 

This was simple and loads of laughs! My sister wanted a list of all of the questions I wrote all over the ball because she thought they were so unique and fun! So, I wrote all of them down and made a list for EVERYONE! My kids came up with some of the questions and they were too funny not to include.

This would be perfect for birthday parties, family reunions,
church activities (for ALL ages) etc.
Have fun!


Beach Ball Questions:

What country do you want to visit?
Favorite room in your house?
Favorite Breakfast?
Favorite Dinner?
Favorite Dessert?
Favorite School Subject?
Favorite Birthday Memory?
Favorite Restaurant?
Something you will NEVER do again?
What Super Power do you wish you had?
Favorite Color?
Favorite Radio Genre?
Favorite Piece of Park Equipment?
Favorite Cartoon Movie?
Favorite Food at Thanksgiving?
Favorite Memory with your Dad?
Favorite Memory with your Mom?
Favorite place to visit?
Favorite camping tradition?
Favorite job you've ever had?
Favorite Board Game?
Favorite Ice Cream Flavor?
Favorite Toy?
What Animal would you be?
Favorite Holiday?
What are small things that make your day better?
What Olympic Sport would you compete in?
Favorite Candy?
Favorite Fruit?
Favorite Vegetable?
Favorite Smell?
Favorite Sport? Play? Watch?
Favorite Christmas Tradition?
Favorite Trip you've ever been on?
Yuckiest Food you've ever eaten?
Favorite type of Cookie?
Favorite Children's Book?
Recite your favorite Nursery Rhyme.
Favorite Primary Song?
Favorite thing to do in the Summer?
Favorite thing to do in the Fall?
Favorite thing to do in the Winter?
Favorite Super Hero?


Have fun! Xo

Friday, August 18, 2017

Basil Pesto

Need a quick AMAZING fresh pesto recipe? Look no further! I've made 
Lemon Spinach Pesto before (which was DELICIOUS), and this Basil Pesto is just as scrumptious and fresh! Classic and perfect. Not too runny or too thick, honesty, it's just right! We had it for dinner with grilled chicken and fettuccine noodles! Put this on your "Make ASAP" list!


Basil Pesto

In a blender or food processor place:

2 c. Fresh Basil Leaves
2 Garlic Cloves - Minced
1/4 c. Walnuts or Pine Nuts
2/3 c. Olive Oil
2/3 c. Parmesan Cheese
1/2 tsp Salt

Blend until smooth. 

Serve immediately over hot pasta or place in a small sauce pan and cook on medium for 5 minutes.

DELISH!


http://cookandcraftmecrazy.blogspot.com/2013/01/sauces-dips-salad-dressings.html

Wednesday, August 2, 2017

Chicken Pot Pie Soup

I am a soup fanatic! I could eat soup and salad every day of the week, spring, summer, fall and winter! I also LOVE CHICKEN POT PIE! But I am more of a buy a frozen pot pie kind of a lady, instead of a make from scratch 4 hours later lady.
Well, that all changed when I was determined to make a Chicken Pot Pie "inspired" soup and simply put my favorite Buttermilk Biscuits on top! HOLY COW! Our family was in HEAVEN! Hearty, flavorful and DELICIOUS! I will be making this OFTEN!


Chicken Pot Pie Soup

2 T. Olive Oil
3 Medium Carrots - Peeled and Sliced
2 Stalks Celery - Sliced and Cut
1/2 Onion - Minced
2 Boneless Skinless Chicken Breasts- Cubed
1 large Garlic Clove - minced
2 tsp. Salt

(Optional- Add Peas! My husband and kids won't touch peas, so I left them out)

4 Small Potatoes - Peeled and Cubed + 1tsp. Salt

4 c. Milk
1 T. Basil
Salt to taste

1 c. Sour Cream

In a soup pot, place olive oil, carrots, celery and onion. Saute over medium/high heat until onions are transparent. Dash some salt while cooking.

Add the chicken, garlic and salt.

In a small pot place cubed potatoes with enough water to cover the potatoes. Add salt and boil on high until fork tender. Drain and add to the large pot of chicken and veggies

When all is in the large pot add the milk, basil and salt to taste. Simmer over medium heat for 10 minutes.

While the soup is simmering, make the Buttermilk Biscuits!

Stir the sour cream into the soup a few minutes before serving.

Ladle the soup into bowls and place a Buttermilk Biscuit on top!


Perfect Buttermilk Biscuits

Preheat your oven to 450'

In a bowl place:
2 c. Flour
4 tsp. Baking Powder
1/2 tsp. Salt
1/2 tsp. Cream of Tartar (Makes them SOOO SOFT!)
2 tsp. Sugar
1/2 c. Soft Butter

Cut ingredients until nice and crumbly.

Add:
2/3 c. Buttermilk (I always make my own with milk and a little bit of vinegar. If using "real" buttermilk you may need to use 1/2 c.)
1/4 tsp. Baking Soda

Stir with a wooden spoon to make your dough.

Place your dough on a floured surface. Knead a couple times, then flatten the dough with your hands or with a rolling pin.

Make your dough about 1-1 1/2 inches thick. 

Use a cup/glass you drink from or a 1/2 c. measuring cup to cut your biscuits out! 
This recipe always makes 8 perfect biscuits!

Place your biscuits on a greased cookie sheet.

Bake at 450' for 10-12 minutes.


http://cookandcraftmecrazy.blogspot.com/2013/01/soup.html


Thursday, July 20, 2017

Girls Camp Sunshine Notes!

After seeing my Girls Camp Pocket Post, you are probably wondering, "What are all the note cards in the pockets?" Well let me tell you......
They........ are.....SUNSHINE NOTES!
My sister Candace came up with Sunshine Notes years ago, and they have become a tradition for her and I to initiate them into the different girls camps we are involved in. 

Simply place colored or white lined notecards on a picnic table with stickers, markers and pens; then watch the fun begin! The girls and leaders get sunshine and love through those notes to last them a LIFETIME! Everyone writes uplifting sweet messages, short and long, to just about everyone at camp. 

There is ONE rule! We give a warning at the start of camp, if there is ever ONE rude or mean remark on a note we stop all sunshine notes! This is a SAFE/ HAPPY place, there is no place for rude/negative comments. We are spreading SUNSHINE, not rain.
It's sad we have to even warn them, but it's better to be safe than sorry. On a lighter note, we have NEVER had anything like this happen, but we always prepare the girls and leaders.

Girls and leaders go away with a STACK of SUNSHINE at the end of camp. I bought over 1000 notecards last year and we RAN OUT! On the last day I was frantically cutting colored paper I just HAPPENED to have thrown in a tub last minute, so girls could write their last sunshine notes! It was BEAUTIFUL.

One girl told me that she put her sunshine notes up from last year as a border in her bedroom! One leader keeps them on a key ring and takes them with her in her purse. She pulls them out when she needs a little pick me up! THESE SUNSHINE NOTES BLESS LIVES!


Our "Sunshine Note Station" was CONSTANTLY overflowing with girls and leaders writing sweet notes. Many leaders/girls took blank notecards back to their tents because there was NO ROOM for them at the table. 


Monday, July 17, 2017

Girls Camp Secret Sister Pockets

Of all the years I've been to Girls Camp, this is BY FAR, THE BEST, EASIEST way to store secret sister gifts. I have used boxes, cans, bags etc. and none compare to these PLASTIC SHOE HOLDERS! This is seriously the BEST investment for Girls Camp! Use them year after year, they store FLAT and are easy to put up.

Hang up the pockets by threading rope through the holes at the top. Take a hole punch and punch holes down the sides of the shoe holders. Take wire or twine and tie each shoe holder together to make a "wall/sheet" of pockets.

Have each girl and leader write their name with a specific colored marker for each ward or branch (See my color key on the right?), then put the "named" masking tape on their pocket.

NOTE TO SELF: When girls camp is over, take off the tape! Don't let the tape sit for a year, the masking tape will NEVER come off!

These pockets are the PERFECT size for Secret Sister gifts!


https://cookandcraftmecrazy.blogspot.com/2017/07/scripture-candy-2.html


Wednesday, July 12, 2017

Scripture Candy 2

Guess what?! I was just at Girls Camp AGAIN! My husband and I were talking, and in our 9 years marriage I have gone to Girls Camp 7 of those years. What can I say? I ADORE Girls Camp, and LOVE the youth of our church! Girls Camp is a place where Leaders and Young Women can be themselves; while having a safe, fun and spiritual environment to reboot and strengthen their testimonies of our Savior Jesus Christ. 

Well, it is a big deal at Girls Camp to have "Secret Sisters." Secret Sisters is where you draw a name the first day of camp, and give that "sister" small gifts throughout the week of girls camp without them knowing, hence the "secret" part. I have been to my fair share of Girls Camps. So far, I have been to 14 years of Girls Camp. Every Girls Camp is unique and different, but always amazing! In those 14 years of girls camp, I've picked up a few tricks of the trade. I will be posting more details and ideas of my Girls Camp adventures later on. 

Over the years, I have received, and seen MANY different secret sister gifts. They range from extravagant to last minute/thrown together. You have girls that spend days, and DAYS working on special secret sister gifts. While other girls stick a penny on a piece of scrap paper and put, "A penny for your thoughts." While both are obviously acceptable and appreciated, my sister, Candace and I, came up with a "leveling of the playing field" way for secret sister gifts.

We decided last year that everyone would bring candy bars! Other options were fruit snacks, trail mix, gold fish, pretzels, etc. It's edible, portable, won't break and can be eaten at camp. No tiny "fun size" candy bars, no "jumbo/king" candy bars, just NORMAL sized candy bars. PRE-PACKAGED snack sized "snacks," nothing in a ziplock bag. (We don't want a ziploc bag of old potato chips from their house, EWW!) 

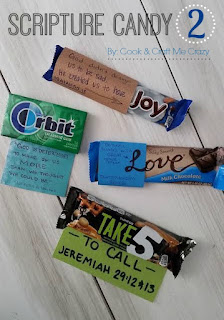
The thing that made these special was, you had to put a spiritual quote, scripture or uplifting saying on it! 

Last year was our first year and it was a HUGE HIT! Some wards covered all the secret sister gifts for their girls, so everyone from that ward gave the same thing! GREAT! Other wards had each girl in charge of their own, AWESOME! The girls loved getting a snack/treat at camp they could eat there or save for later... 99% of candy gifts were eaten at camp.
Last year I posted my personal Secret Sister Candy Bars I was giving, and this year I did the same thing only with different candy bars.

So here they are! Secret Sister Scripture Candy #2

(These also make fun Visiting Teaching Pick Me Ups!)


1. Almond Joy
"God didn't design us to be sad, He created us to have -> JOY!"
- President Uchtdorf
Isaiah 55:12

2. Orbit
"God is deter"mint" to make of us more than we thought we could be."
-Jeffrey R. Holland

3. Dove Chocolate
"Do small things with great -> LOVE"
-Mother Teresa
Deuteronomy 30:16

4. Take 5
Take 5 TO CALL!
Jeremiah 29:12&13

http://cookandcraftmecrazy.blogspot.com/2016/07/scripture-candy.html

Tuesday, June 27, 2017

Strawberry Almond Salad

This salad is beyond beautiful and delicious! I made this Strawberry Almond Salad for a family dinner we had a week ago. It was AWESOME! I love getting together with family; we always laugh, play and eat good food! When I walked in with this salad, I got so many oohs.. and ahhhs.. from my nieces (I have 5 nieces) and sister! It was so funny, they were all so excited to eat this beautiful salad.

My Aunt Bugs taught me an invaluable lesson with "berry salads" last time she visited. 
She said, to put your salad on a platter or cookie sheet! 
We've all been there when dishing up our portion of salad, all "the good stuff" falls to the bottom of the bowl! All the berries, nuts and fruit show up with the last few scoops of the bowl. It's almost better to be the LAST to get your salad! So, to ensure everyone gets "the good stuff" put it on a platter or cookie sheet! Aunt Bugs, you are a GENIUS! Everyone gets the perfect scoop of salad when it's on a platter!


Strawberry Almond Salad

1 pkg. Spinach
1 pkg. Garden Salad Mix
1 (1 lb.) Carton of Strawberries, sliced
2 c. Grapes Halved
1 c. Slivered Almonds
1 c. Mozzarella Cheese
Raspberry Vinegrette

Cut or rip your spinach into smaller pieces, for easier eating. (I hate having to shove HUGE leaves of spinach into my mouth! I know I look as ridiculous, as I feel! Do everyone a favor and save them from embarrassing spinach moments.) 

Place ingredients in order on a flat platter or cookie sheet:
Lettuce & Spinach
Strawberries
Grapes
Cheese
Almonds

Drizzle the Raspberry Vinaigrette over everything just before serving. Give it all a small toss and serve!

DELISH! 


http://cookandcraftmecrazy.blogspot.com/2013/01/salads.html

Linking up here

Wednesday, June 7, 2017

Lemon Drizzle Cake

This is my Aunt Suzie's Lemon Drizzle Cake Recipe, I just added the "frosting!" It's one of our WHOLE family's most favorite lemon cake recipes EVER! 
Personally, I love just about anything with lemon, it's always so fresh and wonderful. To me, lemon is the flavor of summer. Drinking lemonade and watching the kids play in the sprinklers is a tiny piece of heaven. I can't wait to make this again and again for parties or just for us! 
Try it, you will NOT be disappointed that you did!


Lemon Drizzle Cake

Cake:
1 Lemon Cake Mix
1 small Pkg. Lemon Jello
3/4 c. Olive Oil
1 1/2 c. Water
4 Eggs

Mix all ingredients in a bowl until smooth. (Batter will be runny)

Pour in a greased 9x13 pan. 

Bake at 375' for 30-35 minutes, or until inserted toothpick comes out clean.

Let cool.

Poke holes with A FORK! NOT THE DOWEL END OF A WOODEN SPOON! I tried, and the cake is SOOO moist and perfect that the cake comes off on the handle and leaves HUGE holes! 

Drizzle: 
1/3 c. Lemon Juice
2 c. Powdered Sugar

Mix until smooth then pour over the poked cake.

Frost with Extra Creamy Cool Whip. 

It is DELICIOUS and SOO EASY! 


http://cookandcraftmecrazy.blogspot.com/2013/01/desserts.html

Linking up here

Thursday, May 25, 2017

Broccoli Cauli Salad

This is a spin on my classic Broccoli Bacon Salad. This one is just as DELICIOUS!
I had a Broccoli Cauliflower Salad recently at a wedding I attended and LOVED IT! I had never thought about putting cauliflower in it, along with almonds and cranberries. What an AMAZING blend of flavors. So, after day dreaming about this salad for a few days, I came up with my own recipe. I can't wait to make this again and again for back yard parties and barbecues! 
Try it out! You won't be disappointed.


Broccoli Cauli Salad

In a large bowl add:
4 large crowns of Broccoli (chopped small)
1 small head of Cauliflower (chopped small)
(or 12 c. of Broccoli and Cauliflower pieces)

1 c. Celery (finely chopped)
2 c. Crasins
1 (5 oz) bag of Sliced Almonds
1 c. Finely Shredded Cheddar Cheese

* Optional 1 c. Red Onion (finely chopped)

Dressing:
2 c. Mayo
1/3 c. Vinegar
1/2 c. Sugar

Whisk together dressing ingredients in a small bowl, then pour over the salad. Toss salad to coat with the dressing. Chill for 4 hours, stirring occasionally. 


http://cookandcraftmecrazy.blogspot.com/2013/01/salads.html

Monday, May 15, 2017

Camper Color - Just Add Pillows!

We recently purchased a camper and I am STOKED! AHHH! 
I grew up camping my whole life and I can't wait to spend family time in the mountains, and raise my kids around nature. 

The camper/trailer we purchased is VERY nice. I was expecting a fixer upper and was shocked when we ended up buying this one. I am BEYOND excited for the camper and can't wait for us to play games, roast smore's, and play in the stream. 
But before we take off to the mountain this summer, I wanted to make a few MINOR colorful decor items to make this already lovely camper even more fun and bright! 

I am CRAZY about cabins and trailers with PLAID! I LLOOOVVEEE PLAID!!!! I had left over plaid fabric from a table runner and pillow I had made this last year for Christmas. So I went digging, and grabbed the plaid from my fabric collection. I was able to make 3 pillows from that! SCORE! But they were all the same pattern. Sigh... I wanted MORE PLAID! Well, I knew who to call.... My MOM! She is the queen of fabric. I asked her if I could check out her plaid stash to see if I could use any. WOOWWWEEE! She hooked me up, BIG TIME! My mom had a TON of red and black plaid fabric that she had bought in the 80's! And guess what?! IT'S STILL IN FASHION! Because red and black plaid NEVER go out of style; it's always classy! She has GREAT taste! My dear, angel mother, let me use most of her fabric to make pillows to spruce up my camper. She was just as excited as I was to use up her collection! (THANKS for the fabric MOM!) So here it is. The reveal of what it looked like before, and what it looks like now, just by adding pillows! 

Here resides a very HAPPY CAMPER!


In case you missed my INGENIOUS invention from last year, here it is! 
Nutella Smore's! Use Nutella instead of hard chocolate! It's already gooey and melted! SERIOUSLY AMAZING, you will never go back.


____________________________________________


Fishing with my dad then, and fishing with my dad last year! Love you dad!


I'm so excited we can continue to go camping as a family and surround ourselves with the beauty that God has created for us!


Thursday, May 11, 2017

Make your own Fruit Pizza!

I have wanted to post my Fruit Pizza for a while now, but it always seems to be gone before I get a picture of it. Hmmm.... I wonder how that happens?!

Well, this last "movie night" I was determined to take a picture before we even took a bite! 
I always make a treat for movie night, it makes the evening fun and different. This "Make Your Own" version of Fruit Pizza made our night together even better! The kids could choose what they wanted or didn't want on their "cookie" pizza. That way, I didn't have to worry about fruit going to waste with picky little fingers! 
It was AWESOME and fun; A BIG hit at our house!

(My little boy doesn't like to mix things, so having fruit on the side was a big bonus for him. He could not get over putting fruit on a cookie! It just didn't compute with him. Ha ha)

Make this fun dessert, by having a build your own version, or cover the "pizza" with fruit perfectly laid out for a shower, brunch or party! Both ways ROCK!


Pizza Dough

1 tube of packaged sugar cookie dough

Grease a large pizza pan or a cookie sheet with cooking spray

Use your fingers and press the dough to evenly to cover the pan. Remember to leave an inch or 2 on the sides of your pan, because yes, it's a giant cookie, and cookie dough GROWS! 

Bake your "Cookie Pizza Dough" at 375' for 12-13 minutes

Let your pizza cool while you make the frosting!

Frosting

1 pkg. Cream Cheese - softened
1 c. Powdered Sugar

Mix together both ingredients with a hand blender or kitchen aid until smooth.

Frost your "cookie pizza."

Fruit

Wash and cut up any fruit you want on your pizza! 

Keep the fruit on the side for a "Make your own" version, or arrange the fruit to your hearts desire on the frosted pizza!

Enjoy!! 


Wednesday, April 26, 2017

Perfect Buttermilk Biscuits

These Perfect Buttermilk Biscuits are a family secret! 
(Sorry Dad, not so much now, I had to share the secret with all my friends!)

My dad has been making these biscuits for over 40 years! 
(Some perfect recipes just stand the test of time) 
They were a family breakfast staple at our house, and I've kept up the tradition in my home.

They taste SO MUCH BETTER than premade biscuits in a tube, and SO EASY! 
I started making these a few years ago and quickly realized why my dad made them so often. 
THEY ARE SOOOO EASY and take next to no time to bake! 

Biscuits and Gravy
Biscuits with Honey
Biscuits with Jam
Biscuits with Soup
The list goes on and on.........

Wow your family with these PERFECT Buttermilk Biscuits for Breakfast, Lunch or Dinner!

(But don't tell them how easy they are. Make them think you slaved for an hour or two.)


Aren't they GORGEOUS!?!


Perfect Buttermilk Biscuits

Preheat your oven to 450'

In a bowl place:
2 c. Flour
4 tsp. Baking Powder
1/2 tsp. Salt
1/2 tsp. Cream of Tartar (Makes them SOOO SOFT!)
2 tsp. Sugar
1/2 c. Soft Butter

Cut ingredients until nice and crumbly.

Add:
2/3 c. Buttermilk (I always make my own with milk and a little bit of vinegar. If using "real" buttermilk you may need to use 1/2 c.)
1/4 tsp. Baking Soda

Mix to make your dough.

Place your dough on a floured surface. Knead a couple times, then flatten the dough with your hands or with a rolling pin.

Make your dough about 1-1 1/2 inches thick. 

Use a cup/glass you drink from or a 1/2 c. measuring cup to cut your biscuits out! 
This recipe always makes 8 perfect biscuits!

Our family always fights over the "scrap biscuit" (the last biscuit made with just the left over dough pieces) for some reason it always tastes the best! 

Place your biscuits on a greased cookie sheet.

Bake at 450' for 10-12 minutes.

Serve warm! Mmmmm..........

PERFECTION! ENJOY!


http://cookandcraftmecrazy.blogspot.com/2013/01/breads.html

Wednesday, April 19, 2017

Simple Framed Wreath

I've been wanting to make a "Framed Wreath" for a LONG time, I just never had the supplies to make it. I finally got what I needed and made it happen;
and I LOVE IT! It seriously only took me 15 minutes to make 2 framed wreaths.

This is a beautiful way to add a little depth and color to a wall, fireplace, or any space you have in mind! Take a look and make it happen!


1. Supplies:
-Frame(s)
(I got my frames from a second hand store!)

-Burlap Ribbon

-Long Greenery Garland
(I bought mine at Oriental Trading HERE)

2. Use wire cutters to cut the garland to desired length.
Fasten the ends together with a piece of wire.

3. Measure and cut ribbon to desired length.

4. Loop the ribbon through the wreath and frame.

5. Hot glue the ribbon the the frame.

VIOLA! 
A gorgeous "Framed Wreath" to hang ANYWHERE!


This is my dining room! 
I AM SO EXCITED about my "Framed Wreaths!" 
They turned out EXACTLY like I wanted them to!