Image Map

Friday, February 28, 2014

You're One in a "Minion" Valentine

My kids received this from my mother in-law for Valentine's day! She makes cute cards in a "cut out" card class and sends them to us! They're darling! I know you can make this without all of the special cut outs from the class. It's just so cute and clever I just had to share it, even if it is past Valentine's Day. My kids Love, LOVE the movie Despicable Me, and Despicable Me 2, so this was a home run! This would be an awesome birthday invitation too!


My observation of how to put it together:

Yellow card stock folded in half
Thick black strip of paper for the "band"
2 hearts - one white and one grey
One black circle for the middle of the eye
2 small hearts for the sides of the lens
3 small black pieces for hair
Draw a smile with a black marker

SO EASY!


Linking up here

Wednesday, February 26, 2014

Pot O' Gold Rainbow Treat

"There's a pot of gold at the end of every Rainbow"
There sure is in this treat! I was so excited to make something that had to do with St. Patrick's Day! This would be a GREAT treat to make for a class room, play group etc. You would WOW everyone! They're deliciously fun and fabulous!


Take a look at all of these other fantastic St. Patrick's Day crafts and treats!


1) Erin Go Braugh Wreath by Whistle and Ivy
2) Pot O' Gold Rainbow Treat by Cook and Craft Me Crazy
3) St. Patrick's Day Surprise Cupcakes by Play. Party. Pin.
5) DIY Green Ombre Shirt by Homemade Ginger

Here's how to make the Pot O' Gold Rainbow Treat

Take a plastic cup and cut it down the side and around the middle to make a small cup.


They should end up looking like this.


Measure the card stock with the cup and cut out strips that will cover the plastic.


Simply roll up and tape together- if you don't want to see the tape use glue dots. I didn't think kids would mind too much- they would be looking at the treat and not the container!


Next...
Take your new small black cups and place 1-2 Rainbow Twizzlers in the bottom to make it heavier on the bottom. If you fill it with just the popcorn and M&M's it'n not heavy enough to hold the Twizzlers on the side! Believe me, I tried.
Take 3 different colored Rainbow Twizzlers and place on one side of the cup.
Fill with White Chocolate Popcorn, buttered or sugared popcorn and Yellow M&M's to look like a pot of gold! 
Simple and DELISH!


Linking up here

Monday, February 24, 2014

Family Favorite Oatmeal Chocolate Chip Cookies

Oatmeal Chocolate Chip Cookies are one of our family's most favorite cookie! We love this recipe- they're "poofy" and chewy, our 2 favorite things! This is a fast recipe to put together and makes just over 2 dozen cookies, plenty for the family! This is easily doubled for big groups. Take a look! Doesn't your mouth just water and your tummy grumble when you see these?!


Favorite Oatmeal Chocolate Chip Cookies:

1/2 c. Brown Sugar
1/4 c. Sugar
1/4 c. Softened Butter
1/4 c. Oil
1/2 tsp. Vanilla
1 Egg
1 1/2 c. Old fashioned Oats
1 c. Flour
1/2 tsp. Baking Soda
1/2 c. Chocolate Chips
Dash of salt

1. Mix with a hand blender or mixer,  blend Both Sugars, Oil and Butter until well combined

2. Add the Vanilla and Egg into the sugar mixture and mix until nice and "fluffy" - about 2 minutes

3. Add the Oats, Flour, Soda, Salt and Chocolate Chips - Mix well 

Drop by rounds onto a greased cookie sheet.

Bake at 350 for 8-10 minutes

When cookies are removed from the oven, let them sit for a couple minutes on the cookie sheet, then remove and place on a cooling rack.

Serve with cold milk! DELISH!


Here are a few more of our favorite cookie recipes!

(Click on the Title below the picture to link you to the recipe!)


Linking up here

Friday, February 21, 2014

Light Asparagus Fettuccine

Need a light delicious meal that's full of flavor? Take a look at this! I was a little skeptical of pasta without a thick sauce like marinara or alfredo, but boy was my skepticism thrown off! This "light sauce" was SO powerful and definitely packed a punch to flavor the whole plate of pasta! I've made it 3 times in a row for lunch! It's THAT DELICIOUS! You won't feel guilty one bit eating this bad boy!


Light Asparagus Fettuccine

Fettuccine Noodles
Start cooking the fettuccine in salted boiling water

While the noodles are cooking, start making your "light sauce"

In a small sauce pan, 
Saute
1 garlic clove - minced
1-2 T.  chopped onion
in 2 T. Olive Oil

When the garlic and onion are fragrant and onions are transparent add:
2 T. White Vinegar
1/4 - 1/3 c. Water
1/2 tsp. Salt

Let the sauce simmer for a few minutes and add:
1 c. chopped asparagus

Let the asparagus simmer in the sauce until desired consistency. 
*I like my asparagus to still have a little crunch so I don't simmer it very long- maybe 2 - 4 minutes.

Drain you fettuccine when it's at your desired texture, and take a measuring cup and pour your "asparagus light sauce" over top.
*I know it looks like water, but you just taste it and you will see its a LOT more powerful than water! ha ha
Garnish with diced tomatoes - DELISH!


*This is the perfect amount of sauce for 2 servings - this is easily doubled or tripled 
*For more protein add cubed chicken! 


Linking up here

Thursday, February 20, 2014

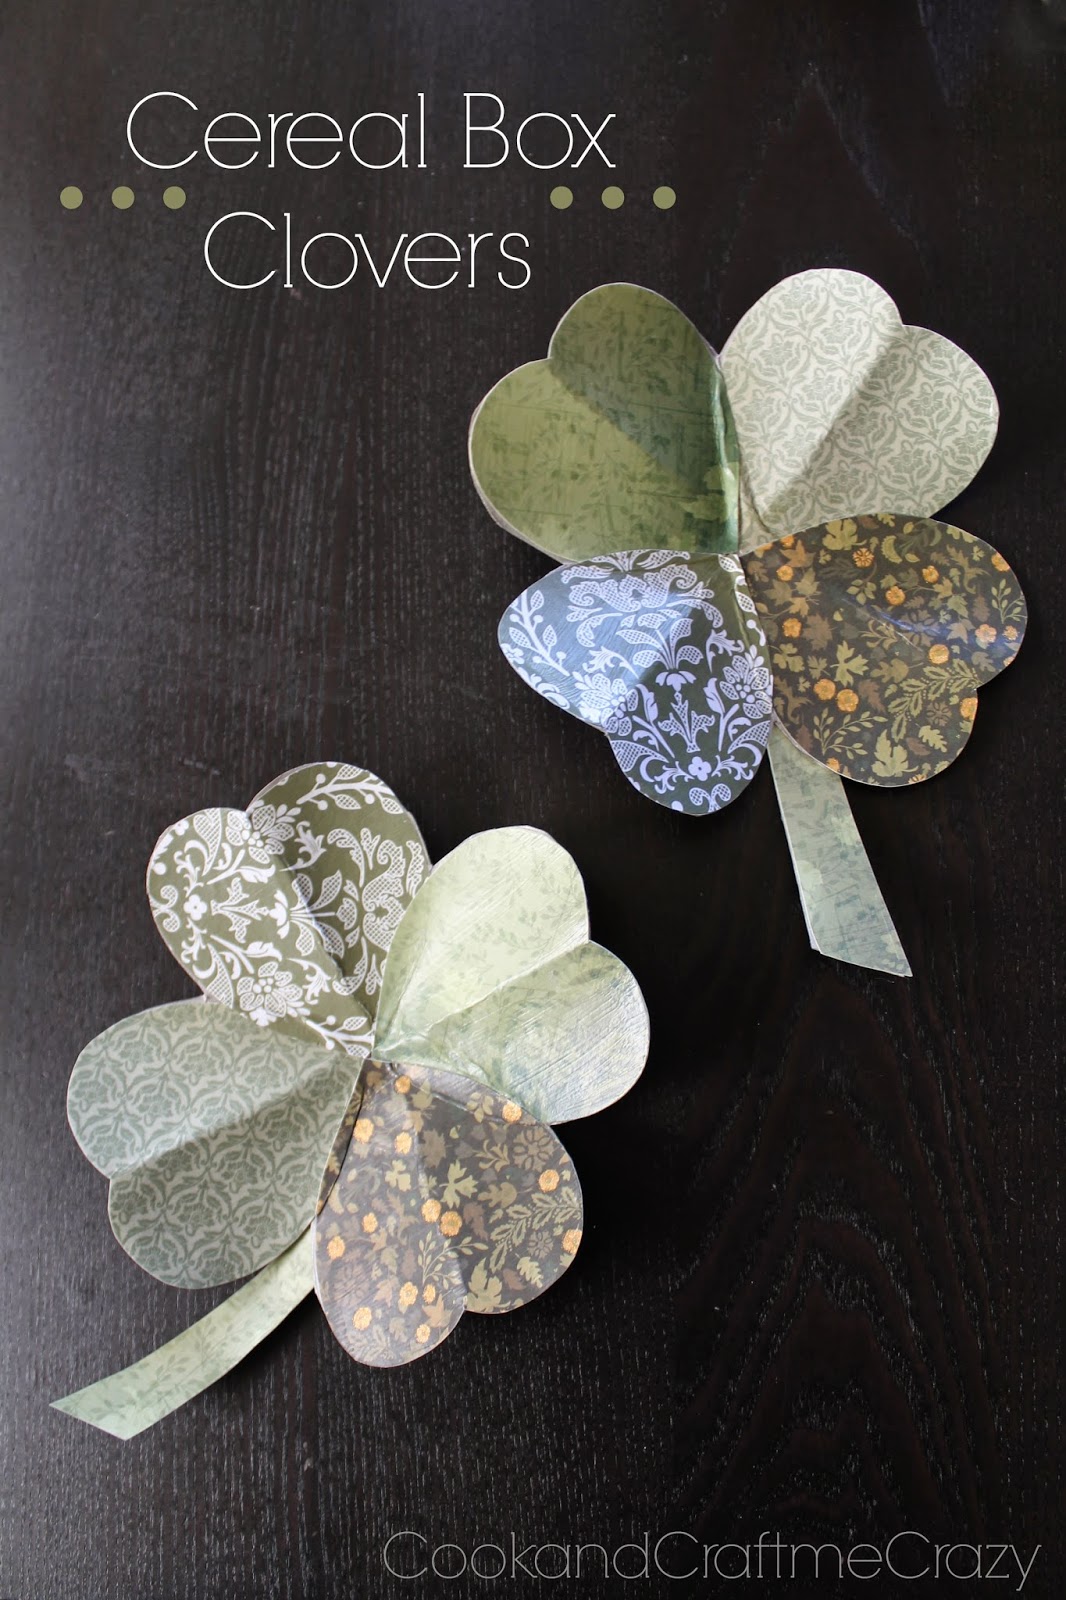
Cereal Box Clovers

Are you ready for Saint Patrick's Day?! We aren't, but our mantel/shelf sure is! I was so excited to come up with a classy/elegant St. Patty's Day decoration. I'm not so into all of the bright green- I wanted more of an older "Ireland" look. This is what I came up with! I took the inspiration from my Cereal Box Barn Stars and decided to make cute 3D clovers! I sent a picture of these to my mom and sister, and they couldn't believe they were cereal boxes! I was beaming!
 Here are step by step picture instructions for your convenience! 


First step - grab an empty cereal box and tear it down to one long piece of cardboard. Cut out a heart from paper -for your stencil.


Trace the heart 4 times to make a clover - overlapping the heart each time just a little. Then cut out your clover!
Now if you want 2 clovers like mine, you take your already cut out clover and trace it over on the other side of the cereal box! Now you have 2! AWESOME!


Bend the cardboard along each petal and between each petal like so...
It looks like you have an X and a T of folds.
The X folds go "IN" and the T folds, fold "OUT"


Grab 4 pieces of scrapbook paper. Trace the heart you used to make the clover 2 times per scrapbook paper. In the end you should have 8 hearts, 4 for each clover.


Arrange the cut out scrapbook papers on your cardboard. Get you mod podge ready with a paintbrush and a surface to paint on. (I use freezer paper)


Paint the cardboard first, place a scrapbook heart on top, then paint over the top to seal it down. 


Just when its about dry, but not quite, bend the clover again on all the creases you made previously so in the final stages of drying it stays creased and not flat.


While it's drying cut out 2 "Stems" from the scraps of your cereal box. Trace them onto scrapbook paper and mod podge them as well.


Finally add a little more mod podge to the stem and place it on the back of the clover. 
Let dry and hang where you like!
SO CUTE!
No one will ever guess they're cereal boxes!


Check out my Cereal Box Barn Stars!


Click HERE for full post


Linking up here


Tuesday, February 18, 2014

5-Star Authentic Guacamole

I recently returned from a week long visit with my family. My kids and I had so much fun! Upon my arrival my sweet parents surprised me with a daddy daughter date to a 5-star restaurant's cooking class! The restaurant is called the Red Reflet Ranch in Tensleep Wyoming. The cooking class was called "Authentic Mexico." My dad and I are some of the biggest Mexican food fans EVER, so this was AWESOME! We learned how to make so many authentic foods- it was such a fun experience! This Authentic Guacamole was our favorite! I've made it 2 times since the class! It's THAT GOOD!


Here's my dad and I making Empanadas!

This is the big bowl of Guacamole we made at our class! YUM!


5-Star Authentic Guacamole

2-3 Avocados - shelled and sliced or cubed
Fresh Lime to taste - (1 whole fresh lime is what I used)
Sea Salt to taste
Cumin to taste

-MASH with a potato masher-

Chopped cilantro - a good pinch
Chopped onion - (I used about 1 T.)
A little diced tomato

Stir and taste
(add more salt, lime, cumin etc. to taste)

It's GREAT being able to cater this to your desires!


Linking up here

Monday, February 17, 2014

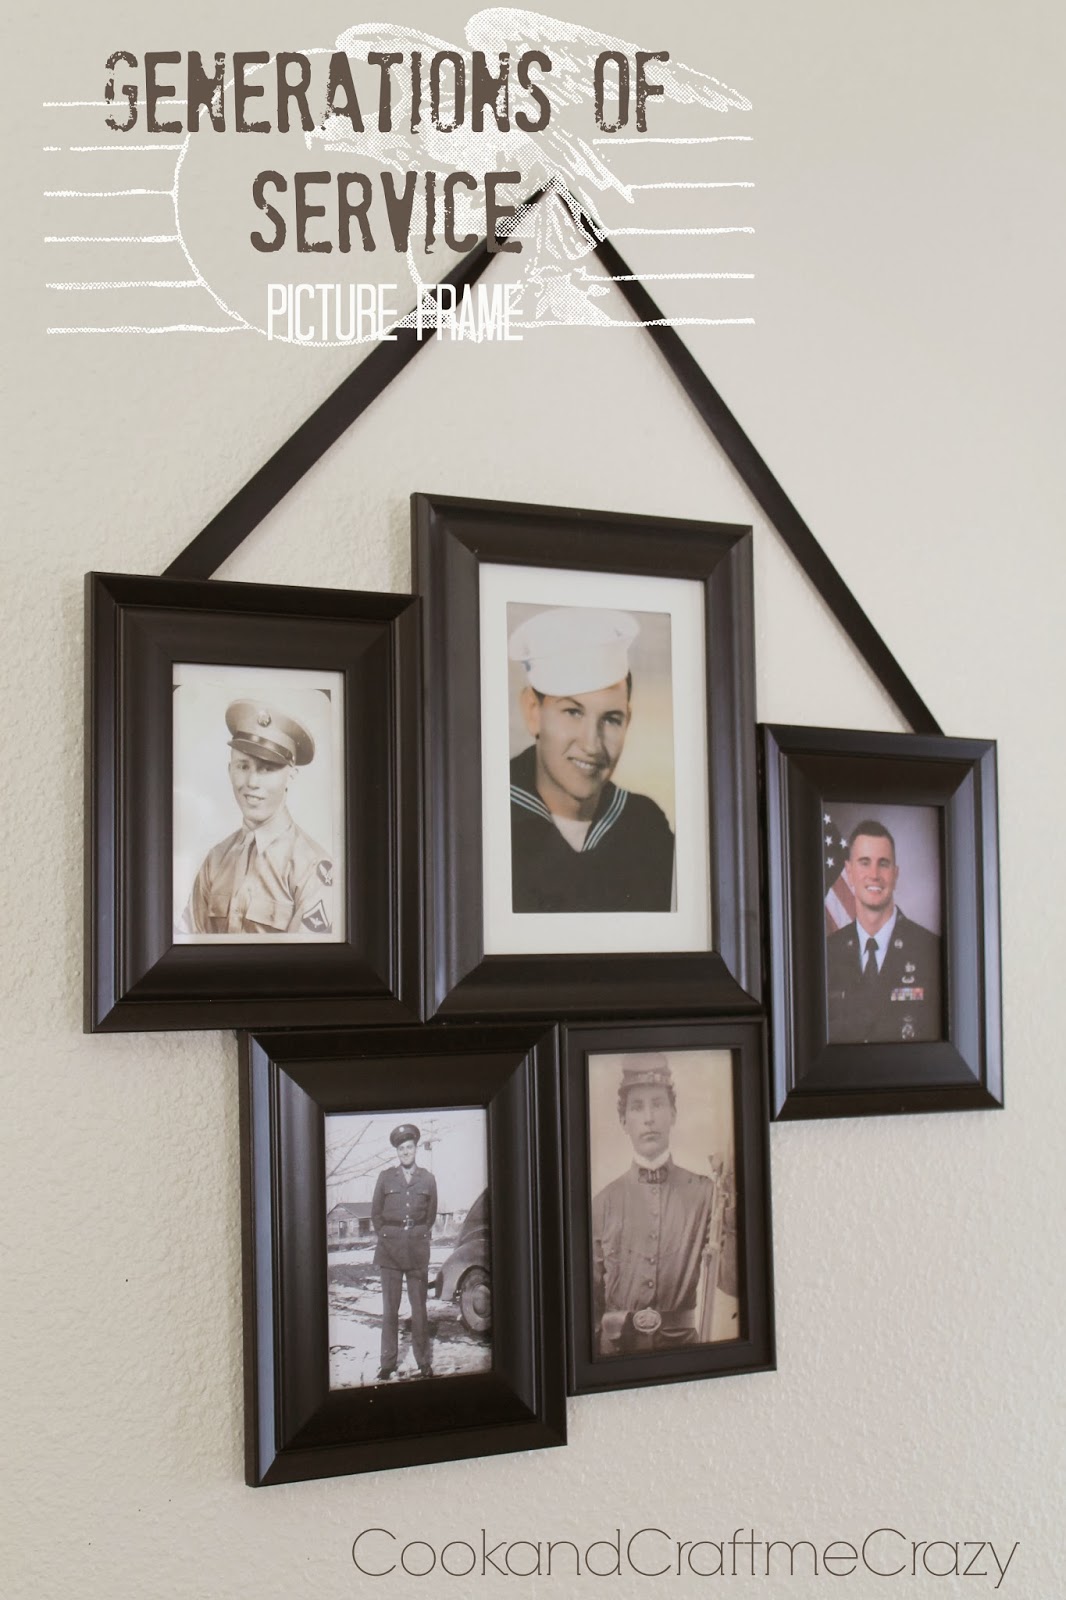
Generations of Service Picture Frame

We are a very blessed family. As I have said before, I'm an Air Force Wife, which makes our family an Air Force Family. Being in the Military has given me such and amazing outlook on our country. I am truly thankful from the bottom of my heart for the country we live in and the freedoms we enjoy. I have such a profound respect for those who serve in the military. I respect and admire those who leave their home to serve and protect us. I'm especially thankful for the families who stay behind. Wives, who are all too often over looked, who worry and wait for their loved ones to return. Your courage and strength are of the highest magnitude.
I am also truly blessed to have such an amazing family history of people who have fought for our country in the past. My dear Aunt Judy is an incredible historian. She has searched and compiled our family's history for centuries! I told her I was putting together a picture frame to display in our home of our relatives who have served in the military. I asked if she knew anyone other than my 2 grandpa's who had served. I was shocked to see when she sent me a picture of a Great Grandfather who served in the Civil War! The other 3 pictures are of my husband and I's Grandfather's who served in WWII, and the most recent as I assume you can tell, is my husband. 
I am so thankful for this opportunity to share with you my family's history in the military. It has blessed our lives and brought a beautiful respect and love for our country to our home. Every time the National Anthem goes off my children stop and salute, or cover their hearts. I'm so grateful they've learned that reverence and respect at such a young age for those who have given their all for us to be free. 

God Bless AMERICA, and God bless those who serve us!


Original Post about the Picture Frame Click (HERE)


I made this cluster picture frame from dollar store frames and glued them all together. I glued a ribbon onto the back to hang it. 
Everyone who comes to our home and sees this always comment on how nice it is to keep our nation's pride burning.


*This would be a great family project, and would be fun to hang in your home around the 4th of July if not all year round!


Linking up here