Image Map

Monday, December 19, 2016

Lazy Leftover Ham & Potato Soup

Any one else have left over ham they don't know what to do with? Well, I did, until I made this yummy soup! I was feeling like Ham and Potato Soup this afternoon. It's a balmy -2 today, (YES NEGATIVE 2,) and wanted something warm for lunch. I knew I had leftover ham in the fridge and making a soup would be a sinch! 

Well, I was feeling a little lazy when it came to peeling and dicing the potatoes thinking, "Man, that will take FOREVER!" Then I thought, "Hold the phone, I totally have cubed hash browns in the freezer! SCORE! I'll use those!"
This basically has 6 ingredients in it and makes a full pot. Not to mention it only took about 20 minutes TOTAL to make! OH YES!


Lazy Leftover Ham & Potato Soup

1 Small Onion - diced
24 oz. Bag Frozen Cubed Hash browns
2 c. Leftover Ham - cut into cubes/bite sized pieces
6 c. Milk
3 T. Green Onion - chopped
2 T. Chicken Bouillon (I would have used ham base, but didn't have any. This was a great substitute!)

In a large pot place 1 T. Olive oil and Diced Onion. 
Saute' for 3-4 minutes or until the onions begin to turn transparent.
Add Milk, frozen Hash brown cubes, Leftover Ham, Green Onion and Bouillon.

Simmer for 15-20 minutes. 

Salt and Pepper to taste. 
DELISH!


This is the season of giving! 
Throw some of this simple soup in a quart sized jar and give it to a neighbor, widow or friend. 


http://cookandcraftmecrazy.blogspot.com/2013/01/soup.html

Linking up here

Tuesday, November 22, 2016

Best Beef Chili

I've wanted to come up with my own beef chili for a while now, but it just never happened, until last night that is.  I wanted to make my chili extra thick and savory, and not to toot my own horn, but I NAILED IT!! DELISH to the last drop! I'm going to be making this often!


I am CRAZY about sour cream and cheddar cheese in my chili. It makes it so creamy and delicious! MM...mmm!

Best Beef Chili

2 quart Jars of Stewed Tomatoes (OR) 2 large cans Stewed Tomatoes (1 drained and 1 un-drained)
1 Green Pepper - seeded
1 small Onion
1 can White Great Northern Beans - drained and rinsed
1 can Kidney Beans- drained and rinsed
1 can Black Beans- drained and rinsed
1-2 lbs. Ground Beef 

2 tsp. Salt
2 tsp. Chili Powder 
2 tsp. Basil
1 tsp. Cumin
1/2 tsp. Cinnamon
1/2 tsp. Ginger
1/4 tsp. Garlic Powder
1/4 tsp. Cayenne Powder

In a blender place Onion, Green Pepper, and drained Stewed Tomatoes, blend until smooth. 

Pour into a stock pot and turn on heat to Medium/Medium High

In the same blender place the 3 cans of drained rinsed Beans, and undrained Stewed Tomatoes. Pulse until desired consistency.

Pour into the heating stock pot and stir until combined.

Add all the seasonings. 

In a separate skillet brown the ground beef with salt and pepper. Drain the grease the best you can. 

Add the browned beef into the chili and simmer for 15-20 minutes. 

Salt and Pepper to taste.

Garnish with sour cream and cheddar cheese.

**If too thick for you add Beef Broth in 1 cup increments.


One of my favorite things about blogging food is eating my pretty plate!
Yummm.....


Need more soup ideas? Click HERE!

http://cookandcraftmecrazy.blogspot.com/2013/01/soup.html


Linking up here

Monday, October 24, 2016

Laundry Room / Sewing Room Fix Up

I'm crazy excited about my new "sewing room/station." Ever since we moved into our home, last February, I haven't been able to find a permanent place to set my sewing machine. I sew constantly. I am mending holes in pants, fixing dresses, taking in shirts, and making pillows for us, family and friends. Seriously I use my sewing machine ALL the time! I've needed to find a set spot for my sewing machine that wasn't in the way but functional at the same time.

I went into my laundry room the other day and I looked at the small counter and cabinets next to my washer and dryer with new light. I don't fold my laundry in the laundry room, I fold it on the couch so I can watch a show and sit comfortably while I do a chore I sincerely dislike VERY much. 
The counter top and cabinets have been very under used. The drawers were empty and the cabinets held a few books. Nothing that couldn't easily be moved. 

(My brain conversation)
"Why have I not thought of this before!?! 
This will be PERFECT! I can put my presser foot into the large cabinet and sit up at the counter top. YES! 
Oh man, the blue cabinets. I am not a fan of these blue cabinets. The cabinets aren't the worst color though, someone took quality time to paint these, they're not that bad. Mixed with other colors, they could be nice... hmmm.... what could I do to bring in more color? I love blues and greens together... I could make a pallet that had this cabinet blue in it. But what could I do to fill the wall space? I want something fun, I want something cute to look at while I sew.... WAIT.... I HAVE IT! GIANT PAPER FLOWERS!"
(exit brain conversation)

I have been LOVING the pins on pinterest of "giant paper flowers!" They are GORGEOUS! I was in SHOCK at how easy they are to make! Just paper, hot glue and some time, then you have a wall to WOW at! Seriously! 
I am BEAMING at how I took something I already had and made a totally new space with supplies on hand! Look around your home and see things differently. Look for new options you may have not seen before. It took me 8 months to see this one. Possibilities in every home are endless!


My niece Maren and I made these fun paper flowers. She was a great help and loved getting crazy crafty with me. I simply looked at the great tutorials on Pinterest of how to make these giant paper flowers and just went for it! They were so easy! Just about an hour of time and we had 6 fun flowers to make my sewing station fun! 

Click HERE to see the Pinterest page of tutorials.


*Thanks for your help Mare-Bear!


Linking up here

Thursday, October 20, 2016

2 Ingredient Strawberry Fruit Dip

This summer my dear friend Jenn, got our family hooked on this recipe. I was FLOORED when she told me it was only 2 ingredients?! SAY WHAT??!!! 
Oh yes, only 2 ingredients make this perfect, delicious, smooth fruit dip! 
(You may drop your jaw)
This is a MUST at any party! Whip it up in 1 minute and serve! PERFECTION! 
Our little girl calls it "frosting!" So here it is, "Strawberry Fruit Frosting!"


2 Ingredient Strawberry Fruit Dip

1 small container Strawberry Cream Cheese (room temperature)
1 small container Marshmallow Cream

Place both ingredients in a bowl and whip with a mixer until smooth. 
Serve with fruit. Delish!


Linking up here

Tuesday, October 18, 2016

My Kitchen Makeover

I was talking to my cousins one day and had mentioned that we painted our kitchen when we first moved into our new home and they wanted to see pictures. I didn't have any side by side pictures at the time so here they are. I have honestly been putting off this post because I didn't want to have to explain in detail the true trial it was! This was a HARD. This was a very long challenging undertaking for us. I will not sugar coat it as some people may do. It took us a VERY long time. Many tears, sweat and sore muscles went into our house makeover.
Was it worth it?
YES, of course, in the long run, I am SOOO happy with how it turned out, but man it was ROUGH getting there! One of the longest months of my life!


We purchased our home and loved the layout and everything it had to offer. It was truly the perfect house for us. We were very fortunate to get it so quickly. I knew I would wanted to paint the walls and cupboards. They were very nice, but just not my style. The walls were creamy-gold and olive green. I am more of a "cool color" person instead of "warm tones." 

We painted the walls before we redid the floor, in case any paint got on the floor. If it did, it was okay, we were going to sand it off anyway. We still used drop cloths, but we weren't as careful. Our family in town helped us paint basically the whole house! We painted the whole upstairs the same color, so we purchased a 5 gal. bucket of paint. THANK YOU FAMILY FOR YOUR HELP! WE LOVE YOU! It helped so much to have a painting buddies! It goes faster and is way more fun! 
(I am a "master painter" if anyone needs a painting buddy, you know who to call!)

The hardwood floor needed to be refinished before we moved in. Just average wear and tear from the family and their dog before us. So we decided to stain the floor and refinish it ourselves. I can TOTALLY see why people PAY others to do it, and why it costs so much! PHEWPH! SERIOUSLY! Sanding the whole floor, sweeping and mopping for days (literally DAYS) because every speck of dust or dirt had to be off before you stain and seal it! I never thought I could get blisters from sweeping and mopping, boy was I wrong! 

I LOVE EVERYTHING ABOUT MY FLOOR! I wouldn't change a thing about it! 

Bless my husband's soul for giving me my dream floor, cupboards, and walls! He is the BEST!

We purchased a paint sprayer and my husband sprayed the cabinet doors. We tinted our primer and primed the doors 2 times, then painted 2 coats of paint. I primed and painted the cupboard edges. The hardware store now knows us by first name. One of us was in there almost every day for over a month. 

After painting, we needed to add hardware! I am a handle/knob person. I like to have handles on my cabinet doors. I've broken too many nails on cabinets and drawers that didn't have knobs or handles, so I made it a point that we were going to have hardware this time! I am very pleased with our choice. The only thing negative about the handles we chose is that the corners are SHARP! I wanted a very crisp line/edge on our handles but with little kids, they are not very forgivable. We have been scratched a few times from pointy corners of the handles, and learned fast to keep a safe distance. So my advice, if buying hardware for your kitchen or bathroom, check the corners to see if they are smooth or sharp.

(In the bottom left picture, you see my husband's can of spray on texture exploded!)


BIGGGG Note to self:
If anyone you know is moving in, or redoing any part of their house, take them a meal! They are beyond exhausted and do NOT want to cook dinner after a long day. 

-A simple meat tray and rolls
-Fried chicken and potatoes
-Deli sandwiches
ANYTHING
etc.

I broke down in tears when my sister came by out of the blue and brought us a rotisserie chicken and bakery cookies. It was a crazy long day and I had had it with EVERYTHING! She was truly a heaven send. It wasn't much to her, but to me it was everything that day. She was at the grocery store anyway and simply added two more things to her list. When you are at the end of your rope and someone gives you a hand, it makes the bad days turn good. 


Hardwood stain color: Harbor Mist (grey stain)
Cabinet Color: Late Night Serenade

Monday, October 10, 2016

Halloween Witch Workbench

I am so excited about my Halloween display this year! I have ALWAYS wanted a spell book, so I finally buckled down and made one! Thanks to Pinterest I found some free printable spell pages at "g*rated" and it was easy! I printed off the pages, glued them in an old empty journal and burned the edges. 

My daughter was obsessed with old "paint with water" coloring books and painted this picture last year. I kept it and put it on display! 

I painted a faux apple to look like the poison apple then added some old candles and old decorative keys... HELLO HALLOWEEN! 


Monday, August 29, 2016

Hold to the Rod - Our Family Motto

OH MY GOODNESS! I AM CRAZY EXCITED!
As a family we wanted to come up with a "motto" that defined us as a family, that we wanted to strive for and to always remember. We needed this "motto" to be something serious, fun and small child approved. My husband shared that one of his favorite scripture stories was Lehi's Dream with the rod of iron and the tree of life. My children and I also love that story. 
We unanimously agreed with "Hold Tight to the Iron Rod" as our motto. 

We even decided after family prayers to come in all together to hold our two fists together like we are holding on to the rod, and say "Hold TIGHT!" 

My kids LOVE "Iron Rod "Knucks." It makes it fun for them, and as they get older they can appreciate the constant reminder of holding on tight to the gospel of Jesus Christ.

I just stumbled upon this new necklace at LDS Bookstore! AHH! IT IS PERFECT! 

If you are in need of a constant reminder to hold strong to the iron rod, this is it!!!
I just ordered mine! WHOO HOO! So cute!


For a Lehi's Dream Family Home Evening click HERE!

Thursday, August 25, 2016

Keep loving, keep trying, keep trusting...

This is from one of my most favorite conference talks in the history of forever. It builds me up, teaches me, and gives me strength to go on. If I was a doctor, I would prescribe this quote by Jeffrey R. Holland 2 times a day every day.
KEEP GOING!
HEAVEN IS ALL AROUND US! CHEERING US ON TODAY, TOMORROW, AND FOREVER! 
WE CAN DO IT!


To read or hear the entire talk
CLICK HERE! It is worth every second of your time!

Monday, August 22, 2016

Ham Fried Quinoa

I made this quick one dish meal when I had extra quinoa that needed to be eaten. It was truly DELICIOUS! If you love Ham Fried Rice, then you'll love Ham Fried Quinoa!


Ham Fried Quinoa

1/2 c. Cut Carrots
1/2 c. Cut Zucchini
3 T. Copped Onion
2 Cut Celery Stalks
1 c. Cubed Ham
1 c. Prepared Quinoa (according to package directions)
2 Eggs - beaten
1 T. Soy Sauce

-In a medium skillet place 2 T. Olive Oil or Coconut Oil. 
-Saute veggies and ham over medium/high heat until tender with a few dashes of salt
-Add cooked quinoa, beaten eggs and soy sauce.
-Cook until eggs are cooked through.
-Serve!
DELISH!


Linking up here

Tuesday, August 16, 2016

Fruit and Veggie Game!

Which is a Fruit? Which is a Vegetable?
Help your children learn which foods are fruits, and which are vegetables. 
My kids LOVED this game. They took turns and played together, then raced and played individually. 
Learning about food can be fun!


Use the play food (or real food) you have on hand with 2 bowls or 2 baskets. 
One labeled "FRUIT" and the other labeled "VEGETABLE."

Play individually or play together!

Make it fun and educational.

Eat a fruit and vegetable when you're done if you want! 
Talk about the difference when you take your kids to the grocery store. Have them point out what is a fruit and what is a vegetable. The sky is the limit!


Linking up here

Tuesday, August 2, 2016

8x8 Gift Set (with printable recipes!)

I am so excited about how well this little gift set went together. If I look back at my graduation and our wedding I would have LOVED to get this gift!

I know I did well when I want to keep the gift I'm giving, then I know it's good!
This is the perfect present for graduations, weddings, house warmings etc.
Check it out!


Contents of the 8x8 Gift Set

1 8x8 Pyrex glass pan with lid

1 cute hand towel

1 nice hot pad

1 8x8 fudge brownie mix


3 Plastic spoons
 ----------------------------------
Place all contents except the spoons in the 8x8 pan. Place the lid on the pan. Tie a ribbon around the full 8x8. Place the 3 spoons under the ribbon with your card! Presto! The Perfect gift!

Need more gift ideas?


Linking up here
Tuesday, July 26, 2016

Blessings and Battles

During girls camp we had leader classes/devotionals during year certification. The leaders expressed how much they loved getting something out of girls camp that was geared towards them. I gave my class on Blessings and Battles. Our Girls Camp theme was "Armor Up" and so I thought this quote was quite fitting for my leader class. 
I designed this handout, 
and printed it off to give to the adults who attended the class. 


I asked everyone to think of a battle or trial that they had faced that is over, or a battle that they are still fighting. 

We had a beautiful devotional about seeing the blessings through the trials, especially when the battle was over. We could look back and see how many blessings happened but didn't notice while in the middle of it all. We thought and talked about how much closer we came to know our Savior personally through our hardest times. 

We had to be humbled, drawn to Him to beg for His help and mercy, then through His grace and blessings we came closer to Him.  (Ether 12:27)

I am so thankful I was able to give this devotional and share my testimony and faith in our Savior Jesus Christ. I know that in every difficult battle we face, He pours out innumerable blessings. It is our job to recognize His hand in all things, because He is truly everywhere!


Tuesday, July 19, 2016

Scripture Candy

Dear Readers,

I apologize from the bottom of my heart for taking almost a month off. I truly apologize. But between family vacations, reunions and being called as ward camp leader and stake girl's camp director (note to self, never accept both callings at the same time again), life this summer has been busy to say the least. I am however, really excited to share with you what we did, things I made for our stake girls camp, and other things I've been making over the summer but literally have NOT had time to post. Here is the first post I would love to share with you about Stake Girls Camp! Scripture Candy!


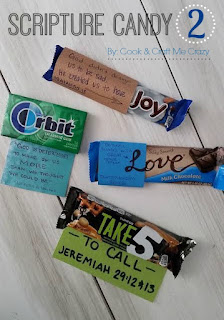
I came up with these fun "scripture candy bars" for girls camp. I have been to 13 girls camps so far and I am sure plenty more are to come. This SERIOUSLY worked AMAZING! Every year YW leaders roll their eyes and heave a big sigh when we say, "Secret Sisters!" I did NOT want that this year. I have seen it done MANY ways and my sister Candace (she is in the Stake YW presidency and was my right arm with girls camp) and I came up with a way to "level the playing field" for Secret Sister gifts. 

Truly this worked out AMAZINGLY! No one felt like they didn't get anything better, bad or best. We decided to have everyone bring CANDY BARS! REGULAR SIZE, no mini size and no large theater size candy. Simple and sweet. The thing they had to do with the candy was come up with a spiritual quote, scripture or saying that went along with the candy. Some candy or food items I saw over camp were:

Regular Candy Bars (all varieties)
Can of Pop
Packages of Gum
Small pkg. Gold Fish
Small pkg. Trial Mix
Small pkg. Oreos and other Cookies
Life Savers
Mentos
Sweet Hearts
Gatorade
Lollipops
etc. 

It seriously was awesome! The wards could come up with gifts and quotes together or the girls could individually bring their own. I never heard one negative comment from any leaders or girls about Secret Sister gifts, every leader said they loved it! SCORE!

These were the ones I made! We had the girls choose from a "young woman bowl" and the leaders chose from a "leader bowl." So leaders got leaders, and girls got girls. I had a wave of candy/scripture inspiration come over me and I made these in just a few minutes! Scrap pieces of cute paper and a sharpie. VIOLA! I was pretty excited to give these to my Secret Sister, and she loved them too.

NOTE: I am ALSO Ward Compassionate Service Leader and I will be making these for women of my ward who need a little "pick me up!" So these are NOT just for girls camp! They are for friends, family, ward family and everyone in between!


If you can't read them, here is what they say.
(I made these literally just a few hours before I left for camp)

Hershey's bar: What is your Favorite Scripture Hero? (Mine is Capt. Moroni - Alma 48:17)

York Peppermint Patty: "Yor Mint" for Greatness! D&C 64:33

Reeses: Read your Scriptures Daily! They give us true understanding. Proverbs 3:5

Kit Kat: Kneel before your King. "Gratitude turns what we have into enough."
(I wrote on the back a scripture about prayer and I encouraged to give a prayer of just thanks.)


Girls Camp ARMOR UP 2016
(I totally propped this up, set it on a timer then ran like crazy to get in there. 
It was hilarious! I'm the one bending over on the far right side.)


https://cookandcraftmecrazy.blogspot.com/2017/07/scripture-candy-2.html

Linking up here

Monday, June 20, 2016

Fruit Cups

I'm sure I'm like most of you out there, when you ask yourself, how can I add fruit or veggies to my lunch or dinner? It gets hard to always have fresh fruit and veggies for every meal. So I am happy to say, I have found a simple solution!

 I recently came upon small glass bowls at a local dollar store. I saw them and thought, "Those are the perfect bowl for fruit and veggie cups! Not to big, not too small, just the right size (as Goldilocks would say)." So...I got them. 
(I have to admit, I also thought they would be a great little dessert cup!)

We've been using these about 3 times a week for dinner, and random lunches. They're so fun. You cut up what fruit you have on hand and serve! No cooking or prepping before hand (other than chopping). My kids call them "rainbow fruit cups." I try, (notice the word TRY) to get as many colors as I can into the cup. Some day's I also try to just get all fruit the same color. It gets pretty fun! I love knowing I'm providing my family healthy natural fruit, that goes with ANY meal! Fast, easy and DELISH! 


Fruit Cups

Some of our favorite combinations:

-Apples, Oranges, Kiwi (as shown above)

-Apples, Bananas, Oranges

-Kiwi, Blueberries, Strawberries

-Raspberries, Bananas, Mango

-Watermelon, Raspberries, Strawberries (Red cup)

-Oranges - Mango - Cantaloupe (Orange cup)

-Kiwi - Honey dew - Green Apples (Green cup)

You get the idea! Have fun with it, enjoy fresh fruit cups with your family and friends! DELISH!

*** Sometimes our favorite fruits are very expensive, sometimes it's cheaper to buy them frozen. I take out some frozen blueberries (for example) and rinse them in a colander under warm water to thaw them out. They taste AWESOME! We do this with a lot of berries!


Linking up here

Wednesday, June 15, 2016

Lemon Cake Cookies

These decadent drops of heaven are seriously amazing. Lemon Cake Cookies, you wouldn't believe they're made from a cake mix! Only 4 ingredients make these lovely ladies.

My mom and I were taste testing half of these cookies and she had mentioned that these would be perfect to serve for a shower. Baby showers, bridal showers etc. They're light and have the perfect flavor. I couldn't have agreed with her more! 

I don't know if I've ever said on this blog or not, but I have an obsession with cookies. I would rather have a soft cookie than a piece cake any day. And what flavor of cookie is my favorite you ask? I honestly would have to say it depends on my mood. Some days I need a sweet chocolate to satisfy that craving, and others I need a sweet/tart like these lemon cookies. 

Everyone has different moods and emotions, it's the same way with food. 
What is your mood food today?
The day I made these, mine was LEMON! DELISH!


Lemon Cake Cookies

1 Lemon Cake Mix
2 Eggs
1/3 c. Oil
2 T. Lemon Juice

1. Mix all ingredients in a bowl. 

2. Place by rounds on a greased cookie sheet.

3. Bake at 350' for 8 minutes


Need more delicious Cookie Ideas?
I've got you covered! 
http://cookandcraftmecrazy.blogspot.com/2013/01/cookies.html

Linking up here

Friday, June 10, 2016

M&M Cake Mix Cookies

Easiest cookies EVER!
My kids LOVE anything with M&M's. I mean who doesn't!? They're bright, colorful, and delicious!

I made these for our church's youth group on Wednesday. I cranked 40 of these puppies out using only 2 cake mixes! SCORE! They were a big hit. These would also be a fun birthday party cookie.

 These confectionary trinkets are also made in less than 20 minutes. SWEET! 
And... they're made with a cake mix so it's even easier/faster prep! Check it out!


M&M Cake Mix Cookies

1 Chocolate Fudge Cake Mix
2 Eggs
1/3 c. Oil
1 tsp. Vanilla
------------------
1 c. Plain M&M's


1. In a bowl combine cake mix, eggs, oil, and vanilla until well blended. 

2. Fold in M&M's. 

3. Place by rounds on a greased cookie sheet. 

4. Bake at 350 for 8 minutes.

Serve with cold milk! DELISH!


Need more scrumptious cookie recipes?
I've got you covered! Click HERE!

http://cookandcraftmecrazy.blogspot.com/2013/01/cookies.html


Linking up here

Wednesday, June 1, 2016

Homemade Summer School

My little girl is going into Kindergarten this fall and she is totally pumped! I'm super nervous and also really excited to have her start on her education journey. Well, she just graduated preschool and the day after graduation she asked, "Is preschool today?!" I had a very distinct impression I need to do more for her this summer to help her keep the education she has gained, fresh. I also know how much she loves to learn and make projects so I decided to make her a "Homemade Summer School." This is definitely also for my active 3 year old boy who wants nothing to do with writing. He will greatly benefit from a little bit of pre-learning before he goes into preschool. 

I pooled together what I already had on hand and I am BEAMING with how it all turned out! I was shocked when I saw that I had everything to put our school wall together. 
We will be doing 3 days a week so WE don't get burned out. This will take a bit of planning and creativity, but thanks to the dollar store and their alphabet work books, and crafts this will be a cinch! 


Contents of the wall

1 capital/lowercase alphabet printed out on brown paper, cut with a circle punch then glued to a long strip of thick green wrapping paper! Use what you have! This took me 20 minutes to make!

1 green chalkboard - given to me by my sister a few weeks ago. (Thanks Candace)

2 bulletin boards with large black clips to post letter of the day, shapes, or artwork.

1 "Number Board" aka: scrap piece of wood with large black number stickers on it! 

1 magnetic dry erase board to use for circle time.

Desks or kids table. My little girl sits in her desk and my boy loves his kids table! 
It works great for my 2 kiddos. Seat according to the number of "students" you have!


Summer School Lesson Plan

Pledge of Allegiance 
(I bought a small flag to hang on the wall not it the picture)

Circle Time
1. Weather of the day
2. Letter of the day
3. Shape of the day
4. Color of the day
5. Number of the day

Workbook  Time
 Letter of the day page, and number of the day page
(Dollar Store Alphabet Workbooks)

Art/craft
Finger painting, chalk board drawing, color page, etc.

Story Time
Books with the letter of the day, color of the day, etc.

End of learning hour
Play time outside, inside, park, run errands to the grocery store. ANYTHING! Go get moving! IT'S SUMMER!


Check out a few fun kids crafts you could make for craft time!
http://cookandcraftmecrazy.blogspot.com/p/crafts.html 

Linking up here

Thursday, May 26, 2016

Thai Chicken Basil Soup

My husband and I recently went on a date to a Thai Restaurant. It was DELICIOUS! It was very authentic and unique for the rural place we live in. I wanted to recreate a soup I had there, but before I do....

I have a confession. I love to go to different restaurants, try something I know is different but bound to be good, and savor every bite as 
I examine every flavor/ seasoning I taste. "Hmm.... this has some basil and garlic in it." or "Hmm... I taste some cumin and paprika." Etc. My husband and I love to sit there and talk about the food. It's the closest thing to being a food critique on 'Chopped' as we can get. If the food is good I will attempt to recreate it, if it's worth recreating of course. Yes... some foods honestly aren't worth recreating. And yes, everyone has good and bad times ordering different foods, but look at the bright side; it's always an adventure! ;)

This Thai Chicken Basil Soup is an attempt at a recreation from the Thai Restaurant. And YES, it was worth recreating and I think I nailed it! Both stove style and in the Crock Pot! SWEET! 
And by the way, my little boy who isn't the biggest fan of soups over rice, LOVED IT! So, if he liked it, just about anyone will! Check it out!


Thai Chicken Basil Soup

3-4 Boneless Skinless Chicken Breasts
2 T. Olive Oil
1 T. Dried Basil Flakes
1 tsp. Powdered Ginger
1 Sweet Potato (peeled, cut and boiled in a small pot until just tender)
1 Orange Bell Pepper
1 Small Onion
1 can Coconut Milk
1 tsp. Salt

In a large soup pot, sauté chicken in the olive oil. Add the basil and ginger with a couple dashes of salt. 

When chicken is cooked through add the tender sweet potato. 

In a blender, place the onion, bell pepper and coconut milk; blend until smooth. 

Pour the liquid into the pot and Simmer for 15-20 minutes.

Add the teaspoon of salt.

Serve over rice. 

*To add more fiber and protein, add a drained can of garbanzo beans into your blender. It makes it thicker, but seriously SOO good!

-----------------------

Crock Pot Thai Chicken Basil Soup

3-4 Boneless Skinless Chicken Breasts - trimmed and cubed
1 T. Dried Basil Flakes
1 tsp. Powdered Ginger
1 Sweet Potato - peeled and cut
1 Orange Bell Pepper
1 Small Onion
1 can Coconut Milk
1 tsp. Salt

In a greased crock pot place cubed chicken, basil, ginger and cut sweet potato.

In a blender combine coconut milk, bell pepper, onion and salt. Blend until smooth.

Pour the mixture over the chicken and potato. Give it a stir to coat the chicken. 

Cook on High for 4 hours or Low for 6.

Serve over rice. DELISH!


Linking up here

Monday, May 9, 2016

Pot Sticker Soup

Need an easy soup? I DO! I love simple soups, and this one is VERY simple. 
I threw this together and it was gone in a matter of minutes. DELISH!

We love Chinese food and they always seem to have a yummy broth soup to start with at restaurants. When I made this our 3 year old son said, "Mom, this is Kung Fu Panda's Dumpling soup!" So, from now on, we will be calling this Kung Fu Dumpling Soup! You can call it what you like, Pot Sticker Soup, or
Kung Fu Dumpling Soup, both names are awesome!
Enjoy!


Pot Sticker Soup

5 c. Water
1 T. Beef Base (I love Better than Bouillon)
1 T. Apple Cider Vinegar
1 T. Soy Sauce
1/4 c. Chopped Green Onion
8-10 Frozen Pot Stickers

In a medium sized pot, combine water, beef base, vinegar and soy sauce. 

Bring to a boil. 

Add green onion and pot stickers. 

Cook for 5 minutes or until dumplings are tender. 

Serve immediately. DELISH!


Need more soup ideas? I've got you covered!
http://cookandcraftmecrazy.blogspot.com/2013/01/soup.html


Linking up here

Thursday, May 5, 2016

Chicken Nugget Salad

Did you ever think that something so "gourmet" could come from something so simple?!
Lunch is one of my least favorite meals; I'm hungry but never know what to eat! I don't want to cook a full meal because dinner will be in a couple hours, oh the struggles...sigh....

Let's be honest, as busy mom's with a million things going on, who has time to grill up chicken for lunch? Honestly?! Someday's I am so tired of cooking! I need something fast and easy! 
This salad is PERFECT! 
Make a fabulous salad with fresh and frozen ingredients. Done in 5 minutes! YES!


Chicken Nugget Salad

5-6 Frozen Chicken Nuggets cooked according to package directions (2-3 minutes in the microwave)
1/2 c. Frozen Blueberries (thawed in a bowl of warm water then drained)
2 c. Spring mixed greens (Or whatever salad you have on hand)

Top with your favorite salad dressing and dive in!

*Add some almonds, pecans, or walnuts to add an extra source of protein and delicious crunch.


Need more salad ideas? Click HERE!


Linking up here