Image Map

Monday, December 30, 2013

Metallic Painted Milk Glass

2014 - Here We Come! 
I love January. I especially love to decorate for January. Most people think, "Hey take a break between Christmas and Valentines day." Well NOT ME! I love to decorate January with SNOW FLAKES! Keeping the silver and gold still alive for one more month! So here it is, a $3 makeover of these fun milk glass vases. Check it out!


Take the milk glass vases you can find basically at any antique store or second hand store for $.10. 
Or grab the ones in your storage room from your mom you never use.
Take your 40% off coupon to Michaels or Hobby Lobby and buy some Silver, Gold or ANY Metallic spray paint.
Take them outside or in a well ventilated area and spray them down! Let them dry and place them on your shelf! 
The metallic paint made the designs in the glass stand out even more! I LOVE IT! 


Linking up here

Friday, December 27, 2013

10 Tasty New Year's Appetizers

I've put together 10 of my most favorite appetizers including dips, sauces and savory finger foods. I hope these help you in your New Year's Planning! They are sure to wow any rowdy crowd!


Linking up here

Minnie Mouse Party!

We recently celebrated our little June's 3rd Birthday! We've been talking about this Minnie Mouse party for MONTHS, and we finally did it! Here it is! I am CRAZY about how it turned out! We had a BLAST! Here is our display and decorations, along with our party favors! Fun, fun fun!


I made a quick little banner with my circle punch and some red paper, it turned out so cute!
The Minnie Mouse Pictures were coloring pages we got in a BIG coloring book. We colored most of the pictures and put them all over the house! It looked so cute!


We made Minnie Mouse Cupcakes! They were the bell of the ball!
http://cookandcraftmecrazy.blogspot.com/2013/12/minnie-mouse-cupcakes.html


My red desk...


Typing paper, my large circle punch and tape
Punch out circles, the put a roll of tape on the back and stick them all over!


Hello, Minnie Desk!


We made little "Bow Cards" for the party favors.
Fold some paper in half and cut a bow along the fold - so it can open and close, like these!


Here are our party favors! 
We wrapped a Minnie Mouse Puzzle, a Minnie Mouse Cup, Star and Button bracelets June made for all of her friends, Minnie Mouse stickers, a bow thank you card, and fruit snacks! 
(What little kid doesn't love fruit snacks?!)


Here they are all wrapped up with curly "q" ribbon


We had so much fun! If you ever throw a Minnie Mouse Party I hope this helps with ideas!


Linking up here


Tuesday, December 24, 2013

Merry Christmas!

Merry Christmas to all!
Here is the picture I took of our little sweethearts this year and wanted to share it with you!
I love the look of amazement and wonder in their eyes.
It's such a magical time of year. I pray we all remember the true meaning of Christmas and celebrate that every day of our lives.
For Christ gave His life for us, and we need to give our lives to Him.

What would you do if under your tree, gifts suddenly appeared and the tags read, 
"To: You
Love: Jesus Christ"
What would be inside? What are the gifts Christ has given to you?
What can we give to Christ in return?
Christ said, "If ye Love me keep my commandments." (John 14:15)
That means to never take the Lord's name in vain,
To LOVE thy neighbor as thyself,
Honor thy mother and father
etc.
He gave the ultimate price for us. Can't we show our love to Him by keeping His commandments and loving others as He loves us? 
It is so easy to get caught up in our day to day routines and never reach out to those around us. 
Cell phones are a wonderful tool to stay in touch, but also a great tool to keep us from seeing those around us who need our special attention and help. May we all be in tune to bless the lives of others around us every day.

I pray you ponder these things in your hearts and remember we celebrate this holiday to rejoice in Christ coming to earth, and to thank Him for His great gift and sacrifice to us.
What can we give to Christ?


Monday, December 23, 2013

Sweet Chocolate Chip Muffins

I love chocolate chip muffins. That's all there is to it. I've been making these muffins for a long time. My oldest sister Candace gave me a small recipe book when I graduated High School and this was a recipe that was in there. I have since tweaked the recipe a little bit, but they are still delicious as ever! These are a great breakfast or treat for any occasion. 


Sweet Chocolate Chip Muffins

Cream together: 
 1 c. Sugar 
1/2 c. Oil & 1 T. Butter    (You can substitute 1/2 c. Applesauce)

Add: 
1 egg
2 c. flour
1 tsp. baking soda dissolved in 1 c. Milk
2 tsp.vanilla
dash of salt
1 handful of chocolate chips
1/2 c. chopped walnuts (optional)

Mix well then pour batter into muffin cups with paper liners.
Bake at 350 for 15-20 minutes

(This makes about 18 muffins)


Linking up here

Saturday, December 21, 2013

Black Bean Dip

Yummy Yummy in our tummies! This Black Bean Dip is fresh and flavorful! I made this with our Healthy Homemade Tortillas for dipping and Oooo Wee, we were in heaven! We are big fans of black beans anyway, but this switch up was GREAT! I can't wait to make this for company with our Healthy Homemade Tortilla Chips! DELISH!
If any of you makes a layered dip or salad that calls for refried beans - this would be an AWESOME substitute!


Black Bean Dip

2 -15 oz. cans of Black Beans - drained and rinsed
1 1/2 T. Olive Oil
1 tsp. Cumin
1/4 onion finely minced
1 small clove of garlic - finely minced
1 tsp. salt

Place all ingredients in a food processor and blend until smooth. 
Place in a bowl and dive into it! DELISH!

Tastes great with:


IRRESISTIBLE!


Linking up here

Friday, December 20, 2013

Spongy Pancake Roll-Up's

Need a yummy breakfast to impress the company for Christmas? How about these Spongy Pancake Roll-Up's? They are light and DELICIOUS! The thing I love about these Pancake Roll-Up's is that you can fill them with your favorite things! We love apple butter - or Strawberry Breakfast Frosting - cream cheese and berries - raspberry or strawberry sauce etc. Everyone can make their roll-up's the way they want! YUMM!


Spongy Pancake Roll-Up's

In a bowl mix together:

2 c. Flour
4 T. Sugar
1 tsp. baking powder
a few dashes of salt

Then add:
4 eggs
2 1/2 c. Milk
4 T. Applesauce

Whisk until smooth. 
Warm a pancake pan (flat pan) on the stove. Grease the pan with cooking spray.
Place the desired amount of pancake batter. (I use about 1/4 c. of batter each pancake.)
When the pancake batter turns golden and little bubbles stop popping, flip over with a spatula to cook the other side. 
When both sides are lightly browned remove from the pan and place another 1/4 c. of batter. Then repeat. 

Fill the Spongy Pancake with your favorite fillings! Here are some ideas:

Cream Cheese and Berries
Apple Butter
Butter with Cinnamon/Sugar sprinkled on top
Whipped Cream and berries
Anything your heart desires!

Then ROLL it up and Enjoy!


Linking up here

Thursday, December 19, 2013

Minnie Mouse Cupcakes

We recently celebrated our little June's 3rd Birthday! My, oh my how time flies. We've been talking about this Minnie Mouse Party for MONTHS and we finally did it! Once June got into Minnie Mouse I knew exactly what I was going to do for her cupcakes! Didn't they turn out SOO CUTE?! They were definitely the bell of the ball! You can make them as simple or as elaborate as you want!
These are the more elaborate ones.


This is where you can choose the easy way or the more elaborate way.
for the simple way, grab your baked chocolate cupcake - simply take 2 Oreos and 2 toothpicks and stick the toothpick half way into the oreo's frosting and the other half into the cupcake to make 2 "ears." 
Then scroll down to the bottom to see how to make the bow. 
For the more "elaborate way" keep reading...


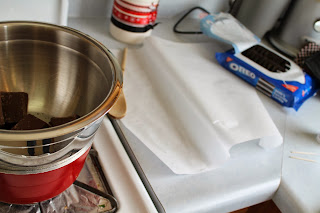
Make a "Double Boiler" by taking a small pan of water and bring to a boil. Take a metal or glass bowl and place it on top. Add in your Chocolate Almond Bark inside and stir until melted. 
(Use an oven mit to hold the bowl, it gets HOT!)
Have a sheet of parchment paper ready on the side
 with your Oreos and toothpicks.


Melt your chocolate down until it's nice and smooth


Stick a toothpick into an Oreo


Dip the Oreo into the chocolate to coat both sides - I laid the oreo onto the chocolate (sideways) instead of dipping straight down - it seemed to work better.


Then lay the chocolate oreo onto the parchment paper - removing the toothpick - you could leave it in if you want - it doesn't really matter


While my oreos's chocolate was setting up I took the left over melted chocolate and "painted/ frosted" my cupcakes with it!


When the chocolate on the oreo's and the cupcakes are set up, take a toothpick and insert it into the chocolate oreo
(unless you already left them in)


Push the toothpick into the cupcake on both sides for both ears! So cute!


For the BOW:

I made a double boiler and melted down White chocolate almond bark - I spooned the melted white chocolate into a frosting bag with a normal tip - it was HOT so I held it with an oven mit then I "drew/painted" white chocolate bows on parchment paper. Just 2 ovals and a small circle for the middle. I let them cool and presto - they peeled right up so I could stand them on my chocolate cupcakes! 

(Sorry I didn't take pictures- the party was about to start and I wasn't done making the games! It was WILD!)

They turned out SO CUTE!


Linking up here


Wednesday, December 18, 2013

Shred Your Chicken with a Hand Blender!

Need a fast way to shred your chicken? How about using your hand blender? One day I was tired of using my 2 forks shredding the chicken by hand, until it dawned on me that I could use my hand blender! IT WORKED LIKE A CHARM! No more double forkin' it to shred my chicken! This takes SECONDS! IT'S AMAZING! 
Your life will forever be changed!


Place halved chicken breasts into salted water (or chicken broth) and boil until center isn't pink.
Drain the chicken from the water (or broth) and place in a metal bowl. 
Grab your hand blender and go to town! Spice it up with chili powder - herbs - sauces etc.
You name it, you can add it! 
Our favorite it adding our Homemade Green Enchilada Sauce! YUMM! 


We use shredded chicken in tacos, on salads, in enchiladas, in lettuce wraps, the list goes on and on. 
I am SO glad I thought of this! It will make my life SO much easier! I hope it makes your life easier too!


Linking up here


Tuesday, December 17, 2013

Earrings - Organized

Doesn't EVERYONE get jewelry for Christmas? I know all of the girls in our family does. Well this comes to show that maybe a new way of organizing that jewelry is in order.
I love seeing all of the different ideas to display earrings on line, but I am always drawn to the more practical solutions. I've grown up with one of these in my drawer, and I would like to share it with you! This is an egg carton. I didn't paint it or change it in anyway. I like the brown color because I don't lose my dark earrings or my white pearls in it.
It's always fun to see people hanging their earrings on lace, or screens to keep them organized. I would love to do that one day, but I am a BUSY mom, so when I need earrings, I need them fast. And when the time comes that I take them off, I need to drop them quickly so little hands don't take them away.
This works for me. Maybe it will work for you! 


Linking up here

Saturday, December 14, 2013

Gem & Jewel Magnets

Need a last minute gift for your parents or in-laws? How about some Gem & Jewel Magnets? These are FAST and it gives them something to open on Christmas with a purpose! Do your parents or your in-laws love to keep pictures of your kids on the fridge? Well OURS do, so this was the perfect solution to our problem! We didn't know what to give them, that would ACTUALLY be used! So, here it is... and you lucky ducks get to see what's on my fridge! Photo strips taken when my husband and I were dating - to married - to announcing #2 - to family fun- to the latest taken last month! I LOVE picture strips and I'm glad we started them early! I can't wait for the years to roll by so we can compare one to the other!


1 container of gems and jewels from Hobby Lobby and Magnet buttons you can find almost anywhere!
Use E6000 glue! IT WORKED AWESOME!
I tried hot glue and the gems would fall off, the plastic and the magnet didn't adhere very well. Glue the magnets and the jewels together, let dry, then wrap them up! Such a fun little present! 


Linking up here

Friday, December 13, 2013

Jingle Bell Bow Ornament

My little June (who turns 3 next week) and I made this little Jingle Bell Bow Ornament together yesterday. She LOVES making ornaments of her own to add to our tree. We were given all of these supplies except the ribbon from CraftProjectIdeas.com. We LOVE the colors and fun textures it gives to our crafts. Juney and I sure love to craft together! Here's how to make this little jingle jangle with your little one!


Start stringing the assorted colored jingle bells with your sparkle elastic cords.


Have them string their name in these fun metallic alphabet beads - I love June's upside down U!
Tie them both into loops.


Tie both loops or cord together and grab your ribbon.


Tie all 3 ribbons into a bow all at the same time. 
With the extra cord, tie it around around the bow and make an extra loop for hanging!


Linking up here