These would be adorable invitations, cards, escort cards for tables, gifts, the possibilities are ENDLESS! I made these purses for our Young Women for a Valentine to receive at school. We are putting a few candies in the bottom and placing a small note. I am SOO EXCITED for Thursday! Here's how to make them! Bring on the paper and origami. They don't take long. Grab your paper, ruler, a pencil, ribbon and hole punch and we are ready to go!
First take your 8x11 card stock paper and mark with a pencil the following measurements on the 11" side.
Mark all your measurements on your piece of cardstock.
First fold both 3/4" sides IN.
Next keep both 3/4" sides folded and fold both 6 1/2" sides IN together as shown.
Un-fold the whole thing and fold your 2 center folds, the 4 1/2" and the 6 1/2"
Like so
Next fold the paper back up with the 3/4" and the 2 center folds.
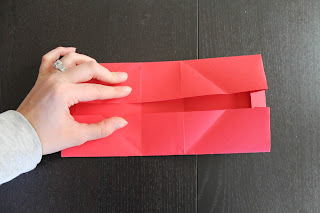
Next hold the paper down on the table, and bring the other side of the paper UP, to crease the diagonal lines to make the "box."
Crease the diagonal lines on both sides
This is what it should end up like
This is what the paper should look like when UN-Folded
On the Front side add your embellishments and have fun! It is A LOT easier to add your details when it is unfolded.
Next cut your 2 "straps" of ribbon to 12"
Put your "half loop" of ribbon through the holes on the front and back of the purse
Turn it over and pull the ribbon through evenly as shown
Tie the ribbon in a knot
As you can see by putting the holes there, the flap covers the ribbon. You can secure the 2 raw ribbon edges on the sides so its not shown by glue dots or tape.
Fold it all up and there you have it! My purse kept opening up so I put a glue dot at the top in the middle, and it held both sides of the purse together like a button. You can also put a piece of tape or a sticker over both sides to keep together! Enjoy your adorable paper purse for any cute gift or occasion!
Linking up here


No comments:
Post a Comment