Image Map

Thursday, February 28, 2013

Scarf Turned to Pillow

I recently went to a "trash to treasure" night where they gave a few door prizes. They gave me 2 scarves, one green polka dot and another pink polka dot. What cute colors for spring! They showed how you can put simple scarves you get from thrift stores to make cover pillows! HOW CUTE IS THIS?! 


All you need is a scarf and a pillow


Place the Pillow in the center of the scarf. The scarf needs to be turned to a "diamond".


Now fold 2 opposite corners over the pillow and tie in a knot.
Tie the other two corners together and PRESTO! You have an all new pillow! SO CUTE!


Linking up here


Wednesday, February 27, 2013

BBQ Chicken

This is my go to meal. I can cook everything in the oven all at once, and if I time it right its all done at the same time. I can cook the chicken, baked potatoes and corn muffins all in my single oven! It's AWESOME! And it tastes FABULOUS! Try it, I know you will love it too!


BBQ Chicken:

4 Boneless Skinless Chicken Breasts
1 1/2 c. BBQ Sauce
1/4 c. Honey
1/4 c. Heinz 57 sauce

Place the chicken in a greased glass pan. In a bowl combine the sauces and honey and pour over the chicken. Cook at 350 for 45 min to 1 hour. Once you put that in the oven, scrub your potatoes and poke 2-3 holes in the potato with a sharp knife and put them in the oven. Make your corn bread muffins according to the directions (add an extra egg to the batter to be more moist). Bake them in the oven with the chicken and potatoes. Put them in the oven when the remaining time on the chicken is how long you cook your muffins! So if the muffins take 20 min, put them in when your timer has 20 min left on the chicken. This way they will all be done at the same time! AMAZING! 

* Easily Doubled for large groups! Some of the BBQ sauce left over with the chicken is GREAT on your baked potato!

* I use an 8x8 glass pan and only make the small box of corn muffins. So my small 6 place muffin tin works great! They sit side by side in the oven and it works great! I didn't want you to be upset if your chicken pan and your muffin pan didn't fit in your single oven if you used larger pans. 


Linking up here

Tuesday, February 26, 2013

"Lucky" Season Picture

Living in a home with limited storage space it poses a problem when I want to have seasonal decorations. I came up with an idea of making 12x12 scrapbook pages for each season. I have a 12x12 picture frame next to my front door. The pages are changed out each month. It is cheap, and takes up next to no space. It also still gives us the "holiday" of the month feeling.


This picture was very simple. I grabbed a 12x12 solid green paper I liked. I grabbed my scrap box of scrap book paper and made 4 of the same "not perfect" hearts of different greens and patterns. I was given by my wonderful mother a book called sticker nestables. It is a whole book of thick sticker borders. That is the brown and green polka dot and the square design "frames". They are sticker borders I just slapped on there! SO EASY! I then came to my computer and typed up the "How Lucky Are We." I played with the fonts to make it fun, and printed it out. I cut and glued it onto a scrap book page I already used in the four leaf clover. I cut out a stem and then glued the 4 leaf clover down. It was super easy and looks GREAT!


Linking up here


Monday, February 25, 2013

Apricot Chicken

This recipe is tweaked from a dear friend of mine. She made this for our family when we had our little girl. It was SOO good, I begged and begged for the recipe. It is DELICIOUS! I make it for my family all the time. I love that it can be prepared two ways, in the crock pot, and in the oven! Score!


Apricot Chicken

2-4 Boneless Skinless Chicken Breasts
1/3 Jar of Apricot Preserves
1 c. Russian Salad Dressing (Wish Bone is the only brand that carries this I believe)
3 beef bouillon cubes (crushed)
3 T. minced or chopped dried onion

Oven Directions:
Cut the chicken into strips and place in an 8x8 greased glass pan. In a bowl mix the apricot preserves, Russian salad dressing, beef bouillon cubes and minced onion all together and pour over the chicken strips. Bake at 350 for 40-45 min. Serve over brown rice. DELISH!

Crock Pot Directions:
Cut the chicken into cubes. Place in a greased crock pot. In a small bowl, combine preserves, salad dressing, beef bouillon cubes, and minced onion. Pour the sauce over the chicken. Cook on HIGH for 3 hours. Serve over rice.

Need more recipes with chicken?

Linking up here

Sunday, February 24, 2013

Stand Strong

This past week something amazing happened. The roses my sweet husband gave me for Valentines did something quite unusual. 


On Valentines Day after my mall walk, my sweet husband surprised me with a dozen roses and a box of chocolates! He knows me so well. The old floral designer came out in me and I arranged my flowers. They looked lovely for a few days as they usually do. Then all of a sudden all the roses I arranged except the top center rose started to wilt and droop down. I was shocked so I hurried and changed the water and trimmed them. I thought this would help them "revive" themselves, as it usually does with all flowers. And over the next 2 days the roses kept wilting and drooping even more but the rose in the middle stood tall and beautiful as it unfolded its petals. 

What a sweet thing that we can liken to ourselves. We need to stand tall while those around us may fall. Sometimes the world wants us to droop like everyone else. There are uplifting things we can drink as roses. There are also toxic things we can sip. Those "drinks" of life will determine the longevity of our "blooming" life.  We can choose to stand our ground and still bloom beautifully in the midst of harsh, and "failing" circumstances. I am sure this Rose had many opportunities to fall just like those all around her. She had a choice, and she made a choice. Stand strong, or wilt with the crowd. What will your choice be?


Saturday, February 23, 2013

Copy Cat Cafe Rio Lime Rice

As I have said before we are some of Cafe Rio's BIGGEST fans! Well I have done it! This rice is as close as you can get to the real thing! It's delicious and goes great on salads, burritos, tacos etc. It's easy, and tastes amazing.


Copy Cat Cafe Rio Lime Rice

2 T. Olive Oil
2 c. Long- Grain White Rice (I use Jasmine)
2 c. Water
2 c. Chicken Broth
1 T. Dry Ranch Seasoning
1/4 c. Fresh Cilantro - chopped finely
1/3 c. Lime Juice

Heat the olive oil in a medium large saucepan or skillet. Put the rice in and saute for 1 min. Add the water, chicken broth, and ranch seasoning. Cover and simmer on medium low for about 18 min. Remove from heat and fluff with a fork. Add the cilantro and lime juice and fluff again. Salt to taste. Eat it up!


Linking up here

Friday, February 22, 2013

Ticket Stub Memory Box

When my husband and I were dating I kept a shoe box full of all the papers and ticket stubs we went on dates to. I was "de-junking" my closet and stumbled upon it. I wanted to display them visually as we  passed by, but not take up much space. I saw on pinterest a long time ago a lady who made a shadow box of ticket stubs. I loved it. You can put all the tickets you had, and still add more with a simple slit on top. My husband and I love ours. We shake it up every few weeks to surface more memories. Dig out all your old tickets, room keys, passes, programs etc. and make a fun filled memory box you can continually add to.


My sweet mother in law found this and gave it to me. She knew I would use it. It's a different kind of shadow box. The front opened on small hinges to be able to show the contents inside. I loved it because there was a lot of room on the top and side to slide in larger and "thicker" programs.
 I put a long piece of black electric tape on the bottom to "seal" the front "door" and the box together to prevent the tickets from falling out. I printed off a picture of the "admit one" tickets. I cut them out and glued it to the top left corner on the outside of the box. This was a simple fun project that brought back fun memories that were forgotten.  

*You can purchase this kind of shadow box or a "normal" shadow box that seals up from the back. You would need to cut a long slit or hole on top to be able to keep adding to your memory collection. It would look just the same! Have fun! 


Linking up here

Thursday, February 21, 2013

Wednesday Link Parties!

High Heels and GrillsWednesday Whatsits Button


Lemon Pepper- Garlic Pork Loin

We try to have nicer dinners on Sunday's. We just don't like all the work behind them. We always put Sunday's dinner in the crock pot so its done when we get back from church. This past Sunday we had this Lemon Pepper- Garlic Pork Loin with Twice baked Potatoes and salad. We invited a friend over and  after we ate she said, she's hated pork since she was young but didn't want to be rude not eating, She ate it and said I converted her back to liking pork! Talk about a Home Run!


Lemon Pepper - Garlic Pork Loin

1 lb. Pork Loin
1/2 tsp. Lemon Pepper
2 tsp. Minced Onion
1 tsp. Salt
3 Garlic Cloves Sliced
1 c. water

Place the thawed pork loin in a greased crock pot. Sprinkle all the seasonings on top of the pork loin. Pour the cup of water around the pork when all done. Cover and cook on high for 3-4 hours. 

*This is exactly how it looks coming out of the crock pot. The seasonings don't have to be spread out perfectly. 


Linking up here


Wednesday, February 20, 2013

Crock Pot Chicken Parmesan

We looked for a good Chicken Parmesan recipe for years. We didn't want to take 3 hours of constant baking, broiling etc. We found this recipe and instantly fell in love. It's easy and best of all its in the Crock Pot! You know I love anything with Crock Pots! Try it, it's sure to be a family favorite. 


Crock Pot Chicken Parmesan

4 Boneless Skinless Chicken Breasts
2 Eggs-beaten
1 c. Bread Crumbs
1 tsp. Italian Seasonings
2 T. Grated Parmesan Cheese
1 jar Favorite Spaghetti Sauce (26.5 oz)

Grease your crock pot and have your thawed chicken ready to go. 

Next grab 2 shallow bowls. 
In one shallow bowl crack your eggs, and lightly beat. 

In the other shallow bowl place your bread crumbs, tsp. of Italian seasonings and grated Parmesan Cheese. Mix gently. 

Take your thawed chicken breasts and dip in the beaten egg to coat.
Next place the "eggy chicken" in the bread crumb mixture to coat. 
Place the coated chicken breast in a greased crock pot.
Continue to dip the rest of the chicken into the egg and the crumbs until all 4 breasts are done. 

Sprinkle some more Parmesan Cheese on top of the chicken breasts in the crock pot. Open your can or jar of spaghetti sauce and pour all over. Cook on high for 3 hours. Serve over your favorite noodles! DELISH!


Linking up here

How to Tuesday!


Tuesday, February 19, 2013

Paper Plate Balls

I saw this idea flipping through a magazine at a dentist office a long time ago and wanted to try to make them. They took me about 15 minutes! They have MADE my little girl's room! I can't wait until Summer so I can spray paint them fun colors. They are super easy and a fun way to add dimension to any room.


First all you need is 20 of the thinnest paper plates you can find, a stapler and extra staples


Fold all 20 plates 3 times to make "triangles" in the middle as shown


Next, to make the top and bottom of the ball you will take 5 of your folded plates and staple them to make a 3D half circle.

When you staple the plates together you match the creases and  press the "flaps" of the plates together and staple it 3 times.

All tips of the triangles meet together at the top, and the "flat" end of the triangle on the bottom to make the 3D half circle. 


Make 2 of these 3D half circles. One for the top and one for the bottom.


Next  take the rest of the folded plates, there should be 10 left. Staple them all together in a long line. The first plate, triangle tip up, the second plate, triangle tip down, next triangle tip up, and the next triangle tip down and continue with all 10 plates like so...

Next, staple the long line of paper plates together to make a ring. This is the middle of your ball. 


Next place your half circle "top" onto the top of the ring. The flaps of the triangles should meet. Staple them all together.

When faced down, it should look like this.


Next add the bottom circle 


Staple all the flaps together 


And you have your paper plate ball! Staple ribbon to the top of the ball to hang.


Linking up here


Monday, February 18, 2013

Banana Nut Breakfast Bars

For some reason I'm always rushing in the morning. I don't know if  having 2 little ones has anything to do with it, but I never have time for breakfast. This recipe has saved my hungry tummy. I make these, cut them into bars and freeze them. I pull one out almost every night so it's thawed for the morning "go time." They taste great and are healthy compared to alternative breakfast bars. They're also a favorite snack in the house!  Make them, freeze them, love them!


Banana Nut Breakfast Bars

1 1/2 c. Flour
1/2 tsp Salt
1/2 tsp. Baking Soda
1 tsp. Cinnamon
3/4 c. Brown Sugar
2 c. Quick Oats
3/4 c. Chopped Walnuts (if desired)

2 Eggs
3/4 c. Apple Sauce
3 Medium Bananas (Mashed)
1 tsp. Vanilla Extract

Mix all dry ingredients together in a large mixing bowl. Mix all wet ingredients in another mixing bowl. Combine the dry and wet ingredients and mix together. Grease a 9x13" pan. Pour the Banana Nut mix into the pan and spread evenly. Bake at 400 degrees until golden brown. About 20-25 minutes. Let cool in the pan. Cut into bars and put in small ziploc bags and freeze.

*Take one out the night before to thaw so its ready for the morning. 
(if you forget to take one out the night before, put it in the microwave for about 30 seconds)
*These are also great in Lunch Boxes to keep the food cold and its thawed for lunch! Delish!


Linking up here


Sunday, February 17, 2013

Speed Racing Card

I love this card. I have used it for Dad's, Grandpa's, little boys, cousins, and nephews. I made 5 of them all at the same time. It is a fun and classy card. Make one to take to someone you know. They are easy and great to make in bulk.  


Start out with a blank card. I buy my blank cards at Walmart in their scrapbook section. They have packs of 6 or 8 cards with envelopes for $1. 
Grab a sky blue card stock and cover the front of your card. 
Next cut a thick strip of black paper for your road. 
Glue down the black strip on the bottom of your card over the "blue sky."
Next make a thin yellow strip (you can also make yellow dash lines) for your road. Glue the yellow strip (or dashes) onto your "black road." 
I was given these cute car stickers as a gift at one of my many Girls Camps. The cars have a green border around them so I peeled them off and put them on a white rectangle of card stock. 
I then glued the car and white card stock "rectangle" onto green scrapbook paper that matched the border around the car. 
I cut out the now "green and white rectangle" with the car sticker and glued it at an angle onto my road to look like it was racing. 
I finished the card by cutting out a "cloud of dust" in white card stock and shaded it with pencil. Glue that at the car's "exhaust pipe" to add dimension. 

Give to someone special for a birthday, a thank you, a thinking of you.
"Hope your Birthday doesn't race by too fast..."
"Hope your Day doesn't speed on by..."
"Thinking of you in your fun car racing the summer away..."
"Thanks for speeding to my aid!"
"Thanks for racing to rescue me!..."
etc.


Linking up here

Saturday, February 16, 2013

Copy Cat Cafe Rio Salad Dressing

We are probably the biggest Cafe Rio fans in the world. Ask anyone in our family, we LOVE, LOVE, LOVE Cafe Rio. We also try to make everyone else like it as much as we do! We have tried a few recipes for Cafe Rio's salad dressing and we have finally figured it out! It will make any salad a absolute masterpiece!


Copy Cat Cafe Rio Salad Dressing:

3/4 c. Buttermilk
1 c. Mayonnaise (you can also substitute the mayo with sour cream, both ways are delish)
3 T. Dry Ranch Seasoning
2 Tomatillos (remove the green "tissue paper" like skin)
1/2 bunch of Cilantro
2 medium Garlic Cloves
1 small/medium Jalapeno (cut in half and remove seeds)
1 T. Lime Juice

Combine all ingredients in a blender and liquefy until smooth. Refrigerate leftovers for more delicious salads. *The longer it stands in the fridge, the spicier it gets.


Dessert Now, Dinner Later!    Linking up here


Friday, February 15, 2013

Surprising Barn Stars


I am passionate about saving money but still having a beautiful home. Its tricky to keep on a tight budget. I have found many ways to make Barn Stars fun made with scrapbook paper, but this one took me away. I didn't believe it at first sight, but now I am hooked and telling everyone...


These Beautiful Barn Stars are made from...


CEREAL BOXES! Can you believe it?! People who come over to our home always comment on how cute they are, until I turn them around and they look at me like, "WHAT?!" 

They are so simple and ADORABLE, you will want to make them today. I saw this on funkyjunkintereiors.net a few years ago and fell in love with the idea!

 First go to Google and print out a perfect star on paper. Cut it out and grab the largest cereal box you have. Trace the perfect star onto the box and cut out the star. Next fold the star "in half" all five points around, really make the seams deep for a more 3D Barn Star. Then paint, cover, or scrapbook paper away! The options are endless, and definitely cheap! 


Linking up here


Healthy Homemade Tortillas

Homemade Tortillas are a staple at our house and I am sure they will be at yours too. You can half the recipe or quarter the recipe to fit the amount of tortillas you want for your meal. There is nothing like a fresh tortilla! We will NEVER go back to store bought tortillas again. Not only are these healthy but they taste amazing!


Tortilla Recipe

2 3/4 c. Unbleached flour (the unbleached flour makes a difference in taste)
1 1/4 tsp. table salt
1/4 c. Olive Oil (Olive oil makes a HUGE difference in taste as well)
1 c. water

Mix your flour and salt together in a mixing bowl. Add the Olive Oil and the water into the flour and salt mixture. Mix, Mix, Mix. Separate the dough into balls about the size of a golf ball. When you are through with separating the dough grab your rolling pin and your thinnest TEFLON pan. The teflon makes it possible so you won't have to cook them in grease or oil. You can also use an electric griddle. 

Turn on your stove to medium/medium high and put your pan on to begin heating. On a lightly floured surface roll out the dough balls with a rolling pin as the pan gets hot. Place the rolled dough onto the hot pan to cook. As the tortilla is cooking roll out another ball. Flip your tortilla over when the tortilla gets golden on top and bubbles start to form. Keep an eye on your cooking tortillas to prevent burning! Everyone's stove burns differently, so you'll want to play with your heat to see what works best for you. Continue to roll out all your dough balls to make your amazing tortillas. This recipe makes about 14 tortillas.

*I like to make a big batch and keep the rest in the fridge for future meals! You will never go back! This is definitely worth your time and effort! 


Linking up here

Thursday, February 14, 2013

Love Design Canvas

Happy Valentine's Day! A couple years ago one of my friends found this idea and we made them together. I loved the idea that you can make this as simple or as elaborate as you want. 


Grab a 20"x 16" canvas and some chip board letters at a craft store and paint them whatever color you want. I then hot glued some fun scrap book paper on the painted letters to add detail. Hot glue the letters onto the painted canvas and you're done! Super easy and SUPER cute!


Linking up here

Wednesday, February 13, 2013

Crazy Good Cole Slaw

This Cole Slaw is our favorite recipe ever! We have tweaked and tweaked it and have finally made it the best recipe EVER! 


Crazy Good Cole Slaw

1/3 c. Mayonnaise
1/3 c. Sugar
1/3 c. Buttermilk
2 T. Lemon Juice
1 T. Vinegar
1/2 tsp. Salt
1/2 tsp. Onion Salt
Dash or 2 of Pepper
2- 16 oz. bags Shredded Cabbage

Combine all ingredients except cabbage in a mixing bowl. Whisk until all combined. Get a large bowl or large container with an air tight lid. Put cabbage in the large container and pour the liquid over.(I love the air tight lid so I can shake it to mix it up) Put in the refrigerator to set. Shake or stir every few hours. Let sit at least 4-5 hours in the refrigerator before serving. It always tastes better when it "soaks" over night. This goes great with Pulled Pork, Sloppy Joes and Sweet Potato Fries. I love to make this for big family gatherings, or Barbecues so I can make it ahead of time. DELISH!


Linking up here


Tuesday, February 12, 2013

Skinny Sweet Potato Fries

These Skinny Sweet Potato Fries are wonderful for barbecues, dinner and lunches. We love to make them with Pulled Pork Sandwiches. They are easy and taste great!


Wash and peel your sweet potatoes. Cut them into fry "strips." Put in boiling water and boil for about 4 min. (They are done when they are tender when poked with a fork but don't fall apart) Place the fries on a greased cookie sheet. Put on the top rack of your oven. Set oven to Broil and bake until browned and crisp on one side. Pull them out and rotate the fries about every 5 min.(depending on how fast your oven cooks) All sides of the fries should be browned or crisp.  Sprinkle a little salt on top and dip in your favorite ranch or blue cheese sauce and gobble up! Hope you love them as much as we do!


Linking up here

Monday, February 11, 2013

Valentine's Paper Purses

These would be adorable invitations, cards, escort cards for tables, gifts, the possibilities are ENDLESS! I made these purses for our Young Women for a Valentine to receive at school. We are putting a few candies in the bottom and placing a small note. I am SOO EXCITED for Thursday! Here's how to make them! Bring on the paper and origami. They don't take long. Grab your paper, ruler, a pencil, ribbon and hole punch and we are ready to go!


First take your 8x11 card stock paper and mark with a pencil the following measurements on the 11" side.


This is the 8" side. I put the 2 dots on there for you to see where to put your holes for the ribbon "straps."


Mark all your measurements on your piece of cardstock.
First fold both 3/4" sides IN.


Next keep both 3/4" sides folded and fold both 6 1/2" sides IN together as shown.


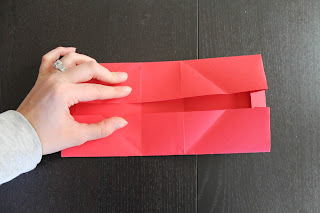
Un-fold the whole thing and fold your 2 center folds, the 4 1/2" and the 6 1/2"


Like so


Next fold the paper back up with the 3/4" and the 2 center folds. 


Next hold the paper down on the table, and bring the other side of the paper UP, to crease the diagonal lines to make the "box."  


Crease the diagonal lines on both sides


This is what it should end up like 


This is what the paper should look like when UN-Folded


On the Front side add your embellishments and have fun! It is A LOT easier to add your details when it is unfolded.


Next cut your 2 "straps" of ribbon to 12"


Put your "half loop" of ribbon through the holes on the front and back of the purse


Turn it over and pull the ribbon through evenly as shown


Tie the ribbon in a knot


As you can see by putting the holes there, the flap covers the ribbon. You can secure the 2 raw ribbon edges on the sides so its not shown by glue dots or tape.


Fold it all up and there you have it! My purse kept opening up so I put a glue dot at the top in the middle, and it held both sides of the purse together like a button. You can also put a piece of tape or a sticker over both sides to keep together! Enjoy your adorable paper purse for any cute gift or occasion!  


Linking up here