Image Map

Monday, September 30, 2013

Pizza Bites

I am crazy about pizza, I mean who isn't? But it takes way to much time to make (I am very impatient when I'm hungry), especially for lunch. As I have said before, I hate cooking for lunch. I never want to make a big meal because I am already doing that for dinner, but yet, I am hungry for something other than leftovers. So... here is another one of my favorites. Pizza Bites. This is so fast and delicious it will Blow Your Mind! Bread, Bruschetta, French Bread, Italian anything really. Tomato Sauce, Mozzarella Cheese, and Pepperoni if you'd like. Literally only 4 ingredients, only 3 without Pepperoni. HOLY YUMM, and FAST!
This is a fabulous appetizer too. I mean come on, who doesn't love pizza?!


Simple Steps to Pizza Bites

1. Cut your bread into even slices

2.Spread Tomato Sauce over each piece

3. Sprinkle Mozzarella Cheese over top

4. Add a Pepperoni to each slice if desired

5. Broil in the oven until golden


PURELY DELICIOUS


Linking up here

Friday, September 27, 2013

Almond Chicken Lettuce Wraps

I have to admit, I LOVE LETTUCE WRAPS! They are lighter meal and delicious to say the least! I especially love lettuce wraps for lunch. My sister and I talk about this all the time, how lunch is one of the hardest meals to cook for. You're hungry but you don't want to cook a full meal because that's dinner! Sigh... so this is my newest "lunch addiction." I love being able to make these in less than 10 minutes and I can make them just for me or I can cater them to multiple people. How awesome is that?! These have been my favorite so far, it's a one pan wonder!


Almond Chicken Lettuce Wraps

2 T. Olive oil
1 lb. Chicken - small cubes
1 c. carrot shavings or matchsticks
1/2 small onion
1 clove garlic - minced finely
1 c. Cooked Brown Rice
1/4 c. sliced almonds

(Mix all together in a small bowl to make the Sauce)
2 T. Brown Sugar
1 T. White Vinegar
2 T. Ketchup
3 tsp. Soy Sauce


In a large skillet add Olive oil. Place onion, small chicken cubes and brown. Then add garlic, carrots, cooked rice and almonds. Add the sauce, and simmer until sauce is thickened.

Scoop the chicken mixture into Boston Lettuce Leaves. (They're more flexible, but Ice Berg and Romaine work too!) And garnish with more almonds and carrot shavings or matchsticks! DELISH!


Linking up here

Wednesday, September 25, 2013

Banana Chocolate Chip Oatmeal Cookies

Posting these cookies reminded me of a sign my sister has in her house it says, 
"Raisin cookies disguised as chocolate chip cookies are the reason I have trust issues"

We were raised to love chocolate, and this is my most favorite chocolate chip cookie in the world.

My dear Young Women's President made these for us one Wednesday Night Activity and I was in HEAVEN! I begged for the recipe and that's when we came up with the idea of having a recipe swap night. She brought her recipe I kept bugging her for, and I've had it ever since. These are LITERALLY MY FAVORITE COOKIE EVER!  It is like banana chocolate chip bread in your mouth. HALLELUJAH!  When I made these my husband was just as shocked as I was to know I haven't posted these yet. So here they are, the best cookies in the world! You can thank me later. ;)


Banana Chocolate Chip Oatmeal Cookies
(This makes a BIGGG Batch)

2 Ripe Bananas - mashed
1 c. Apple Sauce
2 eggs
1 tsp. Vanilla
Mix all in one bowl

1 c. Sugar
1/2 tsp. Ground Cloves
1 tsp. Cinnamon
1 tsp. Baking Soda
2 c. Flour
2 c. Old fashioned Oats
1 c. Chocolate Chips

Combine all together in a bowl, when done add the "wet" ingredients and mix well.

The dough will be sticky.

Drop by rounds onto a greased cookie sheet.

Bake at 375 for 10-12 minutes. Remove onto cooling racks and eat with a glass of milk! DELISH!


Linking up here

Tuesday, September 24, 2013

Beaded Night Lights

This was such a fun project for my little June (2 1/2) and I to do together. We were given these products for free from CraftProjectIdeas.com to make something new. I love to take things I have seen and used before and make something different and child friendly. One of my friends helped me come up with the idea for these beads as night light "globes." I've used beads like this all growing up in bracelets, so I was VERY excited to give them a new concept, like these Night Light Globes.
June LOVED stringing the beads onto the pipe cleaners as mommy glued it to the LED night light.
(It needs to be LED so it doesn't get hot and burn)
This is a GREAT Parent and child activity! Check it out!


Take your Glow in the Dark Pony Beads, Pipe Cleaners and LED plug in night light and get started!

(I wanted to get a picture of the plug in light we have, it was your typical "clear textured rectangular plastic" cover that slid over top of the light, my baby boy loved to take it off everyday so I finally just threw it away, Hence no plastic cover to show you, but that is what it is if you were to go buy one)

(Click HERE to see the LED sensor night lights I bought at Wal-Mart)


Put a loop in the bottom of the pipe cleaner to keep the beads from falling off. Then have your child start stringing the colored beads onto the Pipe Cleaners


Isn't she a doll?!


Have your child string 3 pipe cleaners total.


Take the loops apart and twist them together, so in the end you have 1 LONG strand of beads. You will need to add more beads to make up for the space the loops took.


This is where Mommy or Daddy comes in. Mommy or Daddy get to choose what to do with the long strand of beads your child made, start in the back and glue down.


With the pink and green night light I started in the back and made turns and loops, some how it worked out and I glued the beads all together everywhere they touched.


With the Orange and Blue Night Light I simple glued around and around and around. I tucked the "end loop" of the pipe cleaner on the top inside the "globe."


Super fun all lit up!


Designs and color combinations are endless! Fun little craft for rainy days.


Linking up here

Monday, September 23, 2013

Loaded Baked Potato Soup

Hello All! We are home from vacation. We had a BLAST visiting family and friends for the past 2 weeks. We did a TON of fun things, from going to the mountains for a day, to the zoo, to painting rooms to family BBQ's and fun. We are so grateful for our wonderful families. When we got home yesterday our kids practically got out every single book and toy we had in the play room and acted like it was new! They were so excited to be back to THEIR toys. It was so darling to have my little girl go around and say, "my room, my house, my toys, look mom!" We are happy to be back, but sad to be so far from family. Anyway, photos to come. Now onto the post!

So, as I have said in previous posts I am a soup LOVER, ANDDDD a potato lover so this soup is the BOMB! This is one of my most favorite soup creations yet. It's thickened with potato pearls so even tastier! I love this soup because everyone can put their favorite potato topping inside. Sour Cream, Cheese, Bacon, Green Onions, Broccoli, even Chili if you wanted! This is a fabulous soup for the fall and winter season that is fast approaching!  


Loaded Baked Potato Soup

6 c. Water
5 small/medium Potatoes (peeled and cubed)
2 T. Chicken Bouillon 
1/2 tsp. Parsley
1/4 tsp. Onion Salt
1 tsp. Salt
1/4 tsp. Pepper
3/4 c. Potato Pearls (thickened to desired consistency)


In a pot, boil the cubed potatoes in salted water until firm but not fork tender (don't let a fork go all the way through, the potatoes will cook more in the soup, you don't want mush) In another pot place the 6 c. water, chicken bouillon, parsley,onion salt, salt,  and pepper. Add the cooked potatoes. Simmer for 5 minutes and add the potato pearls, you can add less or more to your desired consistency. Simmer together until potatoes are fork tender (when poked with fork prongs they go through the potato).

Garnish with your favorite Potato Toppings:

Green Onions
Ham Bits
Sour Cream
Cheese
Bacon
etc.


Linking up here


Thursday, September 19, 2013

Melty Reeses Chip No Bake Cookies

Check out these bad boys! Talk about melt in your mouth no bake cookies, literally MELT IN YOUR MOUTH! Scrumptious! My husband is a genius with anything peanut butter. I can seriously say he is a master at adding peanut butter to just about anything dessert related! I owe a lot of my success with recipes like Peanut Butter Oatmeal Cooke Pies with Peanut Butter Cream, Chocolate Cake Cookie Pies with Peanut Butter Cream, and many more to his genius intuition. This is another of his master creations. I made my Favorite No Bake Cookie Recipe from my dad, and my husband said, "Let's take it up a notch." He grabbed some Reeses Peanut Butter chips we had and placed them on top as the cookies were setting up so they softened over top. HOLY MOLY! Talk about silky smooth in your mouth! I could talk about this all day, you'll just have to try it to believe it! Change up your classic no bake cookies tonight for dessert!


Melty Reeses Chip No Bake Cookies

In a medium sauce pan-
Mix and bring to a boil:
1 c. Sugar
1/2 T. Butter
1 T. Cocoa Powder (Hershey's is the best, we have tried Nestle Toll House and its not as "chocolatey")
1/4 c. Milk (Almond or Soy Milk for Gluten Free)

Remove from heat and add:
dash of salt
1/4 tsp. vanilla 
(heaping) 1/2 c. creamy or crunchy peanut butter 
(creamy makes them smooth and luscious, crunchy adds a delicious peanut crunch to the cookie, whatever your taste buds desire)
1 c. Oatmeal 

Mix all together and drop by spoon fulls onto freezer paper or parchment paper, we have found they work better than wax paper. Add Reeses Peanut Butter Chips to melt on top as the cookies are setting up. Let cool a few minutes (as long as you can stand). Peel and eat with a glass of cold milk! DELISH!


Here are a few other great No bake Recipes:


Linking up here

Sunday, September 15, 2013

The "Man" Omelet

I just found this picture. This was a picture I took in my first month of blogging, not bad for a beginner Eh?! I never posted it! It makes me laugh because my husband wanted so badly to have one of HIS meals on the blog. So this is why it's called The "MAN" Omelet. It has Mushrooms, Onions, Cilantro, Jalapeno, and Spinach over an egg omelet.  So its basically an inside out omelet. My husband went through a omelet phase. This was his breakfast for a good 2 months. So here it is... the ultimate protein packed omelet of the day! 


The "MAN" Omelet

In a skillet with 1 T. Olive Oil, place...
1 handful of fresh or frozen mushrooms,
1/2 onion chopped
1 handful of spinach
1 jalapeno (seeded for the faint of heart, THAT'S ME!) chopped
1/2 handful of cilantro chopped
dash or two with salt and pepper

While the veggies are being sauted and cooked... in a small well oiled pan, crack and place 3 eggs, dash with salt. Let cook until bubbly and with a spatula flip like a pancake. (This is how we make ours, if you make your Omelets differently, power to ya!)
When eggs are done, place on a plate and pour sauted veggies over top. 


Linking up here


Thursday, September 12, 2013

Fun Foam Monsters

Hello from vacation! We are loving the time we're spending with family and friends. I cant wait to show you all the projects I have been working on here. Now... onto the post!

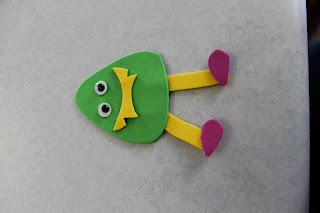
These little foam monsters were so fun to create with my little June. Only we can't call them "monsters" at our house, they are "CREATURES." When you say "monster" she FREAKS! So, these are "monsters" to the world but "creatures" to us. Ha ha. Anyway, the best thing I love about these is I made some into magnets and some into puppets on sticks. I hot glued little magnets on the back or tongue depressors.  
We also used them as a lesson. We have family night on Mondays and we have little lessons. We talk about our week and what to expect, we have a lesson, game, family spotlight and treat. Our lesson with the foam monsters was focused on everyones differences. Some people may not have legs or arms, some may just have one eye, or look funny but God loves us all the same, and we should love everyone too. It was short and sweet but it got the point across. Plus it was great to let the kids play with the toys/object lesson all they wanted! 
See how easy they are?!


Just craft foam paper, googly eyes, and hot glue


What fun little friends! 


Linking up here


Monday, September 9, 2013

Sweet & Sour Stir Fry

Hello wonderful people! So sorry I haven't posted recently. We are happily on vacation visiting family. I previously prepared a few pictures and recipes to share while we are gone. Here is the first...

I have grown up with this Sweet and Sour Stir Fry. It has been a family favorite long before I was ever born. This recipe came from a lady my grandma knew named Marie Ota. She was a Japanese immigrant and made this for my grandparents. They loved it of course and asked for the recipe. It's been in our family ever since and now I would love to share it with you! 


Sweet & Sour Stir Fry

1 lb. chicken - cut into bite sized pieces

In a large skillet place 1-2 T. Olive oil and add chicken, cook slightly then add:

1 tomato -cut into cubes
1 green pepper - cut into pieces
1 can pineapple tidbits- drained

Place lid over top and let steam until veggies are cooked yet crisp and chicken is cooked through. While the large skillet of chicken and veggies are cooking prepare the sauce.

In a small sauce pan make your sweet and sour sauce, cook over medium low heat stirring constantly:

3/4 c. sugar
1/4 c. soy sauce
1/3 c. white vinegar
2/3 c. water
3 T. Corn Starch
1 T. Ketchup

When when sauce is thick and "glossy" pour over cooked chicken and veggies. 

Serve over brown rice. Delish!


Linking up here


Wednesday, September 4, 2013

Freezer Paper to Wrapping Paper

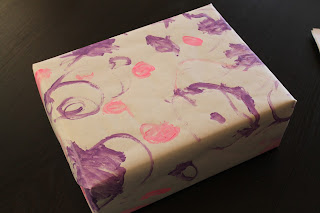
Check out my Freezer Paper to Wrapping paper! This is a project sponsored by CraftProjectIdeas.com. They sent me a free package of their products to craft with. Now I get to show you what I came up with using a few of their products. My little 2 1/2 year old made this. She had a BLAST making her own wrapping paper for her dear friend's 3rd Birthday. I can't tell you the BEAM in her eyes when she handed over the package and showed her that she painted it! This was VERY VERY simple and I can't wait to do if for more Birthday's and for Christmas! My little girl was sooo excited that she could paint where ever she wanted and didn't have mom telling her what to do. It was a piece of art used to dress a box. Here's the perfect way to make your next wrapped gift extra personal! 


Cut your freezer paper to the size needed to wrap the box


Grab your Neon Paint from CraftProjectIdeas.com, I LOVE all the colors!


Then let your little one get to painting! 


When dry, wrap your present


Add some curly Q ribbon, and its ready for delivery!


Linking up here


Monday, September 2, 2013

Peppercorn & Garlic Pulled Pork

My husband and I recently went on our monthly date to a newly opened restaurant. It is "cowboy" themed. You were given a basket of AMAZING corn bread mini muffins (I will probably try to recreate them soon) and their food were all "western themed" names. I LOVE pulled pork sandwiches so I always love to try them at different restaurants we visit. Well this particular restaurant's pulled pork was TO DIE FOR! I ate SOO much I felt like they would have to roll me out of there. But I was quite impressed that their pulled pork wasn't drenched in BBQ sauce, they let the pork speak for itself, it was peppery and scrumptious! Making this I was impressed with myself. It was as if I grabbed some pork from the restaurant and put it on my plate! TALK ABOUT A TON OF FLAVOR! YUMMMY! 


Peppercorn & Garlic Pulled Pork
(This makes A LOT)

2 - 1 lb. Pork Loins
4-5 garlic cloves finely minced
4 T. Fresh Cracked Pepper
3 tsp. Salt
1/3 c. water

In a small bowl mix the minced garlic, pepper and salt in a bowl, like a dry rub. Rub the pork loins down and place in a greased crock pot. Pour in the 1/3 c. water. Cook on low for 8-10 hours. 

When done- shred the meat in the juices to keep moist and flavorful. Place shredded pork on a bun or roll and garnish with avacado slices - We love avacado on almost anything! 


Linking up here