Image Map

Saturday, November 30, 2013

Scrapbook Paper "Cone" Trees

Who loves these "cone" trees, as I call them? I DO! I love the simplicity, and sleek design of them. As most of you know I always try to pinch my pennies to make a dime. I'm always in search of the cheapest way to make something look expensive! And I think I have succeeded! These trees were simply made with scrapbook paper! "No way!" you say... Well I say "YES WAY!"  And look how AWESOME THEY ARE!


(I intend to make more, MANY more!)

"Christmas" Scrapbook paper - reds, greens, browns etc.


Roll the paper to make the desired size and shape of your "cone tree"

Staple the paper at the bottom

Cut off the excess paper 


Cut the bottom of the "cone" to make it even. So the tree stands upright and tall.


Hot glue the flap down and YOU'RE DONE!
 YAY!


Linking up here

Thursday, November 28, 2013

Happy Thanksgiving!

Happy Thanksgiving all! I am so thankful today for my wonderful family and friends. I am so thankful for The Church of Latter-Day Saints. I am also SO... thankful for you! When I see how many page views and all of the awesome comments you leave it MAKES MY DAY! It keeps me pushing on and love sharing the things I know and try! Thank you all of the support you've given me! Have a marvelous Thanksgiving holiday and I will see you tomorrow!

Wednesday, November 27, 2013

2 Step Lace Headband

I love the statement that lace headbands make. They are soft and dainty but yet a fun accessory. This took me all of about 30 seconds to make. LITERALLY 30 SECONDS! So grab some lace, a rubber band, and some hot glue! Let's get to work!
(You probably could have made one in the time it took you to read this)


Fold the lace over the rubber band and hot glue together, repeat on the other side!


And you're finished! YAY!


Linking up here


Monday, November 25, 2013

Honey Roasted Carrots

Here is a quick last minute side for your thanksgiving feast! Honey roasted carrots! These were DELISH! Shake all in a bag and throw in the oven to bake! AWESOME! Easily put together and even easier to eat!


Honey Roasted Carrots

Place 4-6 long carrots - peeled and cut into strips in a ziploc bag. 
Place...
1 T. Olive Oil
1/4 c. Honey
1 dash of Rosemary
1 dash of Thyme
2 dashes of salt


Place on a parchment paper lined cookie sheet. Spread out and bake at 375 for 15 minutes. Remove from the oven and turn the carrots over. Put in the oven again and bake for another 10 minutes or until desired tenderness is achieved. 


Linking up here

Saturday, November 23, 2013

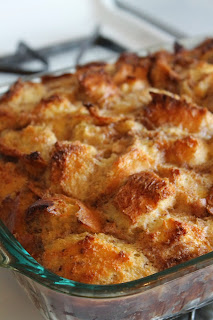
Basic Bread Pudding with Strawberry Sauce

This bread pudding was FABULOUS, there's no doubt about it! This is very basic and you can dress it up with any toppings you want! We had fresh strawberries at the time so we made some homemade strawberry sauce! Talk about as basic and as scrumptious as you can get! Ha ha. YUMMY! Talk about a delicious dessert to finish the day! 


Basic Bread Pudding:

1 large soft Italian loaf of bread - cut into cubes
1/2 c. butter - melted
2 tsp. cinnamon

Mix the butter and cinnamon together and drizzle over the bread cubes until all coated, Place in a greased 9x13 glass pan

In a bowl mix together...
9 eggs
1 1/2 c. Sugar
1 tsp. Vanilla
2 tsp. Almond Extract
4 c. milk

Pour the liquid mixture over the bread cubes and let soak about 10 minutes.
Bake at 350 for about 45 minutes to 1 hour. (It depends on how your oven cooks)

*You can tell its done, if the middle doesn't "jiggle". If it does, cover it with foil to prevent the top from burning, and cook another 5-10 minutes at a time. Keep checking it!
When done- let it set for about 10-20 minutes. Its HEAVENLY warm!


Homemade Strawberry Sauce:

1 carton of strawberries - green tops removed
2 T. Water
3 T. Sugar - (add sugar to desired taste)

In a blender, "liquify" the strawberries to a nice pulp. Place in a small sauce pan, and turn heat to medium high. Add the 2 T. water and 3 T. Sugar. Cook and stir until desired consistency and taste. DELISH!

Garnish with Whipped Topping and ice cream! YUMMM...


Linking up here

Thursday, November 21, 2013

Chicken & Wild Rice Soup

Hey! Over here where I live, it's snowwwinggg today! BURRRR.... I am making this soup to warm us up for sure! This is a light but very filling soup. I say, "Yumm-a mia!" I love a good warm soup that stays with you! 


Chicken & Wild Rice Soup

10 c. Water
2 boxes  Rice a Roni Long Grain Wild Rice
1 Stalk Celery - Diced
1/2 Medium Onion - Minced
2 Chicken Breasts - Cubed
1 T. Chicken Bouillon
1 Garlic Clove - Minced
Salt to Taste

In a small saute pan, place cubed chicken, onion and celery with 1 T. Olive Oil. Cook until onions are transparent. (chicken doesn't have to be cooked all through - it will cook in the soup)
In a large pot place, water, Rice a Roni wild rice, bouillon, garlic, and sauted chicken, onion and celery. Simmer until Rice is tender. Salt to taste, and serve with Corn Muffins! YUM!


Linking up here


Wednesday, November 20, 2013

Fall Paper Wreath

I made this darling paper wreath in about 10 minutes, and look how cute it is! I love bringing the fall season colors into my home! The reds, deep greens, creams etc. They are just lovely together. This is very fast and makes a fun statement to any door or room. Check it out! Just glue and paper! 


Cut your 12x12 Fall papers into 6x6 squares. Just cut the paper in half, then in half again! 


Take the squares and roll to make "cones"... like this.


Glue the paper down on the fold.


Repeat until all papers are rolled and glued into "cones."

Cut the ring off a paper plate for the back.


Place all of your glued "cones" in the order you want and glue them down to the paper plate. When done gluing all of the cones, take some ribbon and glue to the back. 


To cover all of the tips to the cones that meet together in the middle, simply glue 2 green single silk leaves down, then 1 yellow leaf on top for the finishing touch!


Linking up here


Tuesday, November 19, 2013

Last Resort Tortilla Pizzas

Last night was a funny night to say the least. I was excited as usual to have my dinner in the crock pot all day so when it came to dinner time it was ready. Well we were trying something new for the blog, and man did it go WRONGGG! I tried a "citrus chicken" all it is was, was orange juice - chicken and a little brown sugar. Sounds perfectly easy and delicious right...??? WRONG! UGHHH!! It was GROSSS!!!
I am telling you all this because ALL people make yucky meals once in a while they can't live down. Believe me this was one of them. We all couldn't even gag it down. I don't want you all thinking that I'm a master chef who never makes mistakes. Because I'm just a wife and mom like many of you who loves to try new things. I'm proud to say, most work, but some don't.

Well needless to say, we were all left with a bad taste in our mouths and STARVING! I went right to the fridge and scanned with my "x-ray" vision (just like on TV). I saw we had some extra Healthy Homemade Tortillas I made previously- Mozzarella Cheese - and Pepperoni. I grabbed them, opened a can of tomato sauce and went to town! We made these Tortilla Pizzas as a last resort and I am very pleased to tell you they were AWESOME! I don't think I will ever buy a frozen pizza again because everyone can make it the way they want and it is a lot healthier.


Tortilla Pizzas:

1 can tomato sauce 
Mozarella Cheese
Pepperoni

Optional - 
onions
olives
mushrooms
peppers
etc.

Pre-heat the oven to 400 to get hot. Place one healthy homemade tortilla on a cookie sheet - place a few spoon fulls of tomato sauce on top. Garnish with cheese, pepperoni and your other favorite toppings. Make a few other pizzas as you go! Place the cookie sheet full of mini pizzas in the hot oven and change the oven to BROIL. Broil the pizza until cheese is bubbly and starting to brown. Take out - cut and EAT! This is FAST AND EASY for a last resort!

*College people! THIS IS FOR YOU TOO! FAST, CHEAP AND FABULOUS!


Linking up here

Monday, November 18, 2013

Rice Noodle & Turkey Meatball Bowl

I'm not going to lie - ever since I have made this for dinner one night I got hooked! I make it at least every 3 days for lunch. I AM CRAZY about these meatballs. I had only tried rice noodles at a Chinese buffet once, and loved them but I didn't know I could make them myself! DUH! OF COURSE you can! So, now, I am HOOKED on those as well! The flavor from the meatballs is AMAZING! I am now WILD about ground turkey - it is cheaper, healthier,and MORE FLAVORFUL! I LOVE IT! This looks like a lot of steps but it's done in 20 minutes!


Rice Noodle & Turkey Meatball Bowl

In a small saute pan - place...
1/2 c. Chopped Onion
1/3 c. Chopped Celery
1 T. Olive Oil
Saute until onions are transparent and both are fragrant.

In a bowl combine
1 lb. ground Turkey
1/2 tsp. Ground Sage
1 T. Flour
1 egg
1 handful Spinach - cut into small pieces
Previously Sauted onion and celery
a few dashes of salt and pepper

When all is combined, start forming the meatballs, place them in a greased deep pan (with lid). Brown the balls on one side then on the other - When the other side is browning... Pour
2 c. Chicken Broth (chicken bouillon and water)
Over top. Put the lid on the pan and steam the meatballs for 10 minutes or until done inside.

Cook the Rice Noodles according to package directions.

When noodles and meatballs are done - drain the noodles - and place in a bowl. Add the Meatballs and a spoonful of "meatball sauce" (juice left over in the meatball pan, it has AWESOME flavor)
Add some lettuce and carrot shavings and you're done! DELICIOUS!


Linking up here


Thursday, November 14, 2013

2 Ingredient White Chocolate Popcorn

How about a soft sweet with a fun crunch? Then this is the popcorn for you! This is gently sweet and scrumptious! We LOVE making this popcorn, its fast and fabulous! I love that there are only 2 ingredients Popcorn, and White Chocolate. Perfect to share with friends and family, ESPECIALLY for the holidays!


2 Ingredient White Chocolate Popcorn:

Freshly Popped Popcorn - about 2 large bowls full
Vanilla Flavored Almond Bark - 3 blocks melted
(If you want to know how to melt the chocolate a better way than a microwave, use a double boiler - see the picture instructions here in my White Chocolate Oreo Popcorn Recipe)

When popcorn is popped and the chocolate is melted - pour the melted chocolate over the popcorn evenly and stir until lightly coated.

It doesn't look like anything is on it, but man it's a DELIGHTFUL surprise when you taste that there IS!


Linking up here

Wednesday, November 13, 2013

Silk Leaf Charger

Need a fun serving accent? I had a whole bunch of left over leaves from my Silk Leaf Table Runner. I thought to my self, "What if you make a serving charger for the table before you use the runner? HEY WHAT A GREAT IDEA!" So I made one! It took me 5-10 minutes. It will remain on my table until our feast of Thanksgiving begins! This gives my table a fun texture and feel of fall. 


First take some scrap materials and a charger or something that has your desired size and trace it onto the fabric


Cut the shape out with sewing scissors


Grab your silk leaves (These were left over from my Silk Leaf Table Runner)


Place the first leaf on the outer edge so the materials underneath doesn't show.


Place the leaves slightly under each other to avoid from seeing the fabric underneath


When starting on the next row, turn the next leaf to over lap the first row of leaves 


Keep sewing around and around, layering the leaves so as little material underneath shows through.


Keep sewing ins circles and circles until you've reached the middle, and finish!


 Linking up here


Monday, November 11, 2013

Banana Raspberry Oatmeal Shake

Breakfast or Dessert? Whatever you want to call it, it all came from a blender! This is my most favorite frozen banana concoction yet! We are definitely a banana family. When I found out you could make "banana ice cream" from frozen bananas, I thought it was WILD, but I had to see for myself. I mean, an ice cream that was made from just frozen fruit and milk? Get outta here! Well folks, its TRUE! I have done it many times, like in my Blended Banana Ice Cream - Strawberry Style, or my Banana Ice Cream with Blueberries and Strawberries, or my Very Berry Oatmeal Shake, I'm trying my hardest to get it out there that this is an AMAZING substitute for a dessert that is actually healthy! SUPER SWEET and AWESOME! I call it my newest weakness. Only it's not a weakness because its HEALTHY!
 And I love that I can make this Lactose Free for visiting friends!


Banana Raspberry Oatmeal Shake

In a Blender or Bullet whatever you have, place...
2-4 Peeled Frozen Bananas
1 "normal" Peeled banana
1/4-1/2 c. Frozen Raspberries
1/4 c. Old Fashioned Rolled Oats (optional - for a sweet smooth raspberry shake don't add oats)
1-2 cups milk (more or less according to your desires) - almond milk - soy milk ANY MILK 

Place all in a blender and LIQUIFY! HOLY YUMMY IN OUR TUMMIES! This is awesome! 
*Don't forget you can adjust the consistency with the milk, it can be as thick or as thin as you want! 


Linking up here

Saturday, November 9, 2013

Chicken, Spinach & Hummus Lunchwrap

Lunch is calling! This takes 4 things. 1 tortilla, chicken lunch meat, fresh spinach and hummus. This is fast and fabulous! Are you like me and CRAZY busy during lunch? Either too busy at work or at home? From getting the kids fed, to cleaning the kids, to doing the dishes, to everything else?! And when you're done with all of that you turn around and think as your tummy grumbles... did I eat lunch? Well that is me to a "T." I needed something fast, and portable! These have been my saving grace during lunch times. I can carry them around and eat them fast!
THANK YOU DELICIOUS LUNCH WRAPS!


Chicken Spinach & Hummus Lunchwrap

2-3 Slices of chicken lunch meat
half a handful of spinach

Place altogether, wrap up and go! 

*Keep a stack of Healthy Homemade Tortillas in your fridge so you can grab, make and go!
*A bowl of Homemade Hummus is ALWAYS handy! We use it in place of Mayo, as a dressing on salads, etc. you name it, hummus is there for a packed punch of delicious flavor!


Linking up here

Friday, November 8, 2013

Give Thanks Sign

As I have said before, I LOVE FALL and Thanksgiving. It's one of my most favorite times of the year. I love the leaves, the cold outside and the warmth inside. I love the FOOD, the family and friends. I love it all. Well most of all, I love to think of all the things I am thankful for. I love seeing banners and signs that say "Give Thanks." Well I wanted one of my own. Everyone is on a budget and a lot of the things I make either come from things I have or I spend very little money making. This was totally free for me. I had a picture I purchased from a hobby lobby for $4 a long time ago and it had a scratch all along the front. But I know I can always change the picture! Well the "board" the picture was printed on was coming out of the frame, so I knew it was time to fix the picture and fix the frame! This is how I made my very own "give thanks" sign!


The broken "America sign" and fall scrap book paper


The board that had the picture printed on it was literally falling out, so it really just popped right out!


I took the scrapbook paper I wanted and put it over the picture and pressed along the edge to make a crease.


I turned over the creased paper and cut along the line.


I had 3 pieces of paper to cover the board.


I grabbed my Mod Podge and painted the bottom. When you put the paper over top of the glue push out any air bubbles to get a good smooth seal.


When done with that, paint more mod podge over top.


While that is drying I took some extra paper and cut out individual leaves like so...


These will hide my "seams" where the papers meet like this...


I put some extra leaves all over the board for added texture.


I printed out my words and took an exacto knife to cut out the letters.


When all was cut out I traced with a pencil the place of the words.


Then I started painting! I painted all my words/letters! I love the look of hand painted things, I think it looks more "rugged."


(WHAT A MESS! But it's worth it!)


The frame was a black/ distressed grey. I grabbed my brown paint and a WET paper towel. You take the wet paper towel and dab it in the paint, then "wash/rub" the paint onto the frame.


Put the frame and picture back together and this is what you have!


SO FUN!


Linking up here