Image Map

Thursday, August 29, 2013

White Chocolate Oreo Popcorn

I recently made this 3 ingredient popcorn for a Young Women's activity. We had a movie night watching Disney Pixar Short Films. All of the YW loved it! I took a HUGE container of this popcorn and it was a great success! I was completely empty when we were done! We had a wonderful time laughing to "Boundin," "Partly Cloudy," "Jack Jack Attack," and many more. It was our last YW activity before school started, so we wanted it to be fun and relaxing. Every one wore their sweats and we all brought big pillows. What a PARTY, and the perfect popcorn made it even better!


Only 3 INGREDIENT Popcorn?!

White Chocolate Oreo Popcorn

3 "cubes" vanilla flavored Almond Bark
1/3 pkg original Oreo cookies-blended into crumbs (I used my food processor)
2 BIG bowls of popped popcorn

First, make a "double boiler." Funny story for you, I literally learned how to do this on a morning news "cooking show/break." The chef they had visiting, made a double boiler to melt her chocolate. I don't even remember what they made but I learned how to melt chocolate without the microwave! Just goes to show you can learn new things anywhere!

A double boiler is where you get a metal or glass bowl that is larger than a pot. Fill the pot with about  2 c. water.


Bring the water to a boil, USE AN OVEN MIT FOR YOUR HAND IF USING A METAL BOWL!


Place the 3 cubes of Almond Bark inside and stir.


When chocolate is melted, pour half of the chocolate on one big bowl of your popped popcorn. Sprinkle with 1/2 of  the Oreo crumbs, and mix with a large spoon. 
(The Oreo crumbs should stick to the melted white chocolate)

Do the same with the other large bowl of popcorn.

*You might be thinking, "this isn't enough chocolate." Well believe me, the white chocolate flavor goes A LONG way. So that's why you don't need much. Sometimes "less is more."


Linking up here


Wednesday, August 28, 2013

Mini Muffin Tin Quiches

Need something fun for breakfast or a brunch? These Mini Muffin Tin Quiches are just the thing! They are small, delicious and darling! I love that you can add whatever ingredients you want. Green onions, bacon bits, ham, spinach, different cheeses, the list goes on and on. I can't wait to make these for when family comes to visit (this picture should be an incentive!).  Everyone can make their own different mini quiches or I can just make this one, the one EVERYONE will like! What are your favorite ingredients in quiches?


Mini Muffin Tin Quiches
(makes 6 mini quiches)

Frozen Shredded Hashbrowns
3 eggs beaten
1/4 c. milk
1/2 c. cooked ham cubes
1 T. Parmesan Cheese
Dash of salt and pepper

Brown your hash browns in a large oiled skillet- then place in your muffin tins.
OR...
Place frozen hash browns in your well oiled muffin tin about 1/3 of the way full. Bake at 400 for about 10-15 min. until edges are browned. 

*(when hash browns are done, spray some more cooking spray inside muffin tins to prevent eggs from sticking to the sides)

Beat eggs, milk, salt and pepper all together until smooth. Add in cheese and ham. With a 1/4 c. measuring cup scoop out egg, ham and cheese mixture and fill the cups.

Reduce heat to 350. Bake for 15 minutes or until eggs are firm. 

*For easy removal, take a butter knife and scrape around the quiche and the tin, it should come out easily. 


EXTRA ADD INS!
-Shredded Cheese
-Green onion
-Spinach
-Sun Dried Tomatoes
-Bacon Bits
-Asparagus
-Broccoli
etc.

ANYTHING YOU WANT! Make it your own!


Linking up here

Tuesday, August 27, 2013

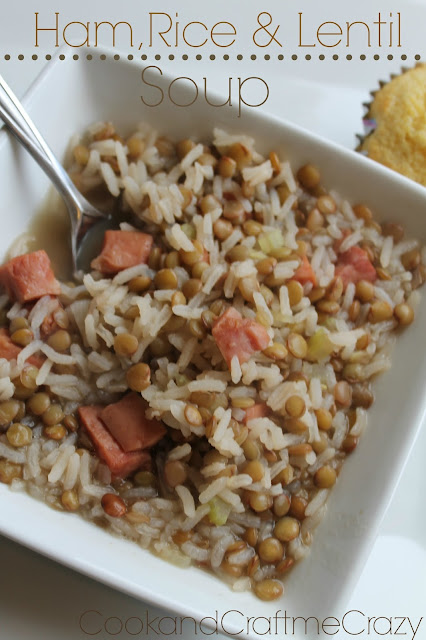
Ham, Rice & Lentil Soup

This is the other soup that made me feel better when I was sick. This along with my Down Home Chicken Noodle Soup and my Beyond Basic Beef Stew. My husband calls this our poor mans soup because it only has about 5 things in it which are all very inexpensive. But I love the simplicity of all 5 things put together, and how delicious they are. I saw Lentils on a show called "Take Home Chef." It is the only episode I've watched and he went home with a lady who was actually re-doing her kitchen and they had to bring her stove in from the yard so he could even cook with her! It was hilarious! Sorry, I'm babbling. Anyway, they made a Lentil soup. I had seen Lentils in the store, and they were very inexpensive so I thought they were just like beans since they were placed right next to them. Well they are a legume so it could be classified as a "bean" of sorts. Anyway, he showed how to rinse them, cook them, and he explained how they have an amazing rich flavor. I swear I could taste it through the TV as he was talking about it. After that, I decided the next time I was going to the store I was going to get some Lentils and make me some soup! So I did, but the lentils alone with broth wasn't enough for me, I added rice and ham. We have made this many times since and have always enjoyed it. Simple, hearty and delicious!


Ham, Rice & Lentil Soup

1 c. Cooked Rice (I cooked 1/2 c. Jasmine Rice in 3/4 c. water)
1 c. Lentils- Rinsed
8 c. Water
1 stalk Celery - finely minced
1/2 small Onion- finely minced
1 1/2 c. cubed Ham
4 tsp. Beef Bouillon
1/4 tsp. Onion Salt

In a large pot bring your 8 c. water to a boil. In a small pan saute the celery and onion in 1/2 tsp. olive oil until transparent and add to large pot. Add all ingredients, Lentils, ham, beef bouillon, onion salt and cooked rice. Simmer until lentils are soft. Salt to taste.


(My husband loves to put a few dashes of Parmesan Cheese on top)
* We had this with corn muffins- DELISH!


Linking up here


Monday, August 26, 2013

Chocolate Cake Cookie Pies with Peanut Butter Cream

Long name, but it explains all of the "scrumptious-ness" inside! I love making cookies with as few ingredients as possible. So, every time I make cake cookies, I am always pleased at how quickly they come together. I recently made Peanut Butter Oatmeal Cream Pies that were to DIE for, and now I made the same filling but with Chocolate Cake cookies! DELISH! If you love chocolate and peanut butter, this is a MUST MAKE! 


Chocolate Cake Cookies:

1 Devils Food Cake Mix
2 Eggs
1/3 c. Apple Sauce
1 tsp. Vanilla

Mix all together and drop by rounds onto a greased cookie sheet. Bake at 350 for 8-10 minutes.

Peanut Butter Cream Filling:

2 1/2 c. Powdered Sugar
3 T. Soft Butter
1/4 c. Milk
1/4 c. Creamy Peanut Butter

Whip all together until perfectly smooth. Slather in between 2 COOLED chocolate cake cookies. ENJOY!


Linking up here


Saturday, August 24, 2013

Earring & Necklace Holder

I totally forgot to post this! I made this during graduation for a Young Woman in our ward in whom we absolutely adore. She has babysat for us many times and we just love their whole family. Anyway, she was graduating and I wanted to give her something fun and girly because she is a girl who definitely LOVES her accessories. Her mom made her and her sister a whole mirror filled with hooks for the back of their bathroom wall to hang their necklaces. It's AMAZING! Anyway, I wanted her to feel comfortable in college and like she was home with her huge necklace holder. So I made her a necklace holder "dorm room style." Small and compact, but just as useful. I found this earring holder at Hobby Lobby for $7 in the 80% off section. I was BEAMING, it was PERFECT for her, and I knew just what I was going to do!

I took a hammer and a nail, hammered in the nail a small bit, took out the nail and screwed in the hook (See the 3 pictures at the bottom of the collage for steps). I did this all along the pattern on the earring holder to make sure they were evenly placed. I put hooks all along the bottom for long necklaces to hang down, and 2 hooks at the top next to the flower design for shorter necklaces. IT WAS AWESOME! So simple and I know she will get lots of use out of it!


Linking up here

Friday, August 23, 2013

Smothered Bean & Rice Burrito

I am SO excited, I literally put this together with all of my different recipes I have already posted! TA DA! It was delicious and all of the flavors were married together beautifully. I'm always ecstatic to make something that gives me a complete protein without having meat. Let me explain, my mom gave my husband and I a hard time about eating so healthy when we were first married, she gave us a Vegetarian cook book as a joke for Christmas. Well one day we opened it up to change up a salad or something, and we saw a chart, a "protein" chart. This chart tells you to combine one thing from 2 columns to make a complete protein. So Beans and Rice are a complete protein, Peanuts and Lentils, or Cornmeal and Broccoli. The combinations are endless! We were so excited, we love to learn new things everyday. So I have been sharing this "chart" with LOTS of people. We don't always have to eat meat to get our protein! So this was our "protein packed, no meat" meal of the night. Our Smothered Rice and Bean Burrito. And man, was it GOOD! 


Black Beans - drained and rinsed
Mozzarella Cheese


Linking up here


Thursday, August 22, 2013

Beyond Basic Beef Stew

I was recently sick with a cold and the only thing that would make me feel better was soup. I made Down Home Chicken Noodle Soup, Ham, Rice and Lentil Soup, and STEW! This stew recipe is basic beyond basic. I love that I can "tweak" the portion to what I need that day. My mom always made stew growing up and it was MY FAVORITE! I love love love beef stew in the crock pot. I loved stew so much I couldn't wait for it to cook through. I would eat it for lunch with practically "CRUNCHY" veggies. My words slipped one time eating this crunchy concoction and I called it "Stoop." So from them on my sweet mom and I call "crunchy lunch time stew" Stoop. 
Anyway, like I was saying, I was sick, and this was the thing that popped in my head to be put together fast, and ready for dinner. I definitely knew I wouldn't be up to make anything special, so this was awesome! I was better in a couple days, and I know it was because of the soups! See how easy and DELICIOUS!?


Beyond Basic Beef Stew:
(Everyone likes some things more than others, so make the quantities to your liking!)

1-2 lbs. Stew meat- browned with season all salt, salt and pepper
4-5 large potatoes ( As many as desired, I used red russet potatoes)
1 stalk celery - diced
1-2 carrots- peeled and cut
1 small onion - cleaned and cut
2 cans stewed tomatoes - not drained
2-3 cans water (using the stewed tomato cans, add water until all ingredients are covered)

Combine all ingredients in the crock pot. Add 4-5 tsp. Beef Bouillon (to desired "beef" taste). Cover and cook on Low for 8-10 hours. Salt and pepper to taste. DELISH!


Linking up here


Wednesday, August 21, 2013

Out Back Steak House's Garlic Mashed Potatoes (copy cat)

I am crazy about potatoes as I have previously proclaimed. Well, every time we have visited a restaurant I always examine their potatoes. My most favorite of favorite way to have potatoes is mashed. I love potatoes all ways but mashed is my MOST favorite. So in my years of restaurant "studies" in mashed potatoes, I have come to the conclusion that Out Back Steak House has the best! I have tried to recreate the creaminess with the garlic flavor but have always come up short. I HAVE DONE IT THIS TIME! We even had people over and they said that these tasted like Out Back's Mashed Potatoes! AHHH! YAY! I am BEAMING! So now I share my success with you! 


Out Back's Whipped Garlic Mashed Potatoes (copy cat)

10 small potatoes (7 medium) peeled, rinsed, and cubed.
Place cubed potatoes in water enough to cover. Salt water with 1-2 tsp. Boil until fork tender. (the fork goes into the potato easily and breaks)

Drain the potatoes and add:

3 minced Garlic cloves
1/4 c. (room temperature) butter
1 1/2 c. Milk (I used 1%)
2 T. White Distilled Vinegar
1/2 tsp. Onion Salt
1 tsp. Salt
2 tsp. Parsley

Mix together with you hand blender with your WHIPPING whisk attachments. It made them creamier and very smooth! DELISH! We ate this with out BBQ Chicken


Linking up here

Tuesday, August 20, 2013

Marinated Lemon Herb Chicken

I love this time of year, one, its almost fall and the leaves will to start changing, and two, farmers markets! I love to have fresh farm food! I especially love getting crazy with my herbs. Well I love lemon chicken and I wanted to try something new so I put a TON of herbs into the marinade for the chicken. My husband grilled the chicken to perfection and we ate it with our Herb Roasted Green Beans & Potatoes. Talk about DIVINE! We were in heaven! Note to self: Make this OFTEN!


Lemon Chicken Marinade:

Combine the following ingredients in a large ziploc bag with your chicken

2 T. Lemon Juice
1 T. White Vinegar
1 tsp. Garlic Powder
1/4 tsp. Dill
1/4 tsp. Thyme
1/4 tsp. Rosemary
1/2 tsp. Lemon Pepper

This was the perfect amount of marinade for 2 chicken breasts. Double or triple for added chicken breasts.  For best results let sit over night, or at least 4-5 hours. 


Linking up here

Monday, August 19, 2013

From Dollar Store to FABULOUS - Pumpkins

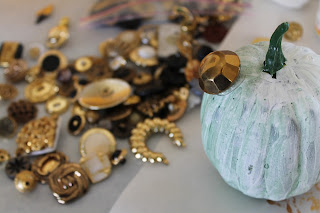
I am a cheap-o, like I have said before. So spending lots of money on plastic pumpkins is something I didn't want to do. But yet I wanted SOME sort of pumpkin decoration to add some fall "seasoning" to my home. I didn't want to have ugly pumpkins gracing my house either, what was I to do? So I grabbed 5 small pumpkins from the dollar store and decided to make them FABULOUS! I grabbed a whole bunch of old buttons, hot glue, paint, mod podge, glitter, raffia etc. and made them my own! I was VERY pleased with the outcome! These look DARLING on my shelves for the fall season! Do you need a fun little project to add a little fall "seasoning" into your home?! This will do the trick!


I painted 2 pumpkins white, one to glitter and one to cover with buttons


I raided all of my old button box, old broken jewelry, plastic buttons, metal buttons, you name it I had it. I just started hot gluing, and gluing more until it was covered


I grabbed a container of gold glitter and my mod podge. I painted mod podge  "thickly" on top and painted it "thinner" as I moved down the pumpkin. I sprayed it with a clear coat of spray to keep the glitter in place.


The raffia pumpkin I painted with a light layer of gold and a little brown. I glued one end of the raffia down and then wound it around and around, and glued the other end down, and repeated many times to cover the pumpkin. (I wanted some of the orange to pop through) To finish it off I made a raffia bow, glued it to the stem and added a button.


I painted a layer of gold shimmer paint to add a soft shine and to tone down the bright orange. I had 2 swirly stickers black and silver stickers. (you can see the thin silver lines) I just doodled more swirls with a sharpie!


I liked the texture and color of this pumpkin, all I did was hot glue some pearl "stick on stickers" I had to add some flair.


Linking up here


Saturday, August 17, 2013

Roasted Ranch Sweet Potaotes

One of my good friends knows we love to eat healthy and knows we love sweet potatoes. Well they are trying to eat healthier as well and asked for some of my sweet potato recipes. I only have a few up my sleeve but they are awesome, if I do say so myself.

My husband is the biggest sweet potato fan in our home, along with our 11 month old son (baby food version). We came up with these together. They are Sweet and Salty, something I LOVE! Very simple and VERY delicious! Perfect for the fall sesaon!


Roasted Ranch Sweet Potatoes

2 large Sweet Potatoes/Yams peeled and washed
1 Large Ziploc Bag
2 T. Dry Ranch Seasoning

Pre-Heat oven to 400. Cut your peeled sweet potatoes into cubes and boil in water for 8-10 minutes (depending on the size of your cubes). When they are still hard but also soft - not quite fork tender, drain the water and place the cubes in the ziploc bag. Sprinkle the ranch seasoning into the bag, and SHAKE. Shake until the potatoes are well coated. 

Take a cookie sheet and line with parchment paper. Place the coated potatoes on the parchment paper and spread out. Place them in the hot oven and switch the oven to BROIL. Bake until the potatoes are beginning to brown and bubble (about 5-10 minutes depending on your oven). Take the pan out. Use a spatula and rotate the sweet potatoes. Place them in the oven again for a few more minutes to brown again. Remove and serve! Enjoy!


Linking up here


Friday, August 16, 2013

Almond & Oat Crumble Parfait

Here is yet another super easy recipe for a fruity crunchy treat! We made these at our last Monday family night treat. YUMMY! Everyone was veery pleased, even our 2 1/2 year old and our almost 1 year old. The warm peaches and blueberries with a yummy sweet oat crunch was just the ticket. We got these peaches at our local farmers market and fell in LOVE! We can't wait to go and get more! 


Almond & Oat Crumble:

1 c. Old Fashioned Oats
2 T. sliced Almonds
1 tsp. Almond Extract
1/4 tsp. Vanilla Extract
1/4 tsp. Cinnamon
3 T. Brown Sugar
1 tsp. Water

In a bowl mix all ingredients until well combined. On a foil covered cookie sheet, spread out the oat crumble mix. Bake at 400 for 10 min. Be sure to keep a close eye to prevent burning. Cook longer for crispier crumble or shorter for softer crumble.

While the crumble is cooking...

Peel and cut 2-3 peaches. In a small pan place the peach slices, 1/4 c. Blueberries, 1 T. brown sugar. Cook until warm and soft. 

Place the warm peaches & blueberries in the bottom of a cup and garnish heavily with the almond & oat crumble. YUMMO!


Linking up here

Thursday, August 15, 2013

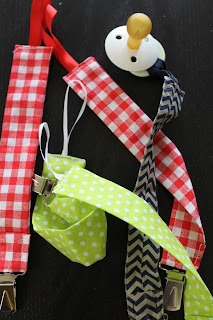
Suspender Clip to Pacifier Clip

My dear friend Sarah (she blogs over at High Heels & Grills) came over one day with one of these in hand. I said, "what is this?!" She said, "I made Connor one of these! It's a pacifier clip, I just got done making Adelaide a whole bunch." HOW SWEET WAS THAT?! She JUST had her sweet baby Addi a couple weeks ago. Well I sure hope her little Addi loves her pacifier clip as much as we do! This has CHANGED MY LIFE! We had a pacifier clip from our first baby - June, it was HUGE. The ONLY one that they sold. I HATED IT! But I needed SOMETHING. Well when we had Connor I pulled out that terrible clip and started clipping it to him. All of this continued to go on until Sarah walked in and blew our minds away with this LOVELY simple clip!

I recently made some pacifier clips for a friend who is having a baby, and some to have on hand for baby gifts! These were SO EASY! I LOVED making them in bulk. They came together SO fast! Here are step by step pictures...


I "guesstimated" how long to make the material according to the pacifier clip from Sarah


 I cut the material 3 inches wide and 10 inches long


Sew the material good sides together to make a "tube"


Turn the "tube" right side out


Iron the "tube" down flat. Make sure the seam is RIGHT along the side or in the middle. Try to make it as even as you can.


Next, cut a ribbon 2 1/2 inches long and fold the raw edges inside the tube and insert the ribbon loop. Sew together.


I measured the the length of the material with the clip inserted.


I sewed the folded material down to keep the clip in place.


Place the ribbon through the pacifier "handle"


Insert the clip through the ribbon to fasten in place.


Here are the 4 I made all at one time! PERFECTLY SIMPLE!


Linking up here


Wednesday, August 14, 2013

Herb Roasted Green Beans & Potatoes

We recently went to our local farmers market. This is my FAVORITE time of year when all of the local farmers come out with their produce and let me enjoy some of their harvesting! I am SO grateful! Well we went to a booth and purchased a TON of fresh veggies, among the plethora of vegetables we purchased, I bought green beans and small red russet potatoes. Now, I don't know if I have told you before, but I am a "fine connoisseur" of Potatoes. I love potatoes EVERY WAY! Mashed, scalloped, baked, you name it, I LOVE IT! So to make some roasted potatoes with green beans, my 2 favorite vegetables, was a given. We came home that morning and I made them RIGHT away! I couldn't wait until dinner! These were FABULOUS! The seasoning was JUST right! This is the perfect side dish to almost ANYTHING! Reap the harvest of fresh vegetables coming our way!


Herb Roasted Green Beans & Potatoes:

(2 large hand fulls of Green Beans)
(8-12 small Red Russet Potatoes)

2 tsp. Olive Oil
1/2 tsp. Salt
1/4 tsp. Onion Salt
1/8 tsp. Garlic Powder
1/2 tsp. Thyme
1/4 tsp. Dill

Cut the ends off the fresh green beans and rinse. Wash the potatoes with water and cut into halves or quarters. 
Place the potatoes and green beans in a large ziploc bag and add all ingredients as listed above. Shake the bag until well coated.
Place the coated veggies onto a cookie sheet lined with parchment paper. 
Bake in the oven at 400 for 20-25 min. or until desired texture. 


Linking up here

Tuesday, August 13, 2013

Oatmeal Cookie Pies with Peanut Butter Cream

I have to be completely honest. I don't think I've had a better cookie "pie" in all my life. The oatmeal cookies are good by themselves, but nothing I would tell you is the most decadent cookie ever. But the oatmeal cookies WITH the peanut butter "frosting/cream" makes these STUPENDOUS! We have made them 2 times in a row for our dessert night on Fridays. The frosting MAKES these cream pies FABULOUS! I should have taken a picture of our little June tearing into one of these. She was a mess but the happiest 2 1/2 year old around. Talk about a home run!

I got this inspiration from my husband. One of his "said to be" guilty pleasures are Little Debbies Oatmeal Cakes. Which I think we have only purchased one time in the 5 years of our marriage. He said they were his favorite growing up. Well I thought, "why not make some homemade oatmeal cakes sometime?" So I did, and these are BY FARRR better than store bought. Plus they have Peanut Butter in the cookie and the filling, which ALWAYS makes everything better!! I promise you won't regret making these! 


Oatmeal Peanut Butter Cookies:

3/4 c. Apple Sauce
1/2 c. Creamy Peanut Butter
1 tsp. Vanilla
2 eggs

Mix all Liquid ingredients together in a bowl.

1/2 c. Brown Sugar
1/2 tsp. Baking Soda
1 c. Sugar
1 tsp. Baking Powder
1 1/4 c. Flour
2 c. Old Fashioned Oats

Mix all dry ingredients in another bowl. When both mixed, combine both bowls and mix together. Grease a cookie sheet and place by spoonfuls onto the pan. Bake at 375 for 10 min. or until golden brown around the edges. 
Remove and place cookies on a cooling rack.


Peanut Butter Cream Filling:

2 1/2 c. Powdered Sugar
3 T. Softened butter
1/4 c. Milk
1/4 c. Creamy Peanut Butter

Mix with a hand blender whip until perfectly smooth. Grab a knife and layer cream in between 2 oatmeal cookies. Eat with a glass of milk. DELISH!


Linking up here


Monday, August 12, 2013

Asian Chicken Stir-Fry

This Asian Chicken Stir-Fry was lovely. Talk about a lot of flavor packed into one meal! The best part about this was that it took me less than 30 min. to make! I am very busy with my 2 little ones, and don't have much time to dedicate to a long complicated meal.So, in other words, I am probably just like you! I open up my stash of meals in 30 min or less quite often. So I am sharing one with you now! The other thing I loved about this, is you can throw in whatever veggies you have on hand. So it's different every time! Hope you enjoy it as much as we do! 


Asian Chicken Stir-Fry:

2 Chicken breasts cut into strips
2 c. Veggies on hand (I used, green and red peppers, tomatoes, carrots, onions & peas)
Fettuccine Noodles cooked and drained according to package directions

Asian Sauce:
2 T. Soy Sauce
1/3 c. Ketchup
1/8 tsp. Onion Salt
1/8 tsp. Chili Powder
(Mix all together in a small bowl)

In a large skillet brown the chicken in 1 tsp. of Olive Oil. Add veggies to skillet. While veggies and chicken are cooking, make your ASIAN SAUCE. When chicken is done and veggies are crisp/tender, add in the sauce and cooked noodles. Simmer for 2-3 minutes. Eat up!


Linking up here

Friday, August 9, 2013

Down Home Chicken Noodle Soup

This past week we have been battling NOT getting sick. My husband has a cold and I feel like I am getting one, but I'm trying to fly under the radar. I am sure many of you will agree with me, "WE DON'T HAVE TIME TO BE SICK!" So this is what I made to sooth my somewhat of a sore throat. One of my favorites, Chicken Noodle Soup over Mashed Potatoes! I call this "DOWN HOME" because all growing up we would eat chicken noodle soup over mashed potatoes. Did you ever do that? If you haven't you will never go back! This is hearty yet soft and soothing. Simple, fast and delicious! Bring on the fall. I am going to come up with so many good soups this fall I will knock your socks off! I LOOOVE  fall, mainly because I get to make me some SOUP!


Down Home Chicken Noodle Soup:

6 c. water
2 c. Egg Noodles
2 T. Chicken Bouillon Granuels
1 garlic clove - minced
1 Carrot- peeled and cut
1 stalk celery - minced
1 chicken breast - cubed
1/4 onion- minced
1/2 tsp. Fresh Parsley- minced
1 tsp. Olive Oil

In a Medium sized pot, start boiling your water with a few dashes of salt. In another pan saute the chicken, celery, onion and carrot in the olive oil. Cook until onions are transparent and chicken is somewhat cooked through. Add the sauteed veggies and chicken to the boiling water. Add in the egg noodles, chicken bouillon, garlic, and parsley. Simmer until noodles are cooked through. Salt and Pepper to taste. Serve over Mashed Potatoes. Delish!


Linking up here


Thursday, August 8, 2013

Go Explore Booklet

I recently guest posted at Made to be a Momma. She was having a round up called Summer Fun with Kids. There were some DARLING things to do with kids to keep them busy and have fun this summer! This is what I posted!

I have been wanting to make something that gives us an excuse to get outside and learn. This is the perfect thing for kids of all ages. I recently remembered my mom on dull vacations would buy me a cheap notebook and some tape. At every stop I would grab some flowers, leaves or grass and tape it in my notebook. I was so fascinated with the colors and "veins" in the flowers and leaves. Just as I was super excited to find things out in nature, your kids will be too! They will look more closely at nature and objects when they have a direction for their search. Take a look at the simple booklet, and the activity pages that you and your child can search for together.


Activity Pages:

Tape down things that grow
Grass, leaves, flowers, weeds etc.

Find things that are sticky
(Different tapes, write down different glues, sappy trees outside etc.)

How many different kind of strings can you find and tape down?

Write down things that match these colors
(Take colored pencils or crayons and make "color swatches" write down the things you see that match the colors, it can be more than one)

What is your favorite place to visit? Draw a picture

What is the softest thing in your house?

What insects live in your yard or at the park? Draw a picture

What is the oldest thing in your house or in your neighborhood? Draw a picture

LAST PAGE: 
Congratulations! You are OFFICIALLY an Explorer of our World


Don't forget to check out the rest of the cool projects in the 20 Summer Fun Activites with Kids Round Up! There were some AWESOME stuff to keep your kids busy!


Linking up here


Wednesday, August 7, 2013

Crock Pot Baked Sweet Potatoes

I was so excited to try baked sweet potatoes in my crock pot. Just like I was excited to try my normal Crock Pot Baked Potatoes. These were AMAZING!
I TOTALLY wasn't expecting them to come out so nicely! The peel literally fell right off as I was unwrapping them to eat! Talk about AWESOME!
We made these in a separate crock pot with my Crock Pot Pork Ribs in the other. So when we got home from church they were both done and ready to eat! I love simple meals on Sunday's because I NEVER want to cook on Sunday's. I just want to relax and be with my family, not worrying about meals! So make your next crock pot meal a "sinch" with these Crock Pot Baked Sweet Potatoes!


Simply wash your Sweet Potatoes/ Yams with water. Dry them off and wrap in foil (no need to poke). Place in your crock pot for 7-8 hours on Low. 


(SEE THE SKINS COME OFF CLEAN?! WOW!)
Take them apart and garnish with a dollop of sour cream, brown sugar and butter, or marshmallows. Whatever your heart desires! DELISH!


Linking up here

Tuesday, August 6, 2013

Crock Pot Pork Ribs

My parents were the ones that got us hooked on the rub for these ribs. You dry rub them before they cook then slather them with BBQ sauce. PERFECTION ON A PLATE! I LOVE LOVE LOVE that I can make them in the crock pot. My parents take hours to slow cook them in the oven with multiple steps. I am busy and don't have the time to devote to that, so one day I tried them in the crock pot. They taste the same! I was so pleased. We have these often with our Skinny Sweet Potato Fries and our Crazy Good Cole Slaw. A meal made in heaven. Prepare it and leave it! Fall off the bone, finger lickin,' fabulous! 


My parents told me about this. There is a "membrane" (they call it) on the back of the ribs you need to pull off before you prep and cook them.


Cut the ribs in sections and rub the dry mix all over. 


Dry Rub for Ribs
3/4 c. Brown Sugar
1 tsp. Salt
1 T.  Paprika
1 T. Garlic Powder
1/2 tsp. Chili Powder

Mix altogether and rub over thawed ribs. Place rib sections in a greased crock, make sure not much of the ribs touch the sides. (The sides make it cook faster) Place 1 c. Water in the bottom of the crock pot. Cook on Low for 8-10 hours. 

When done cooking, lather with Baby Ray's BBQ Sauce. 

We ate this with our Crazy Good Cole Slaw and our Crock Pot Baked Sweet Potatoes. Delish! 


Linking up here